Introduction
Thank you very much for choosing our plugin. We truly appreciate and really hope that you'll enjoy our plugin!If you like this plugin, Please support us by rating us 5 stars (How to rate?)
Need Support?
If you have any questions regarding to plugin issues, please submit a ticket at http://goodlayers.ticksy.com/ (Registration Required)Plugin Installation
Install plugin via Wordpress Dashboard
- After you download the file package from CodeCanyon, you must extract it first and use the file 'goodlayers-lms.zip'.
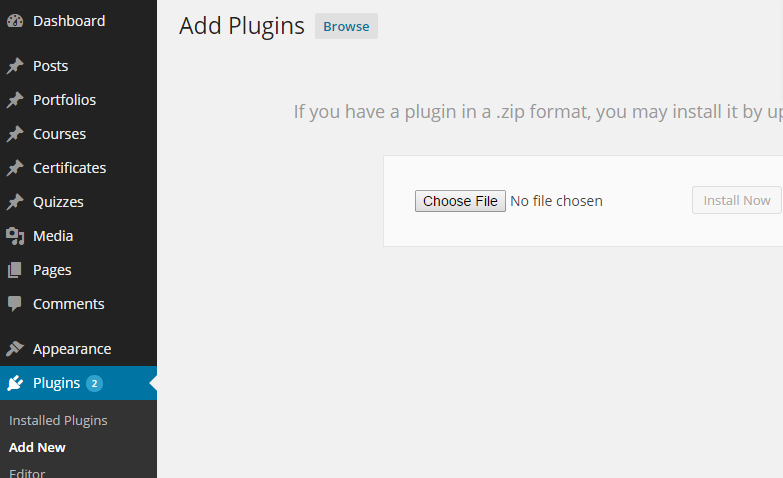
- Go to 'Plugins > Add New' section
- Click 'Upload' option
- Upload the zip file
- All Done :)
Install plugin via FTP
- Access to the file on your server using ftp editor program
- Go to 'wp-content/plugin' folder
- Extract the zip file('goodlayers-lms.zip') and put the goodlayer-lms folder there
- Go to 'Wordpress Dashboard > Plugins > Install Plugins' section to activate the plugin
- All Done :)
Updating LMS Plugin
- Download the plugin file package from Codecanyon.
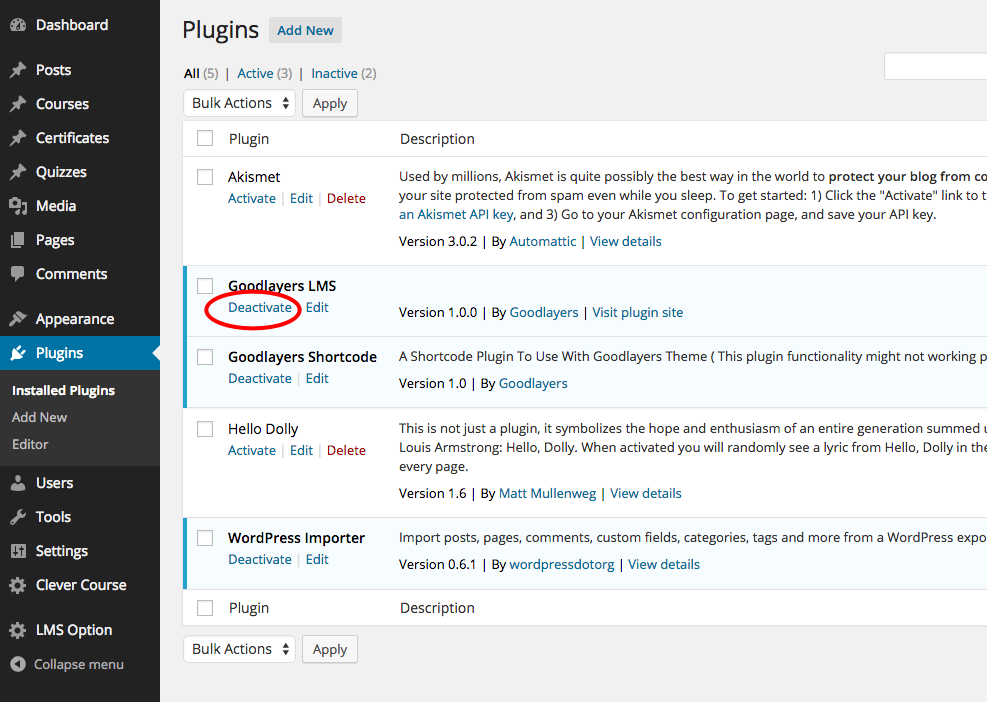
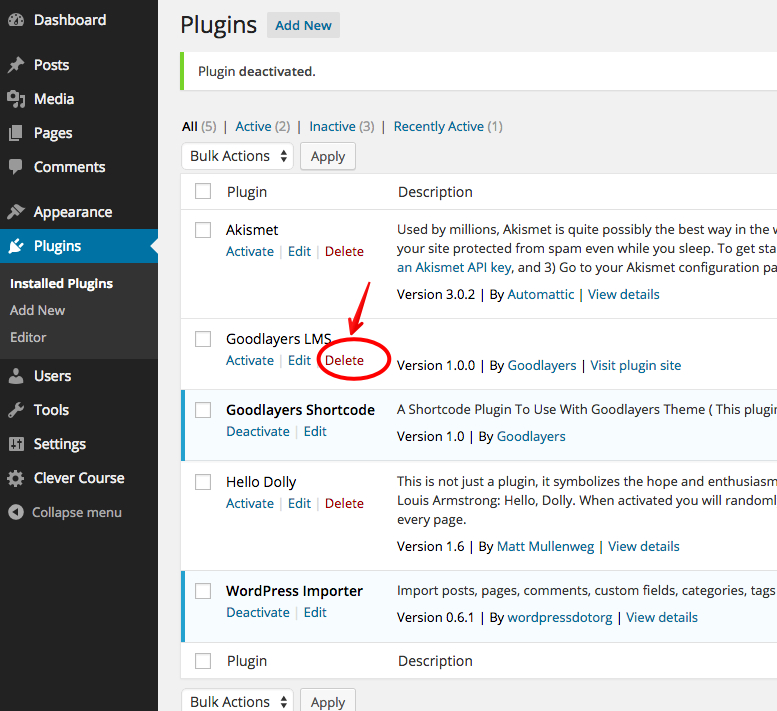
- Go to 'Plugins > installed plugins' then deactivate and delete the LMS plugin.
- Install the new plugin file.
- **Go to 'LMS Option' and click "save changes" button again
Theme Translation
- try installing the 'Codestyling Localization' plugin. ( Can be found in 'Plugin > Add New' section )
- Go to 'Tools > Localization' section.

- Select the PLUGIN you want to translate
- Select the language of your wordpress installation ( Defined in wp-config.php file. Default is en_US )
- Click rescan, then edit the string
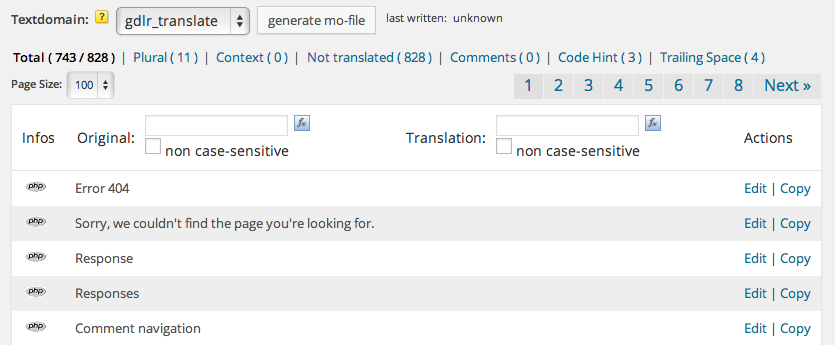
- Translate the word you want and click the generate .mo file button
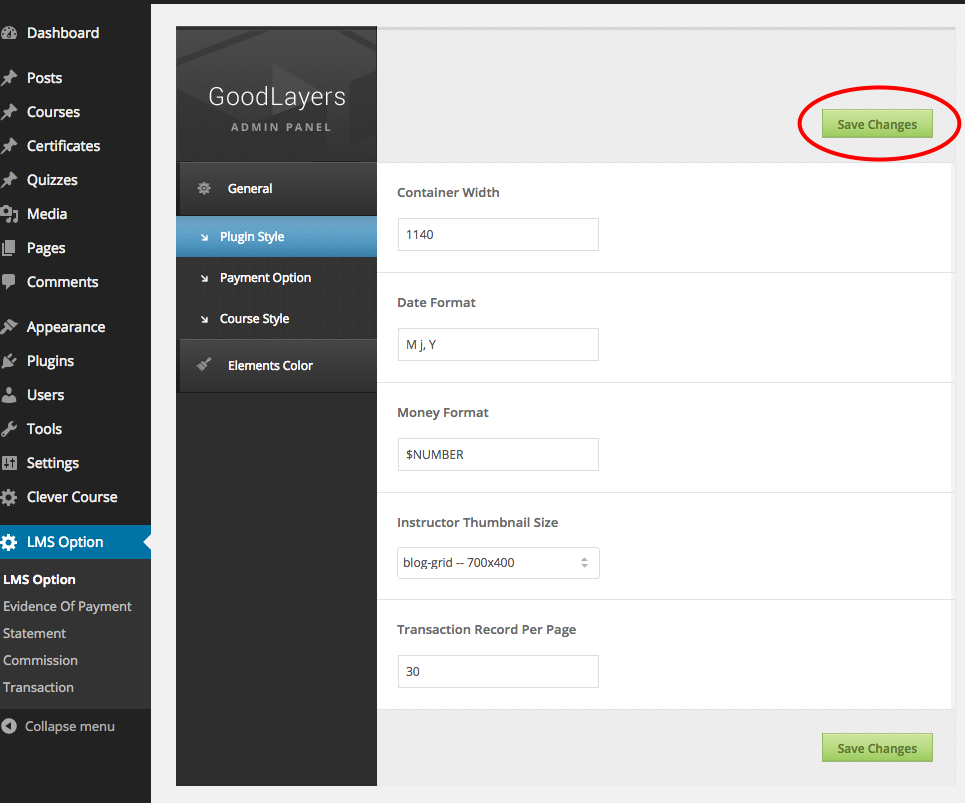
Changing Plugin Color
Go to LMS Option > Elements color section and you'll see a list of colors to choose.
Setting Up Paypal Account
- Include the paypal payment option at the 'LMS Option > General > Payment Option'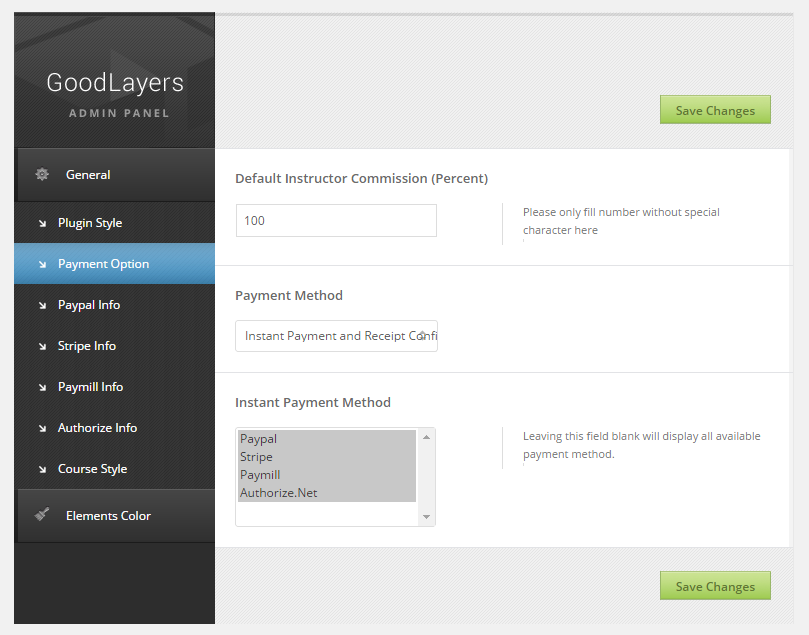
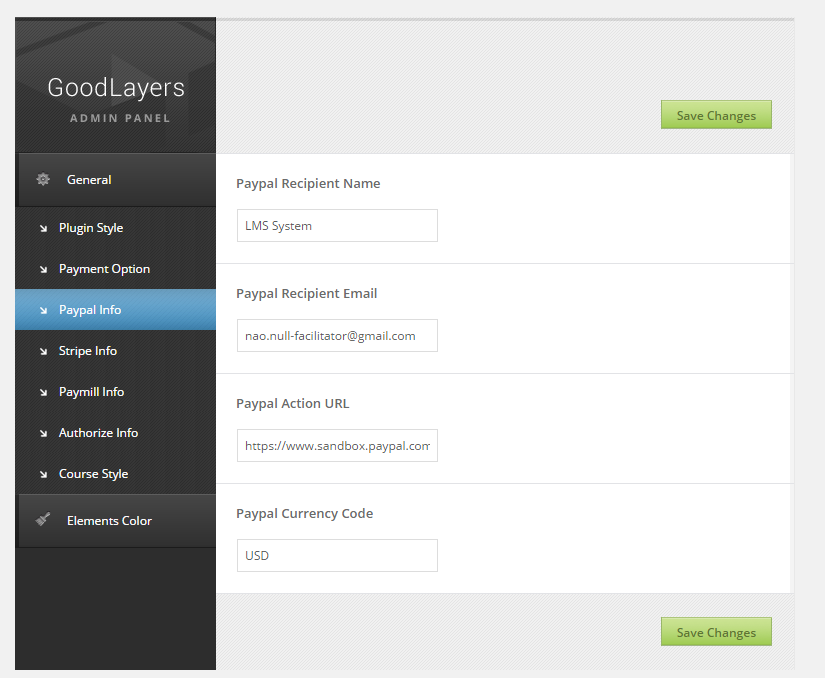
- Then go to 'LMS Option > General > Paypal Payment' to set the paypal value
- You can see paypal currency list here. https://developer.paypal.com/docs/classic/api/currency_codes/
After that try accessing to your paypal account, go to 'Profile > My Selling Tools' and click to update the 'Instant payment notifications' section.
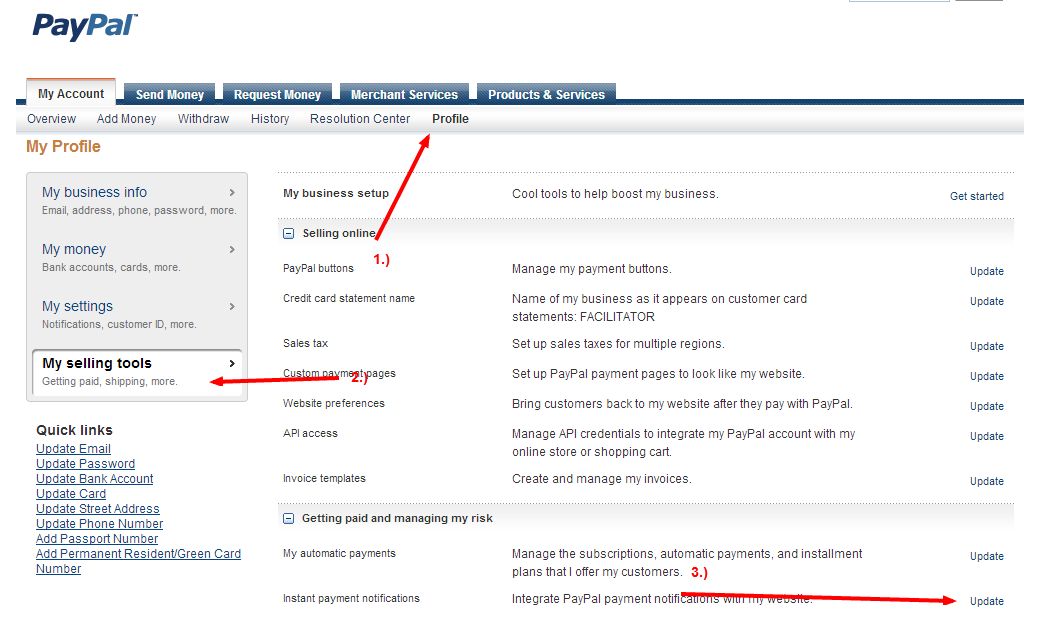
Then fill your site url + ?paypal at the notification url section

After you complete setting this, system will auto matically detect the money received via paypal.
Testing Paypal
Sandbox is a test paypal platform that helps you setting up the test environment. You can register the developer and create sandbox account hereTo Test the sandbox account you have to change the paypal action url to https://www.sandbox.paypal.com/cgi-bin/webscr instead of https://www.paypal.com/cgi-bin/webscr
DON'T FORGET TO CHANGE IT BACK TO NORMAL PAYPAL ACCOUNT AFTER THE TESTING IS DONE TOO.
Setting Up Stripe Account
- Include the stripe payment option at the 'LMS Option > General > Payment Option'- Go to this url and logging in to your stripe account to get the API Key https://dashboard.stripe.com/account/apikeys
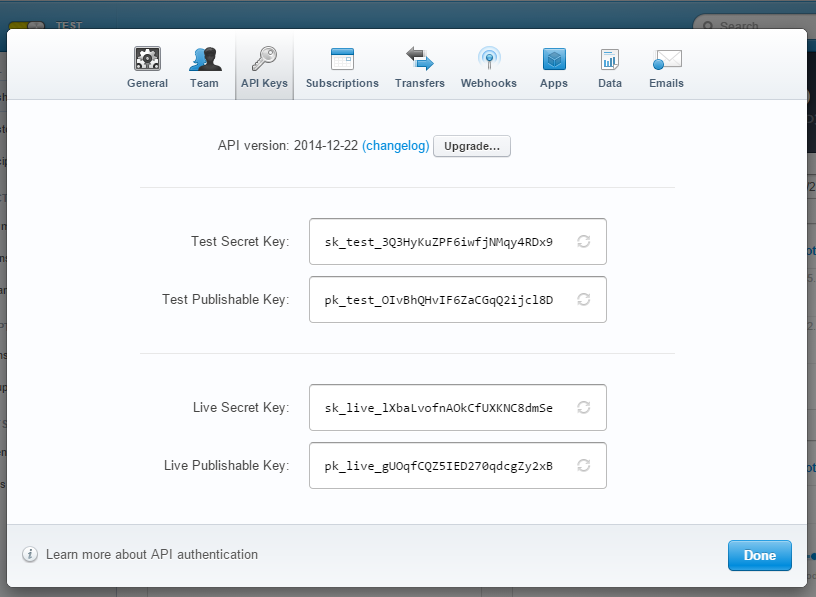
- Fill the stripe API infomation at the 'LMS Option > General > Stripe Payment' area

- If you fill the test key, you can the test card from this link https://stripe.com/docs/testing
Setting Up Paymill Account
- Include the paymill payment option at the 'LMS Option > General > Payment Option'- Go to this url and logging in to your paymill account to get the API Key https://app.paymill.com/development/api-keys
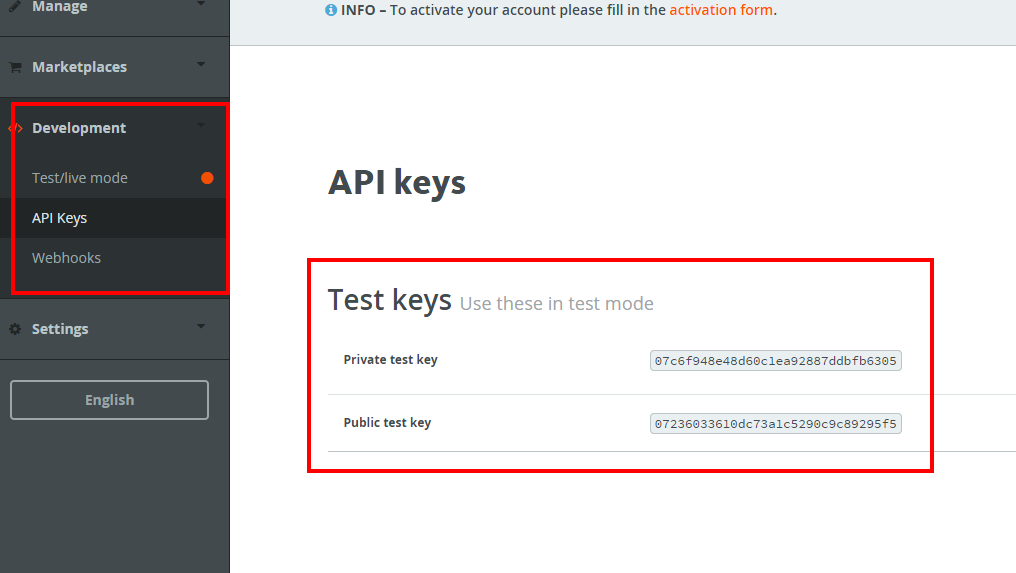
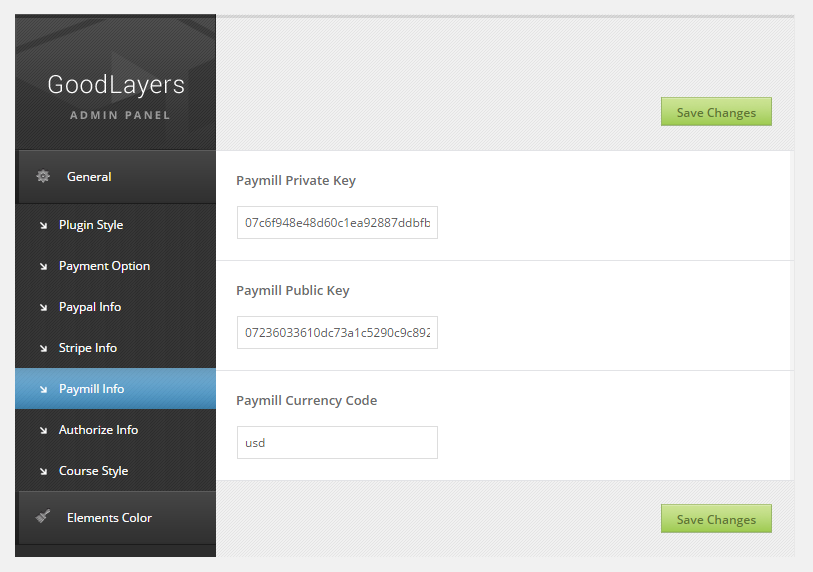
- Fill the paymill API infomation at the 'LMS Option > General > Paymill Payment' area
- If you fill the test key, you can the test card from this link https://developers.paymill.com/en/reference/testing/
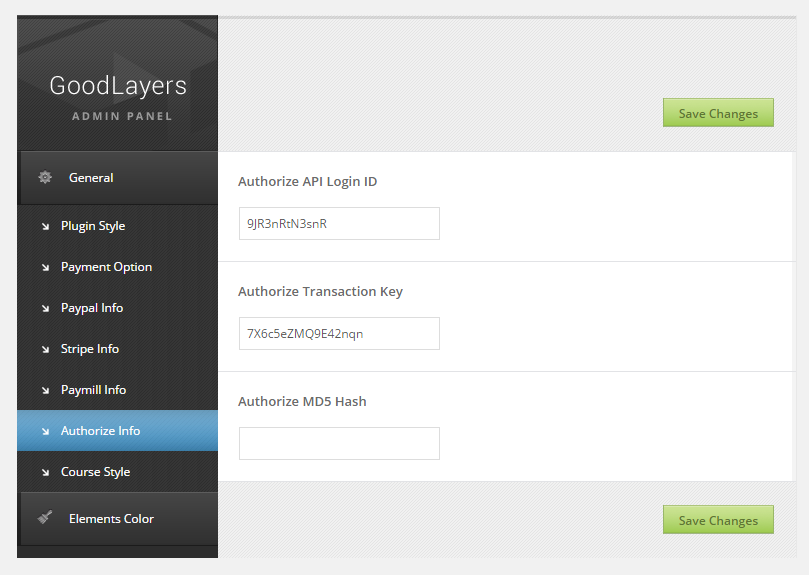
Setting Up Authorize Account
- Include the authorize payment option at the 'LMS Option > General > Payment Option'- You can test the authorize by creating the account in sandbox mode ( https://sandbox.authorize.net/ )
- After logging in to your account, go to Account > API Login ID and Transaction Key to get your transaction key
- The hash value can be set at the MD5-hash menu ( you can fill any number you want )
The default secrect answer is set to 'Simon'
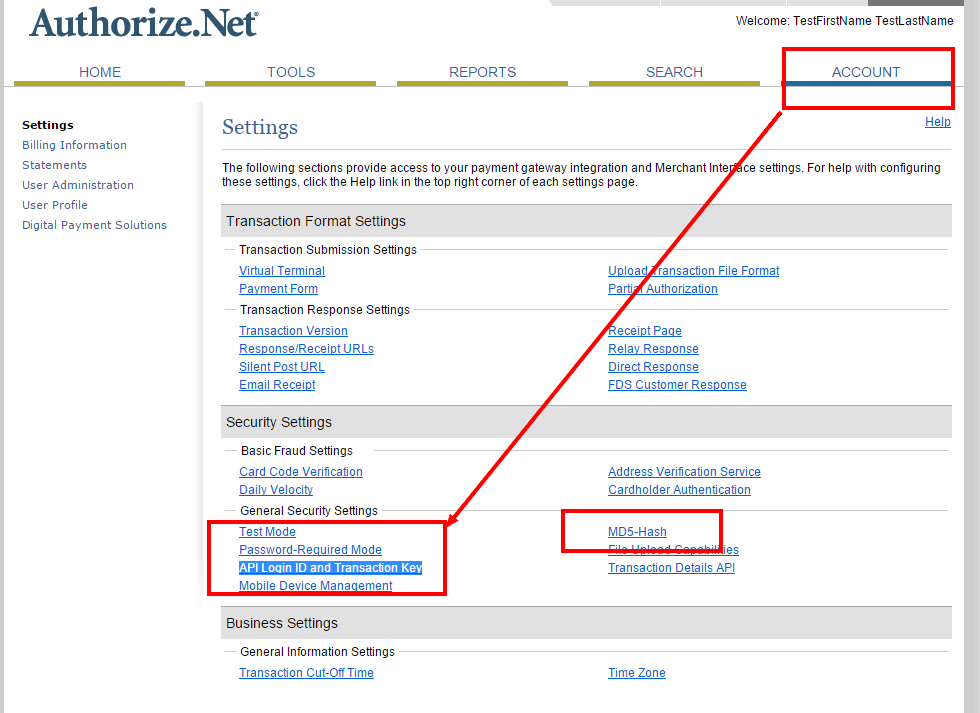
- Fill the authorize API infomation at the 'LMS Option > General > Paymill Payment' area
- You can get the test card number from this link http://developer.authorize.net/faqs/#testccnumbers
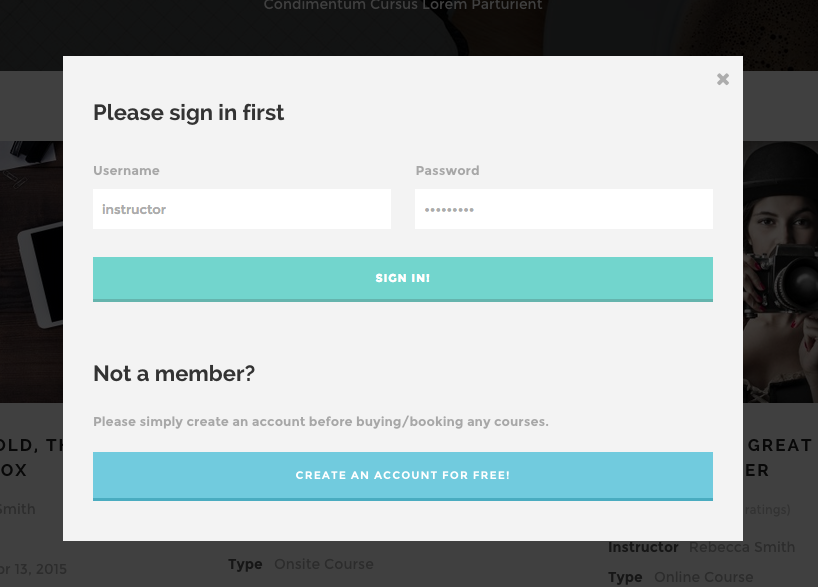
Setting Up Sign In / Sign Up Button
If the theme you're using have option to put code in header, put this shortcodeOther wise, you will need to put this code in header.php of your theme directly.
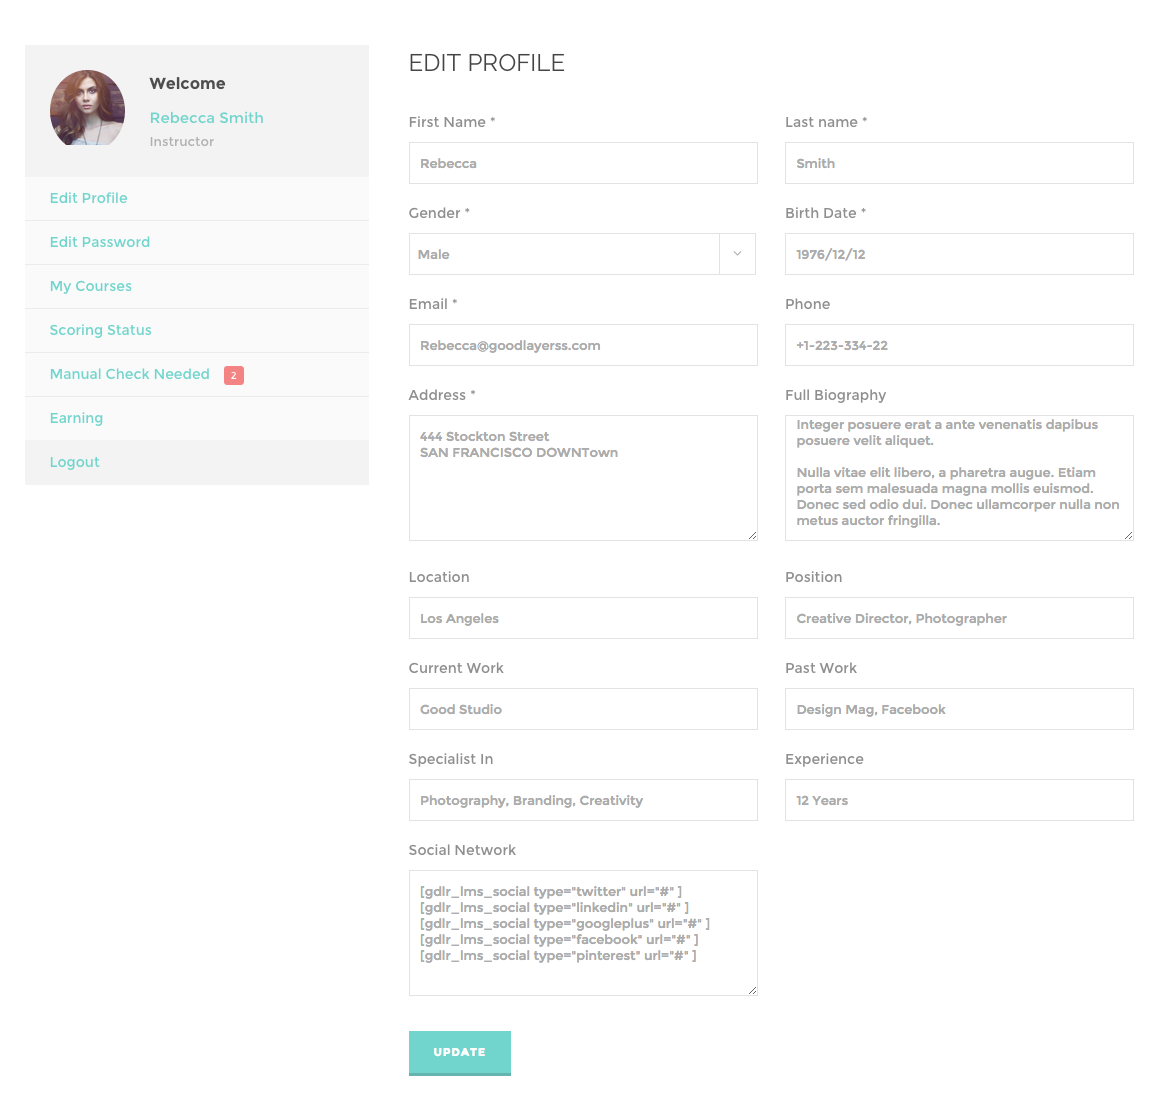
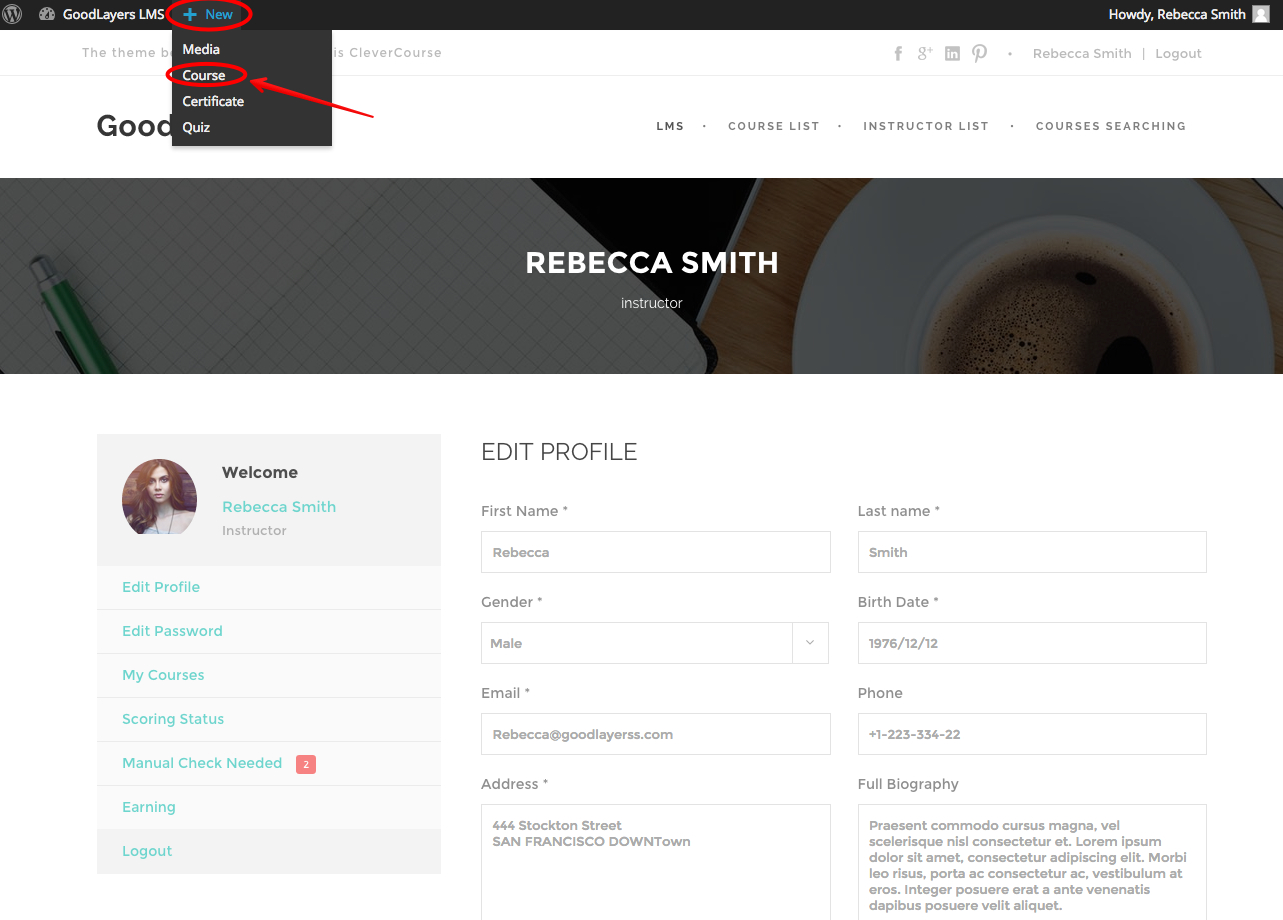
Setting Up Instructor
1.) Go to "Users > Add New", fill data and change role to "Instructor"
*Note that instructor must be created manually by admin only.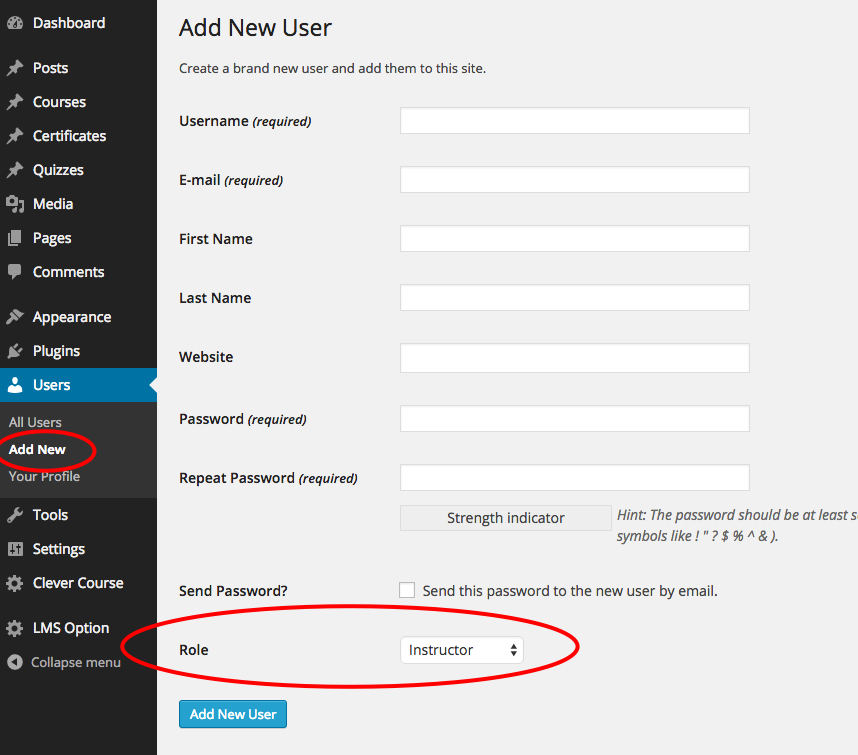
2.) Make sure that you read "Creating Sign Up / Sign In Button" section.
3.) Sign in at front end.
4.) Instructor can change profile, check course, check score, check earning here.
Creating Course
1.) Go to 'Course > Add New' and fill the info you want.
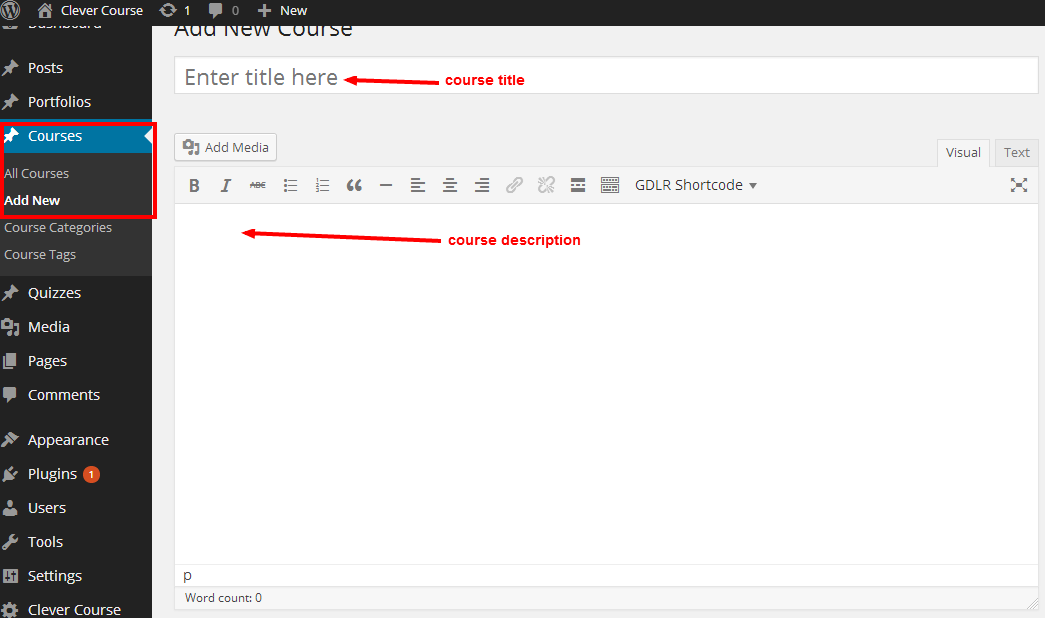
*If accessing from instructor's dashboard.
2.) Assign category, tag and feature image which will be appear on (single) course description page.
Ex. http://themes.goodlayers.com/clevercourse/course/creative-unfold-think-outside-the-box/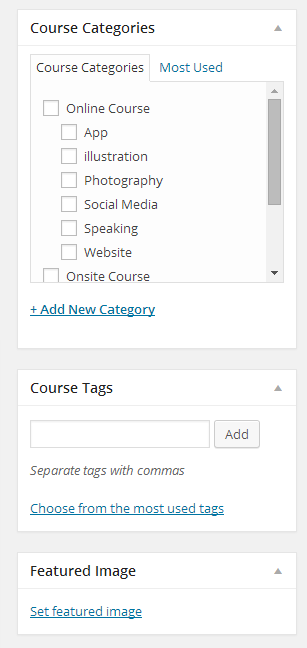
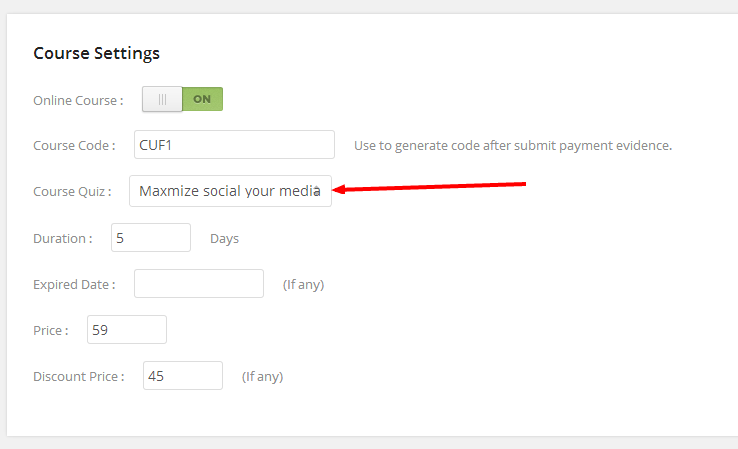
3.) Fill the course setting and content of the course.
** Only students who paid for this course can see the course content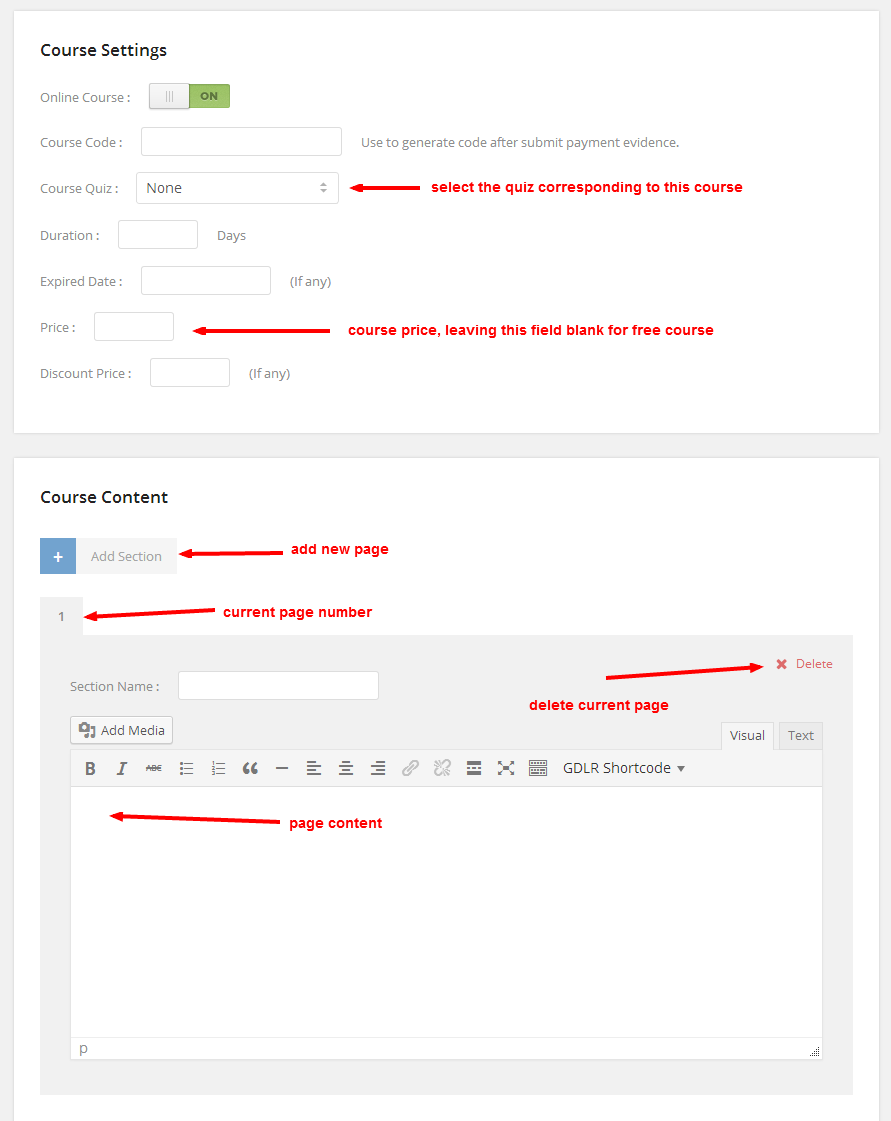
4.) Publish the page.
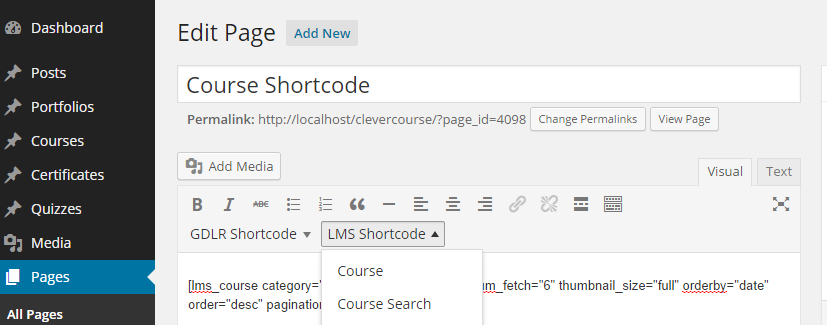
5.) Create new page, add course item in page builder area to show course list on the page
Creating Quiz
1.) Go to 'Quiz > Add New' and fill the quiz info.
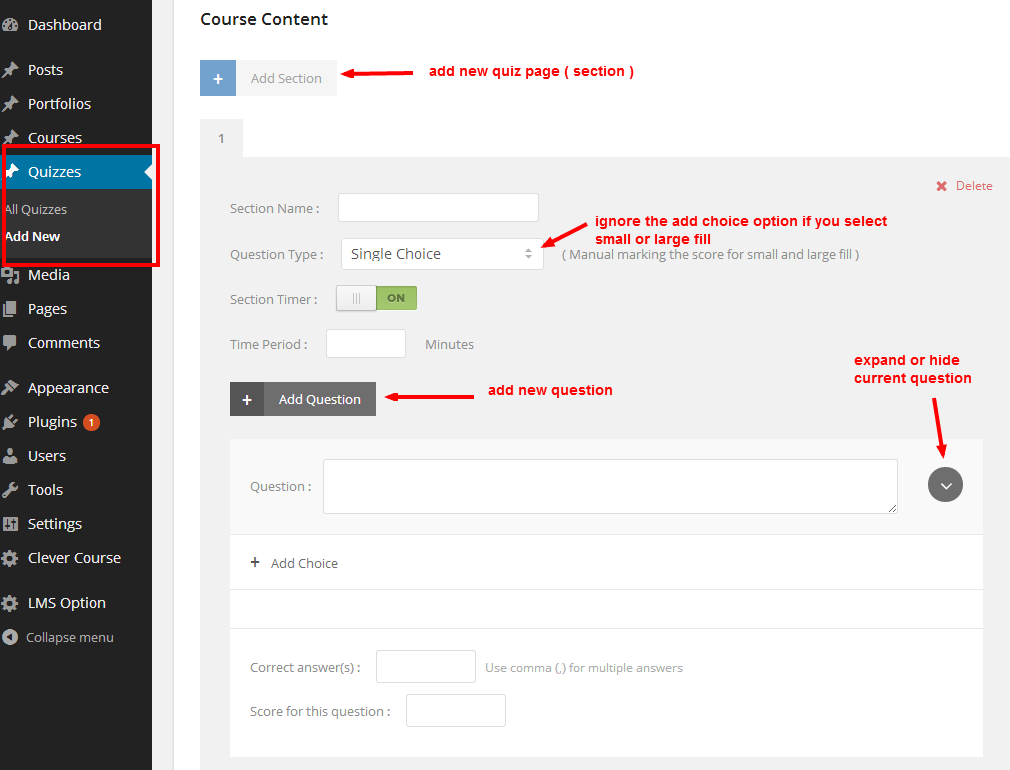
Note that for question type "small field" and "large field", you don't need to add choice for that.
2.) Go to course you want to assign the quiz on to, and select the quiz you created.
Creating Certificate
1.) Go to 'Certificates > Add New'
Then you can use shortcodes in "Shortcode Description" or just click on "Fill Shortcode" button to import default shortcode set from demo site.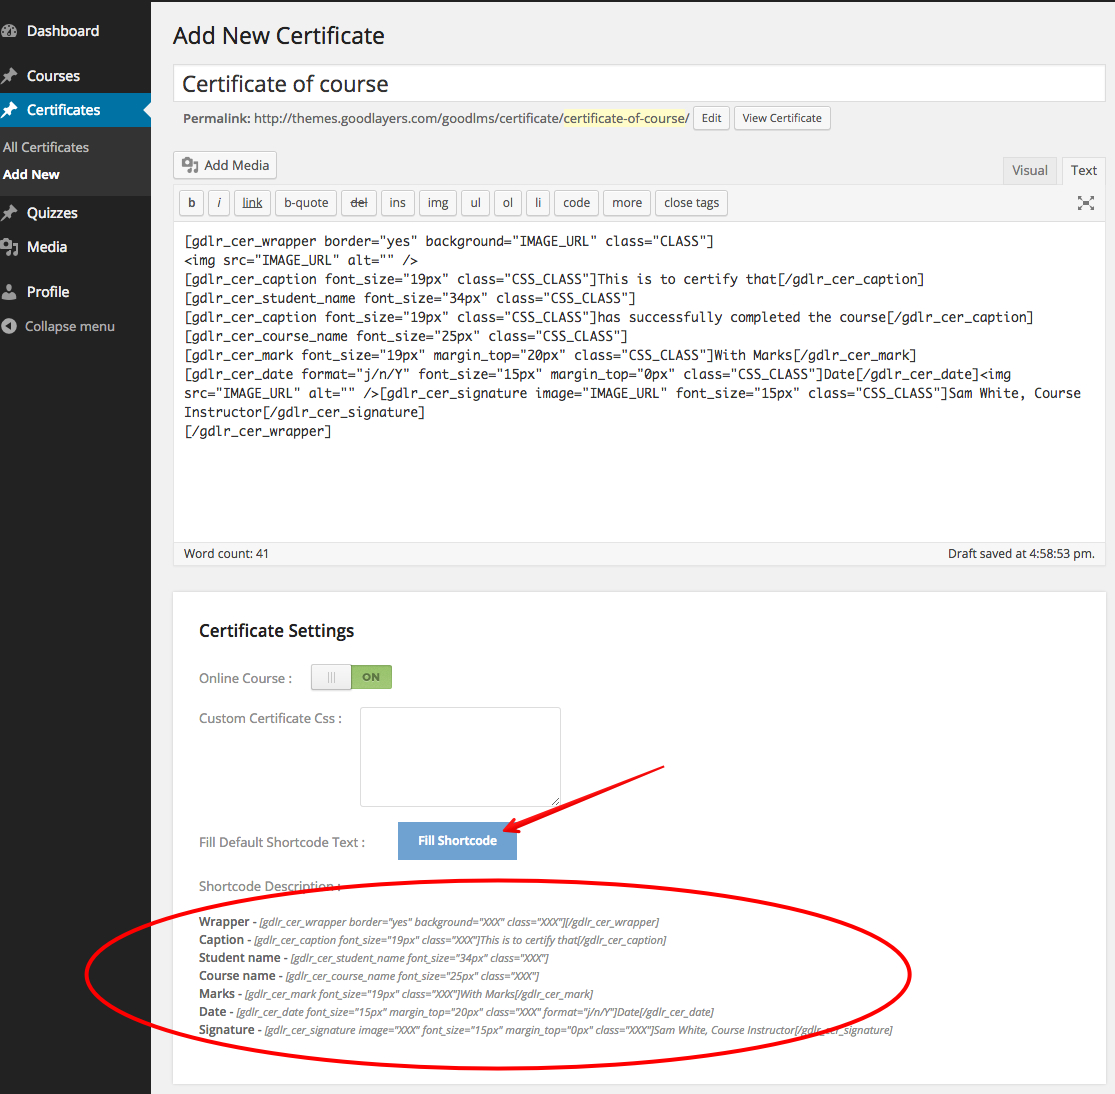
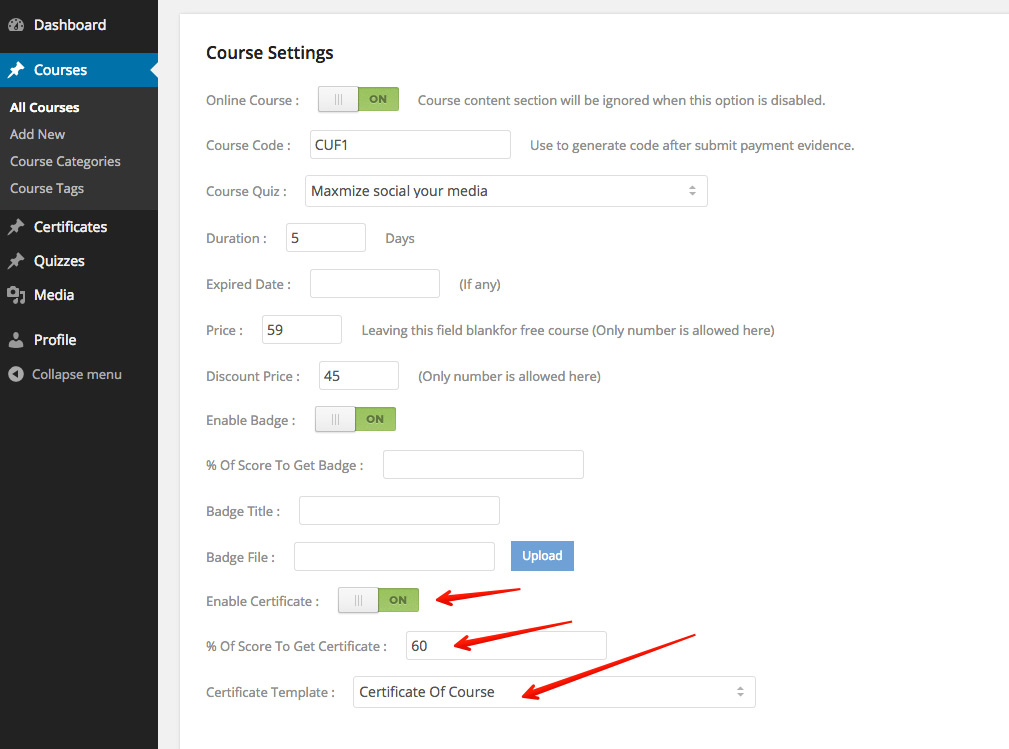
2.) Go to course that you need to assign this certificate to.
Then scroll down to course setting section, enable certificate, put the minimum score for certificate and assign certificate template that just created.
Setting Up Badge
Go to course that need to assign badge
Scroll down to course setting section and enable badge, set the minimum percentage to get badge and choose image for badge.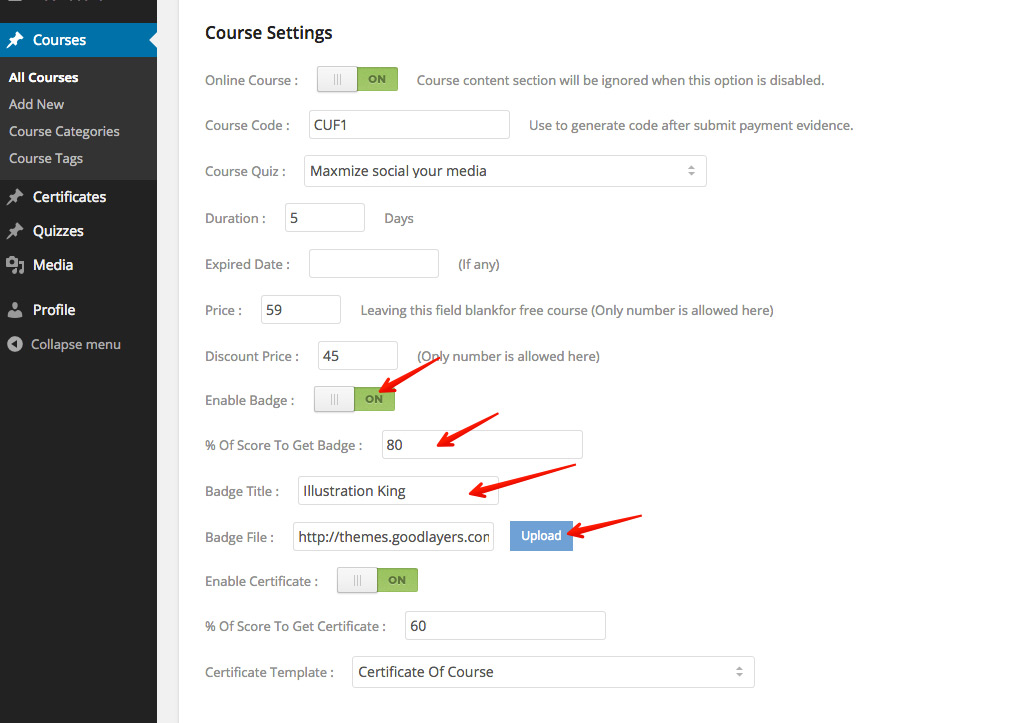
Checking Score
1.) For single choice and multiple choices
Students can check right after they finish the quiz by going to student backend and click on the tab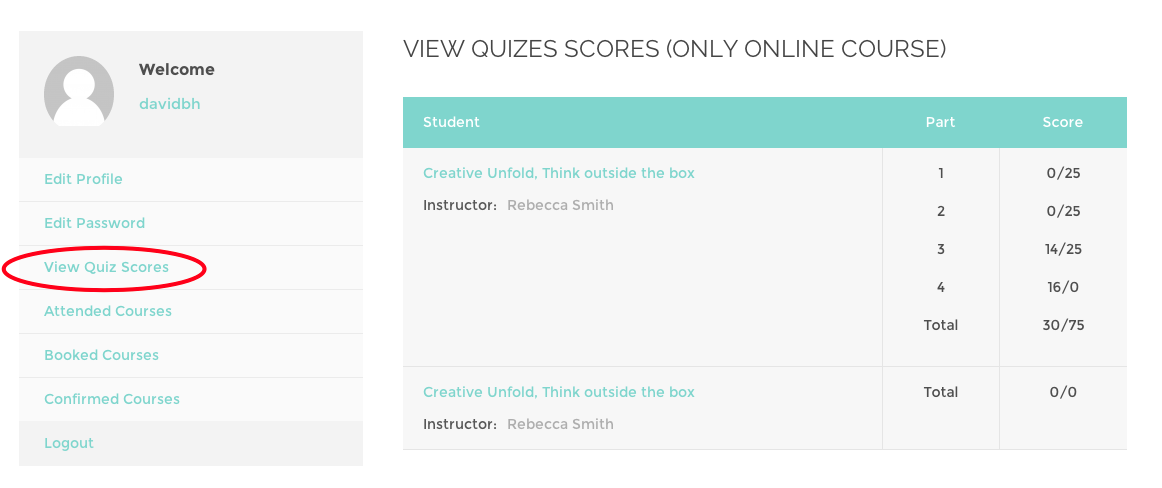
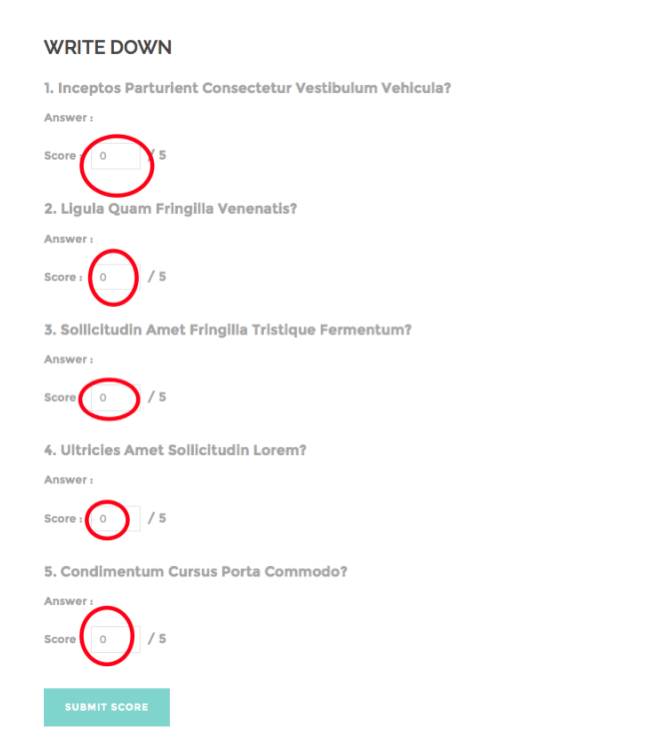
2.) For small field and large field
This will require manually check from instructor of the course.(Score status will be shown as 'Pending' in students' backend.) Instructor can do it by logging in to instructor backend and click on the tab 'Manual Check Needed' then click on student's name.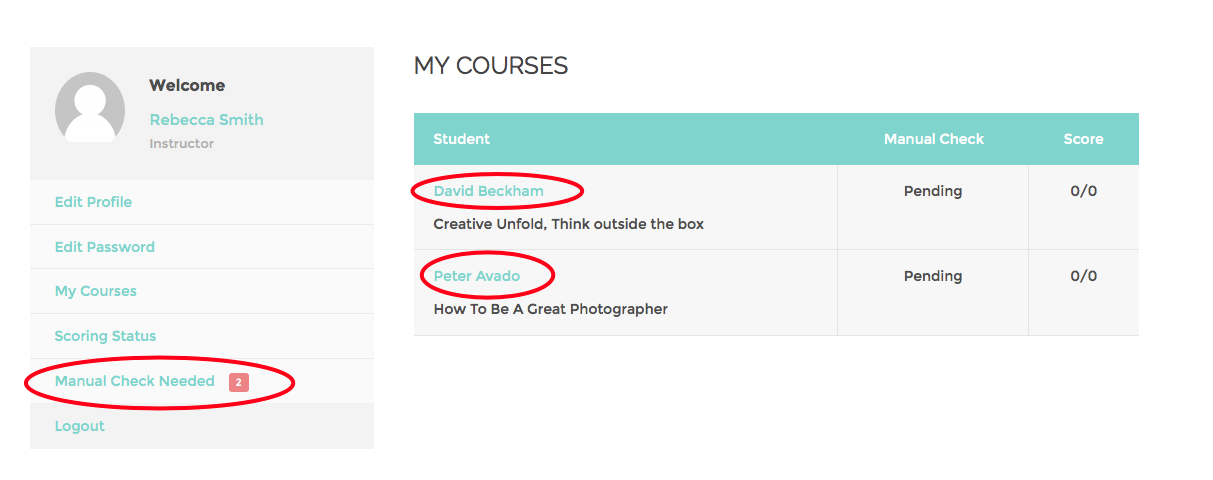
After that, instructor put the score in the box and submit scores.
About Payment
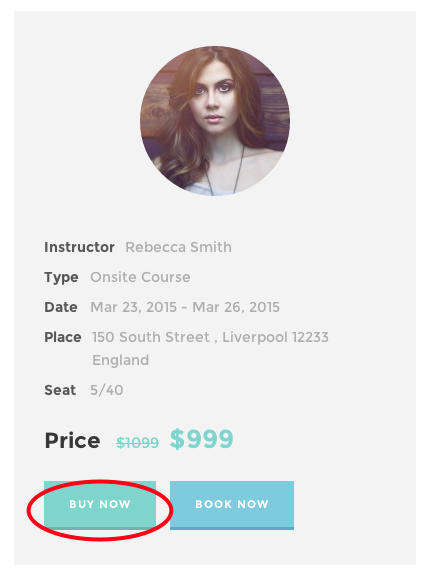
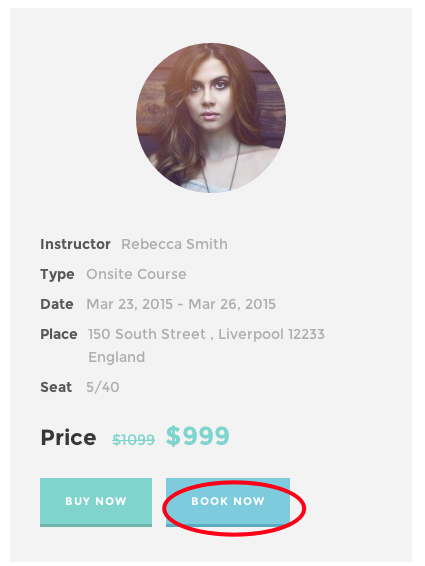
1.) Paypal payment will be conducted under 'Buy Now' button.
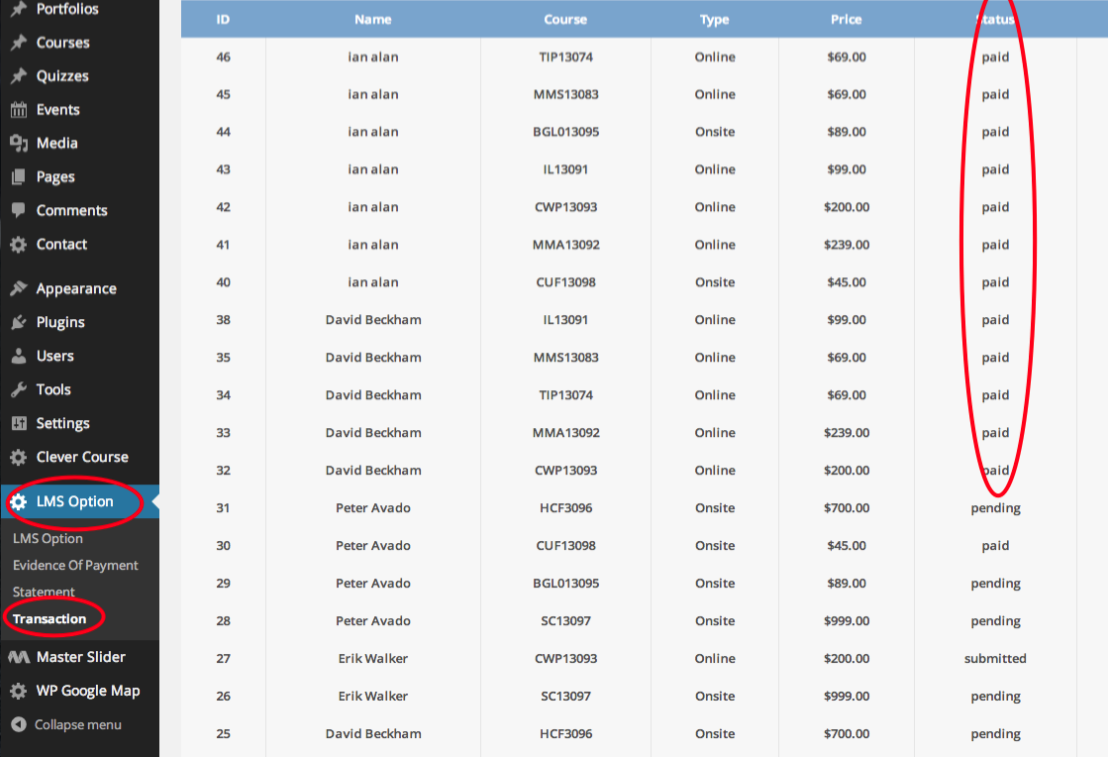
Money will be transferred to your Paypal account right after learners pay. You can check the status of payment in the tab 'LMS Option' > 'Transaction' (System will also send the notification to student's email after they pay as well.)
2.) Booking will be conducted under 'Book Now' button.
Note that for allowing booking method, Admin should provide other payment method such as manual bank transfer.
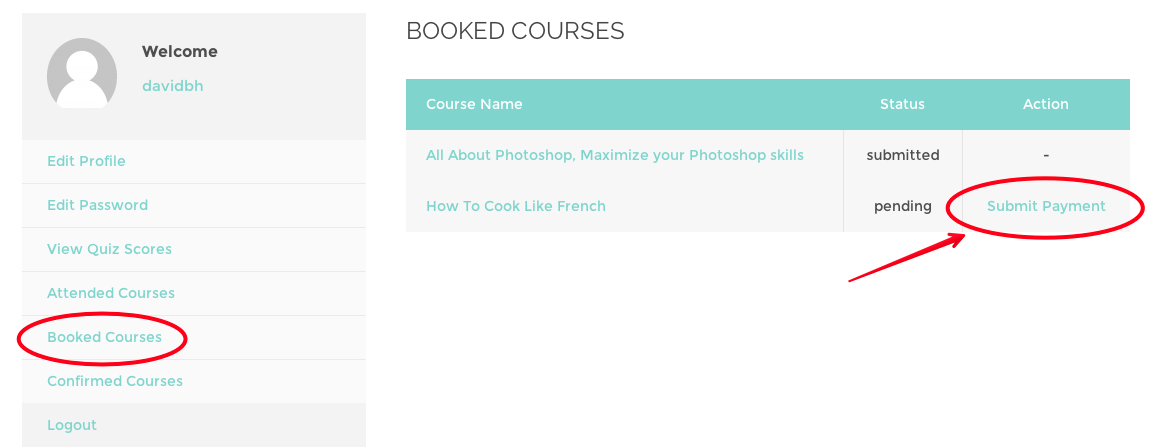
2.1) After students book the course, they have to login to student backend and click on the tab "Booked Course" and click on "Submit Payment"
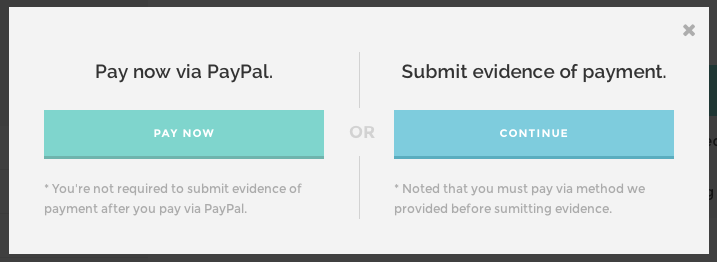
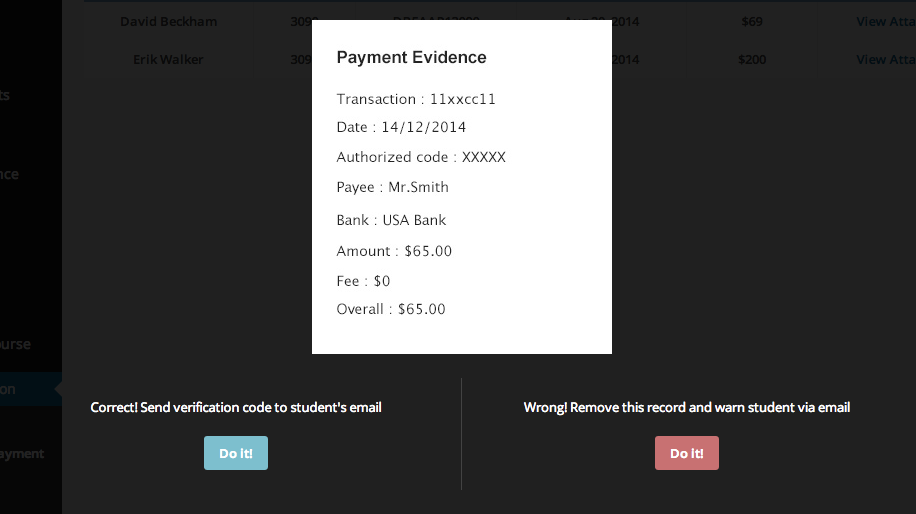
2.2) Student will have two options at this point. First, pay by Paypal. Second, submit the evidence of payment(if they transfer money to admin's bank account for example.)
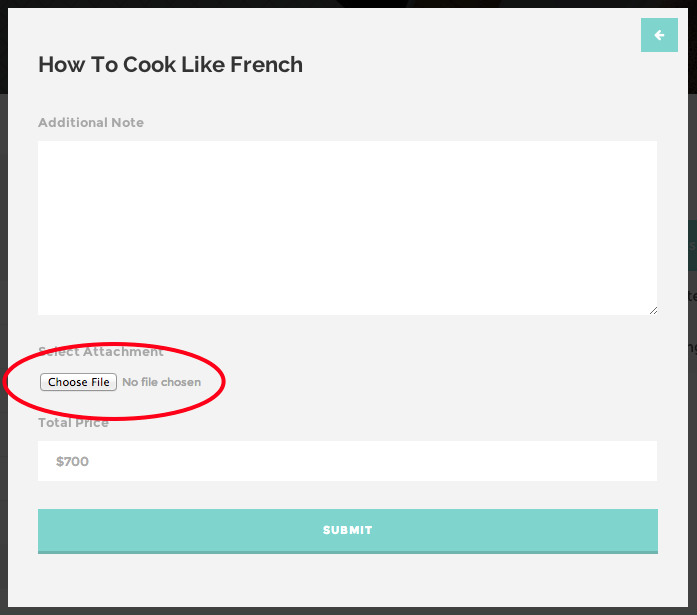
2.3) If student choose to submit payment evidence, they have to attach the evident in the form.
2.4) Back to admin(admin, not instructor!) side, Now we will see how admin check the payment evidence.
Admin has to go to wp admin page and click on 'LMS Option' > 'Evidence Of Payment'. Then click on 'View Attachment'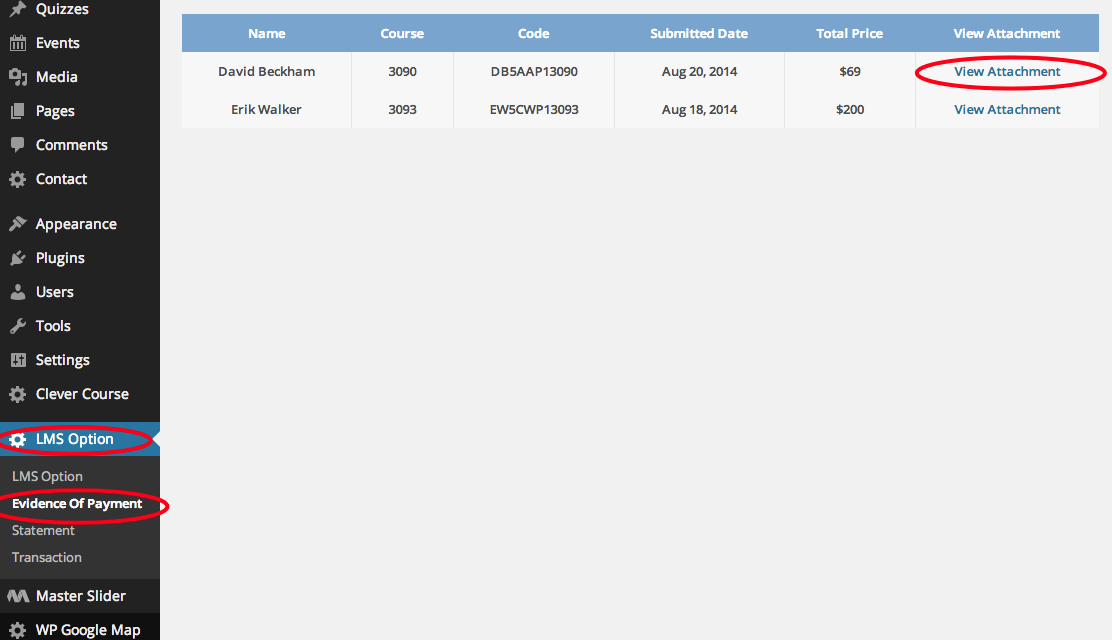
Now admin will use this info to compare with bacnk statement or back record to see if it's real or not, then admin will decide to approve or reject the submission later.
Setting Instructors' commission
1.) Login as administrator and go to 'LMS Option > Commission'
You will see list of instructors and their commission rate. To change, click on 'Change % Rate'.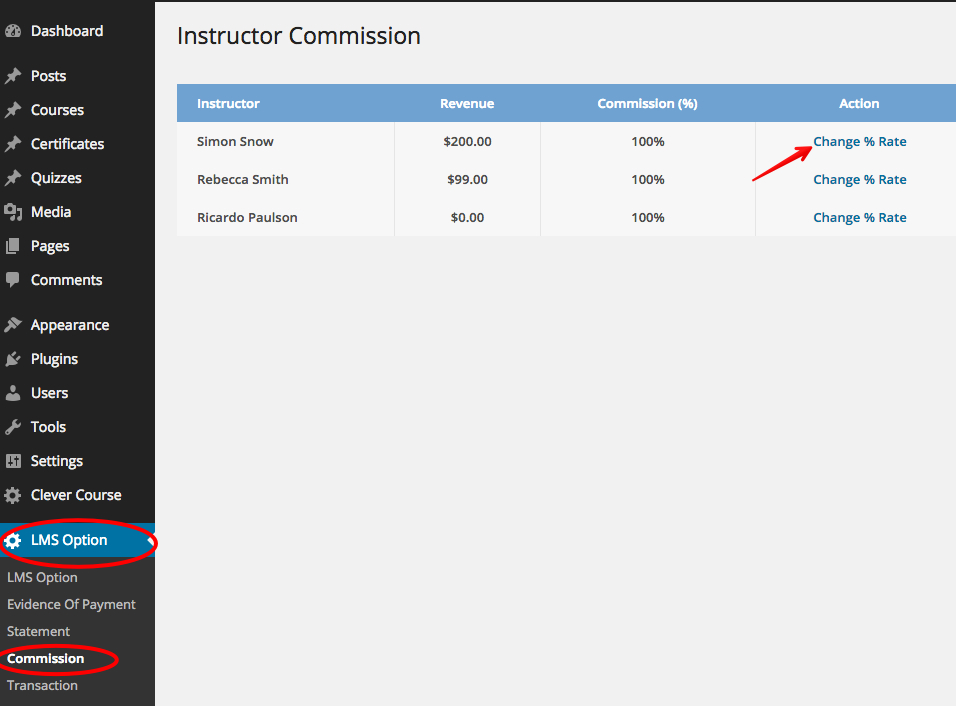
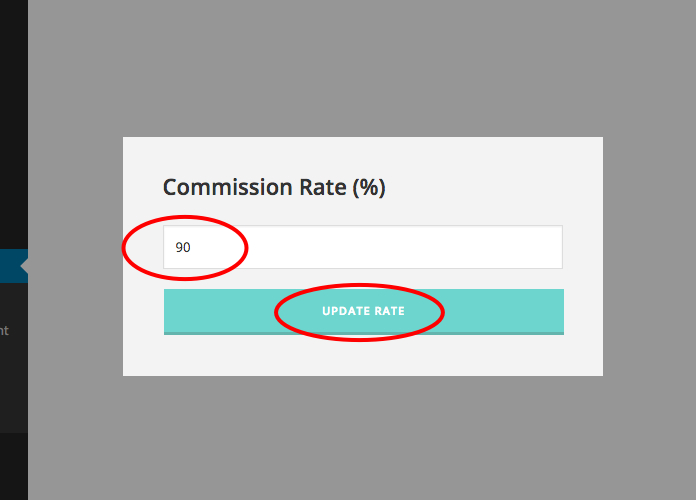
Then fill % of commission and click on update rate button
Shortcodes
Sign Up / Sign In Button (Designed to be placed in header)
Course List
Course Searching
Instructor (Choose only one person)
Instructors (Choose instructors by user role)
Thumbnail Size
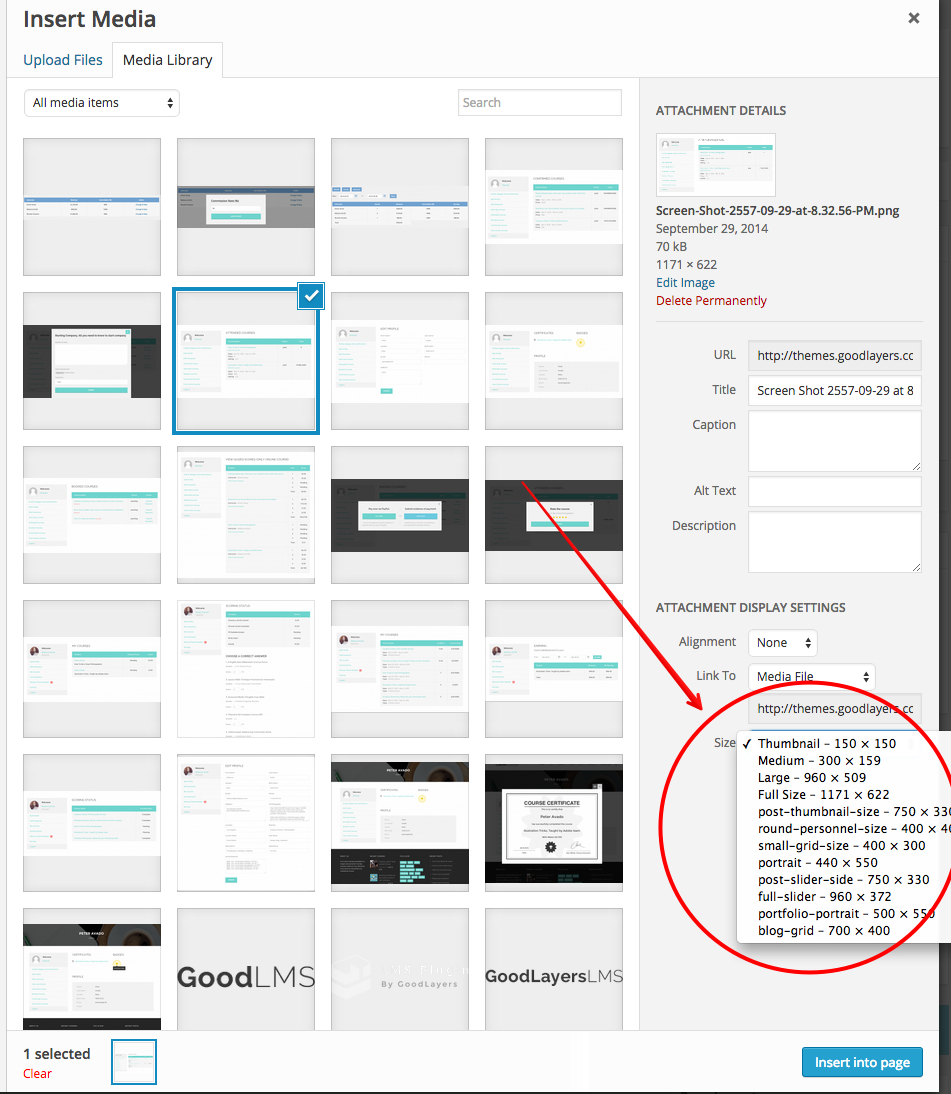
thumbnail_size="full" - This depends on thumbnail size that registered by the theme you're using. For ex, if your theme assign thumbnail size as "big" so you assign "big" to thumbnail size.You can check available size by go to any page, click on 'Add Media' button.

Click on any image and you will see option here.
Changing Thumbnail Size
You can register a new thumbnail size by yourself by following this instruction.http://codex.wordpress.org/Function_Reference/add_image_size
After you register new thumbnail size, you must regenerate thumbnail size using this plugin.
https://wordpress.org/plugins/regenerate-thumbnails/