Introduction
Thank you very much for choosing Wardline. We truly appreciate it and hope you enjoy the theme!Wardline is a cyber security WordPress theme for managed security providers, penetration testing teams, security consultancies, MSPs and security guard companies. It comes with 12 ready-to-import demos. We recommend PixeBuilder, the free page builder from the WordPress plugin directory, for building pages: every demo is made with it. The theme also includes the Goodlayers theme options, header and footer styles described in this document.
Links : Wardline on goodlayers.com | Main live demo | Online documentation
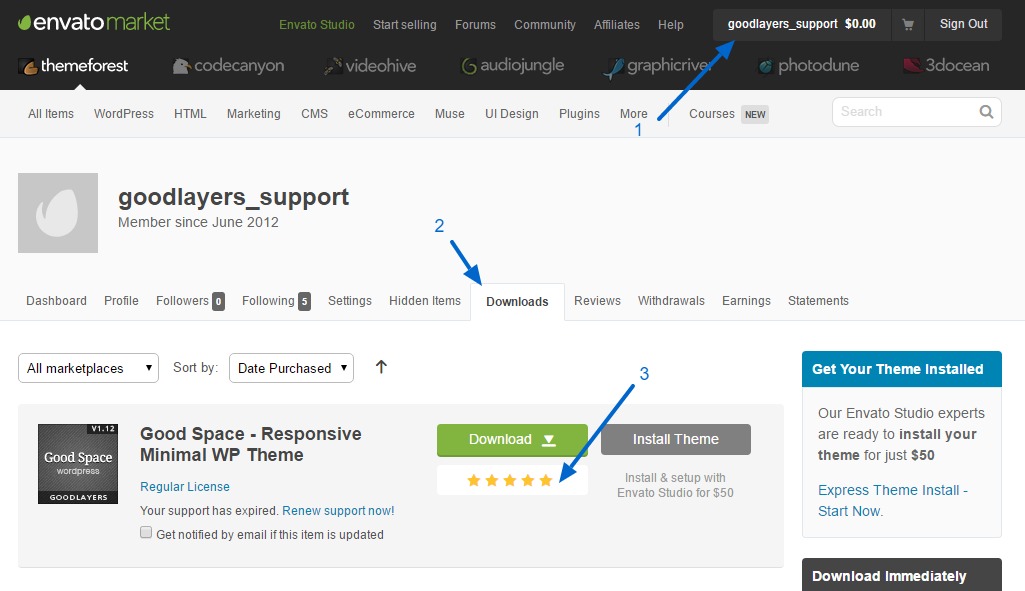
Bought on ThemeForest? If you enjoy the theme, please support us with a 5-star rating on your Envato downloads page (How to rate?)
Need Support?
If you have any questions regarding to theme issues, please submit a ticket at https://support.goodlayers.com/ (Registration Required)Video Tutorials
InstallationImporting Demo
Creating Portfolio
Creating Personnel
Creating Blog
Install Theme
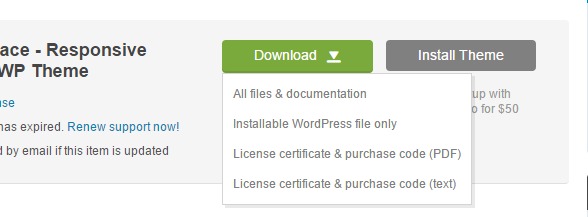
- From ThemeForest you can download two file types: the Installable WordPress file or All files & documentation. If you pick All files (named themeforest-xxxxx.zip), extract it first to get wardline.zip.
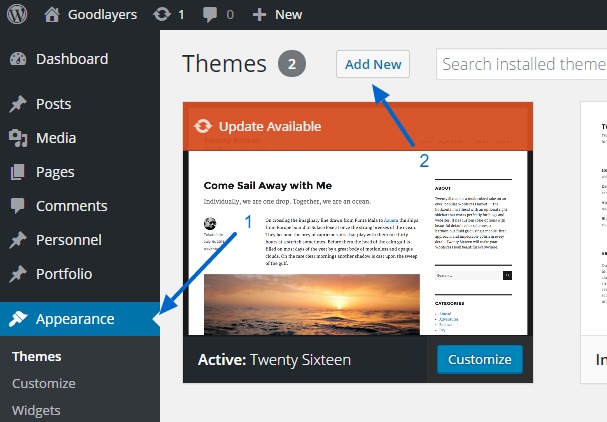
- In WordPress go to Appearance > Themes, click Add New > Upload, choose wardline.zip and click Activate.
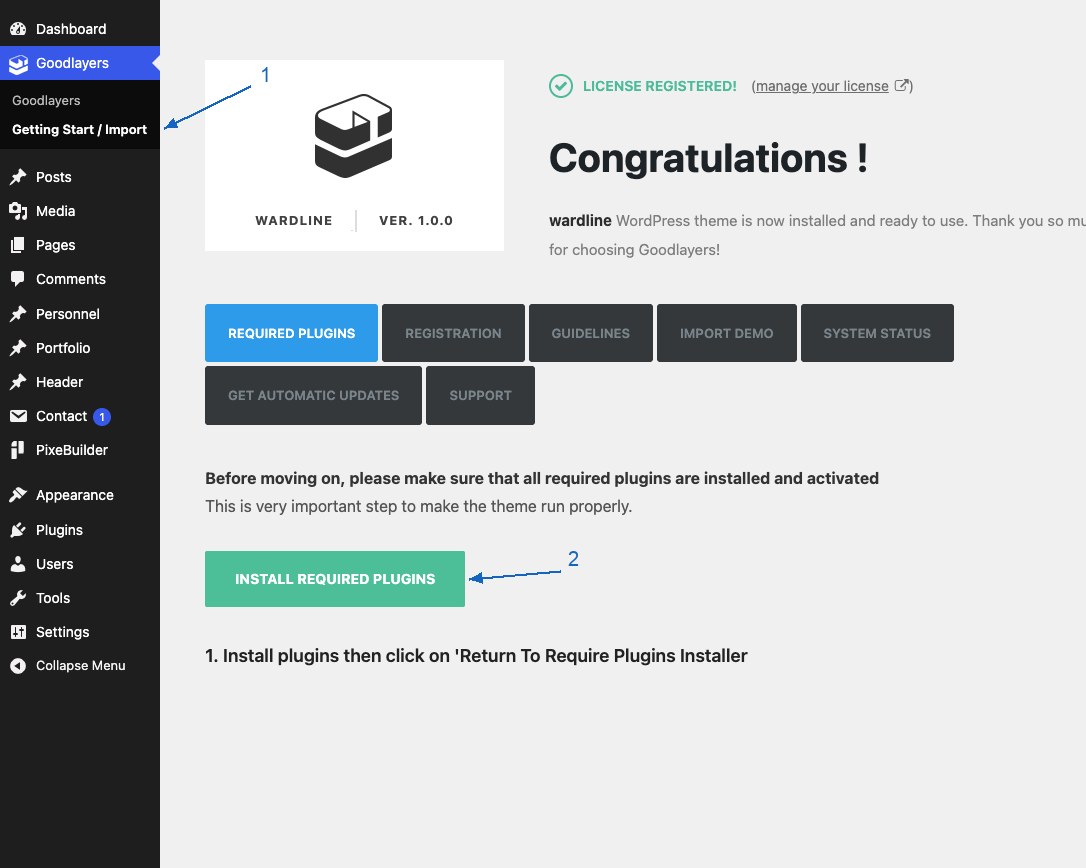
- On the registration screen (if you can’t find it, go to Goodlayers > Getting Start / Import on the left menu), paste your Item Purchase Code (how to find it?) and click Register Now. Registering unlocks the required plugins, the demo import and the theme updates.
Plugins Installation
After you install, activate and register the theme, you will be redirected to the "Getting Start" page. Click the "Install Required Plugins" button to continue with the plugin installation. ( The three Goodlayers Core plugins are offered once the theme is registered with your purchase code. )Wardline uses these plugins:
- Required : Goodlayers Core, Goodlayers Core Portfolio, Goodlayers Core Personnel
- Recommended : PixeBuilder (free, installed from the WordPress plugin directory, used by every demo), Contact Form 7 (contact, report request and newsletter forms), WP Google Map Plugin (maps), Envato Market (automatic theme updates)
If the "Goodlayers > Getting Start" section is not showing up, you may manually go to "Appearance > Install Plugins" section to install the necessary plugins.
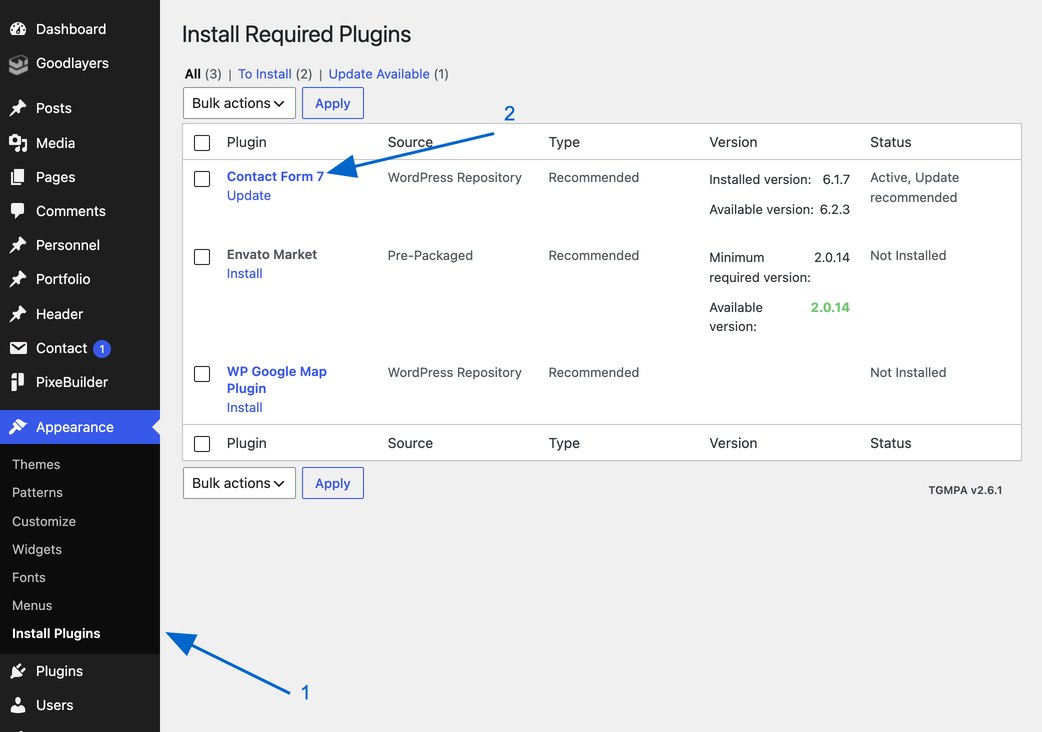
** If you want to reset your website to initial state for import process, you may check this article
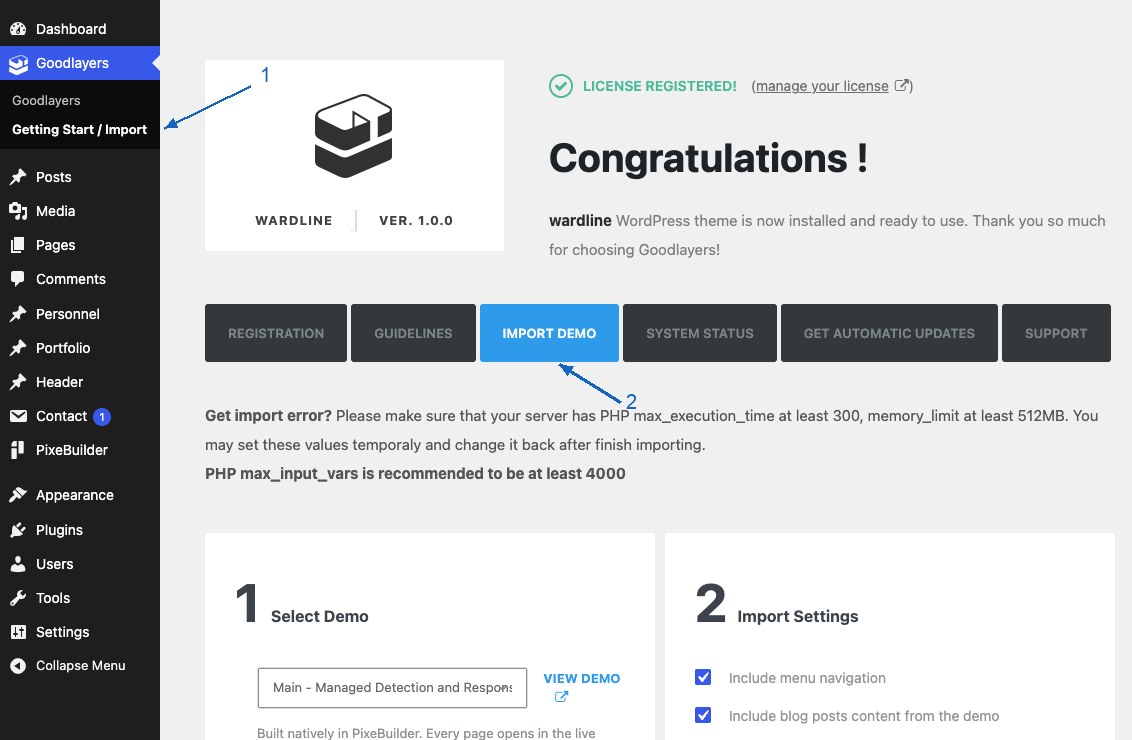
Select the demo you need from the list and click the "Start Import Demo" button, then wait a few minutes and it's done !!
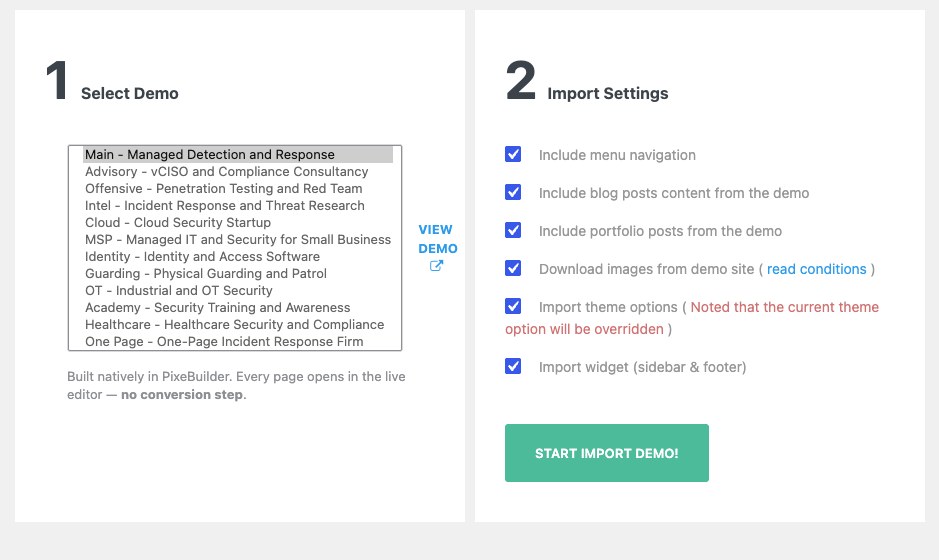
If something is missing, you can start the import process again and it'll continue where it left off.
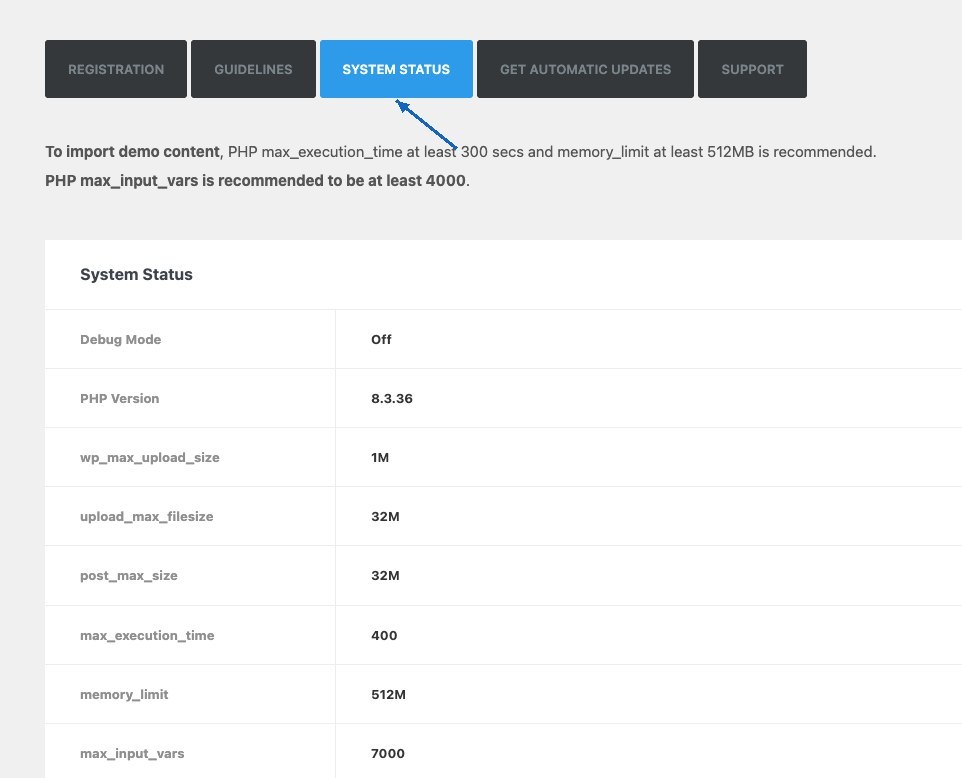
You can also check the server status tab to see the necessary server settings for the import process as well.
Importing Demo Content
After you finished installing theme and plugins, go to "Goodlayers > Getting Start / Import" section, you'll see an "Import Demo" tab.Select the demo you need from the list and click the "Start Import Demo" button, then wait a few minutes and it's done !!
The 12 demos
Each demo includes its own homepage, inner pages, blog posts and portfolio items as shown on the live preview. Import one demo per site.| # | Demo ( name in the importer list ) | For | Wardline Look | Import key |
|---|---|---|---|---|
| 1 | Main - Managed Detection and Response | Managed detection and response provider (main demo) | Ledger | wardline-main |
| 2 | Advisory - vCISO and Compliance Consultancy | Virtual CISO and compliance consultancy | Clear Standard | wardline-advisory |
| 3 | Offensive - Penetration Testing and Red Team | Penetration testing and red team | Afterglow | wardline-offensive |
| 4 | Intel - Incident Response and Threat Research | Incident response and threat research | Field Report | wardline-intel |
| 5 | Cloud - Cloud Security Startup | Cloud security software startup | Afterglow | wardline-cloud |
| 6 | MSP - Managed IT and Security for Small Business | Managed IT and security for small business | Clear Standard | wardline-msp |
| 7 | Identity - Identity and Access Software | Identity and access software | Ledger | wardline-identity |
| 8 | Guarding - Physical Guarding and Patrol | Physical security guards and patrol | Field Report | wardline-guarding |
| 9 | OT - Industrial and OT Security | Industrial and OT security | Ledger | wardline-ot |
| 10 | Academy - Security Training and Awareness | Security training and awareness | Field Report | wardline-academy |
| 11 | Healthcare - Healthcare Security and Compliance | Healthcare security and compliance | Clear Standard | wardline-healthcare |
| 12 | One Page - One-Page Incident Response Firm | One-page incident response firm | Ledger | wardline-onepage |
You can also check the server status tab to see the necessary server settings for the import process as well.
Theme Updates
- Go to Goodlayers > Getting Start / Import and open the Get Automatic Updates tab, then click Get Envato Market Plugin Now.
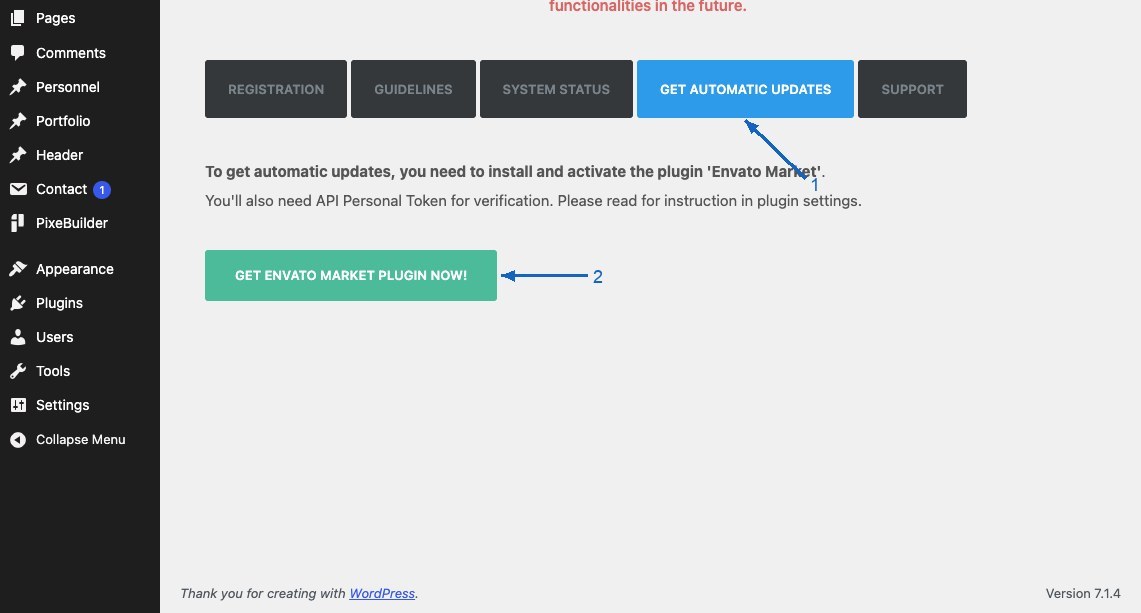
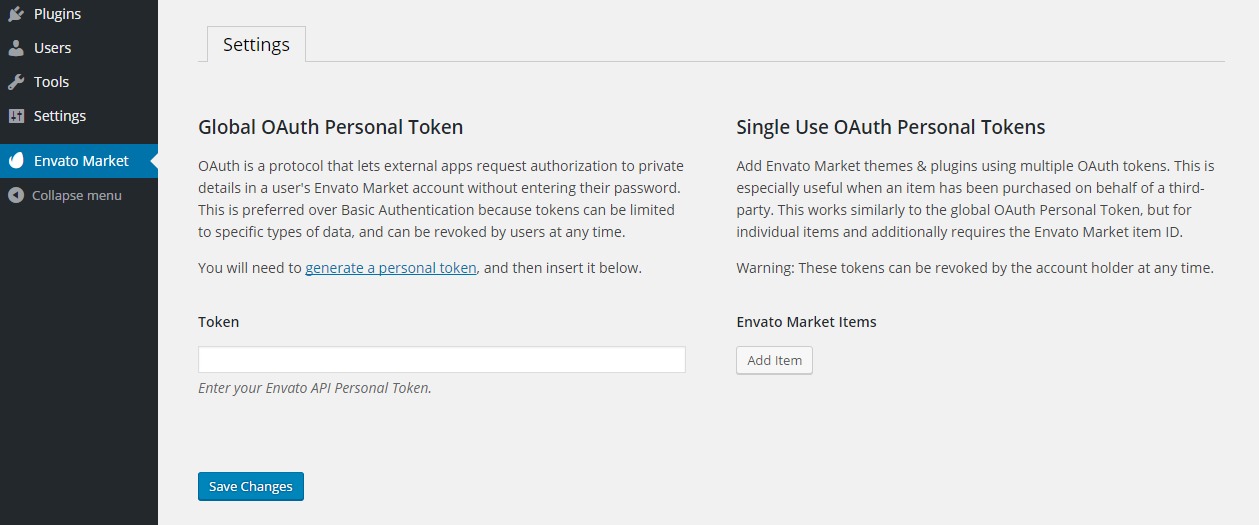
- The Envato Market plugin installs and sends you to an authentication page. Follow the steps there to add the item you purchased.
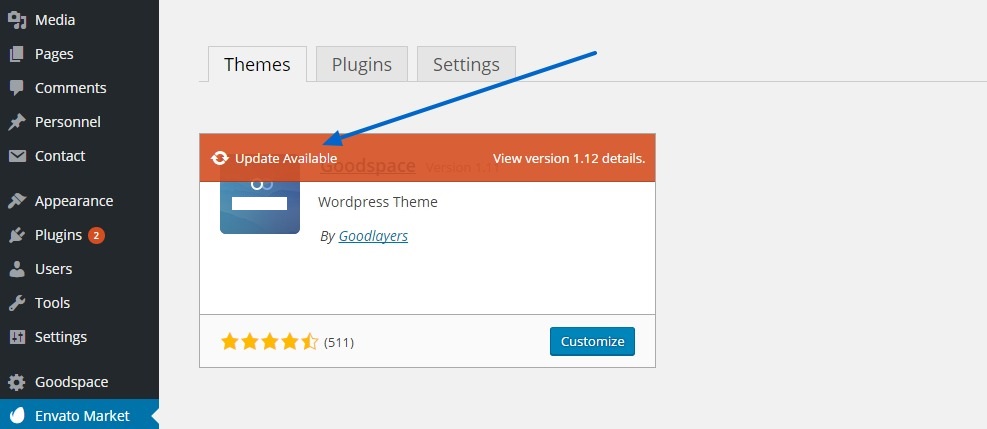
- When an update is available, click Update at Appearance > Themes.
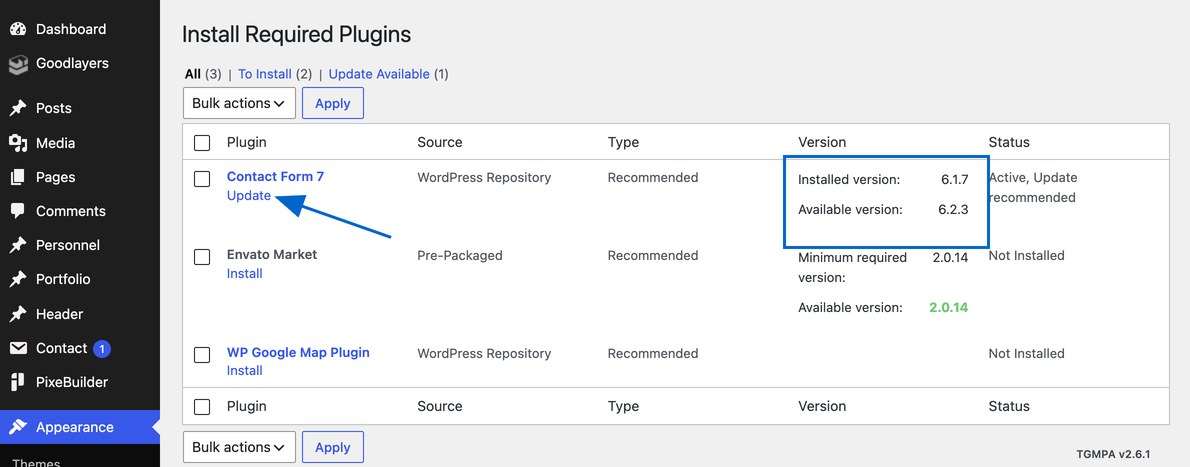
- Also check Appearance > Install Plugins for plugin updates.
Child Theme & Theme Customization
To create child theme
If you need to customize the theme code, of course, you do not want to modify it everytime you update the theme. That's where the child theme take action.We provided the child theme for you within the zip file you downloaded from themeforest. All you need to do is uploading the "wardline-child.zip" file to "Appearance > Themes" section and activate it. ( just like how you upoad the theme )
You can also learn more about child theme creation here
Adding / modify php code
Our theme wrap every function with if( !function_exists('some_function') ) command. If you need to modify any function, just declare it in the function.php file of the child theme and it'll overwrite the existing one.However, you need to use hook and action to modify the plugins since the plugin is loaded before the theme files.
Adding new style / script
You can add custom css / javascript code directly to the "Customize ( or Theme Option ) > Miscellaneous > Custom Css/Js" area. If you only need to add some style / script to the site, there're no need to create the child theme. We provided the custom input option which you can see the changes live !!Customize
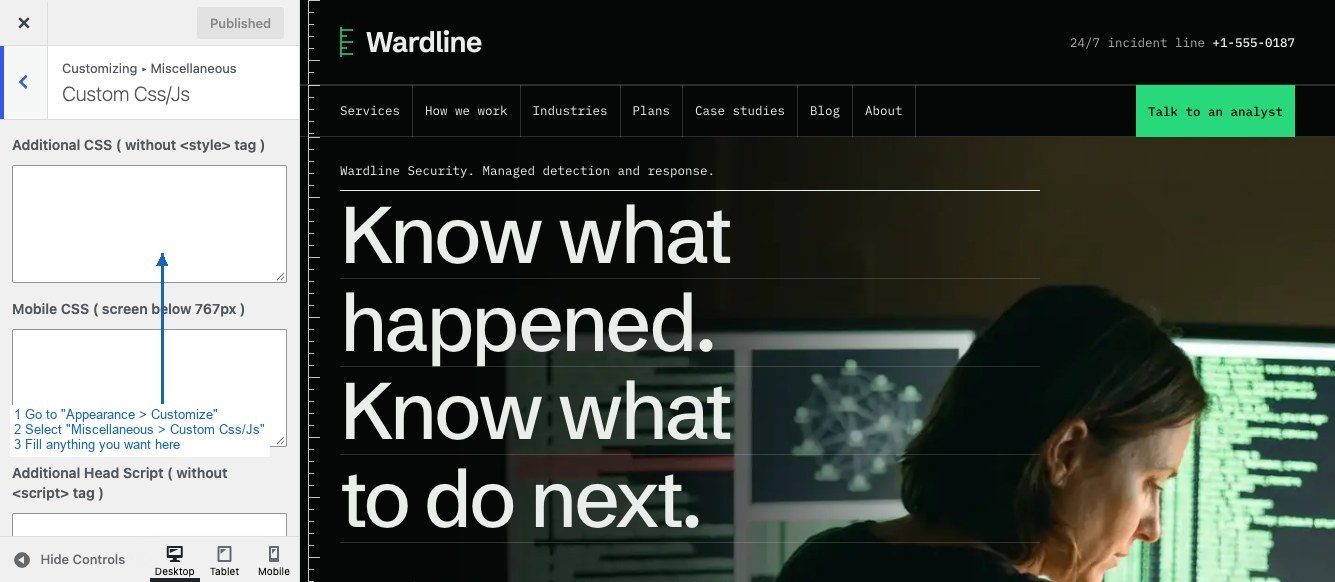
Theme Option
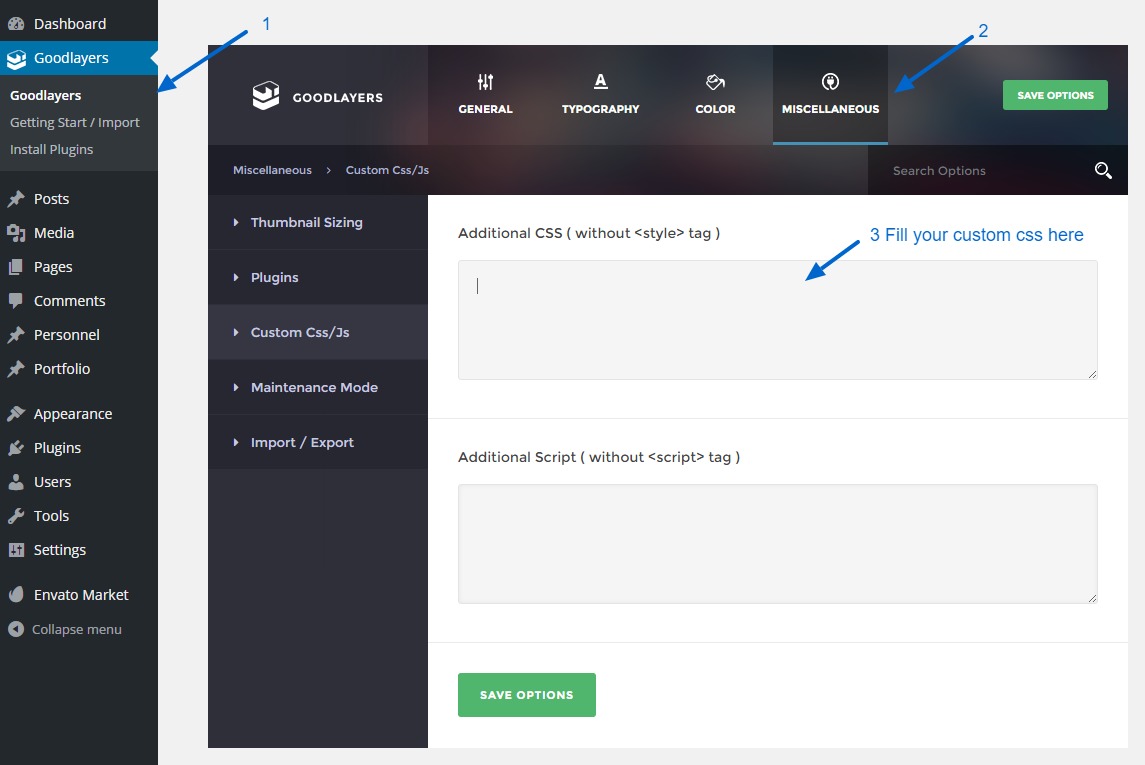
Theme Option / Customize
Theme option / Customize area is one of the main feature in our theme. They give you abilities to made a changes to your site without touching a single line of code."Customize" give you an ability to live preview changes on the site while "Theme Option" give you an ability to search through the options and do some specific task ( Add thumbnail size, Add Skin and Upload Custom font ) which will be explained later.
Customize
You can go to theme customize at "Appearance > Customize" section from wordpress admin area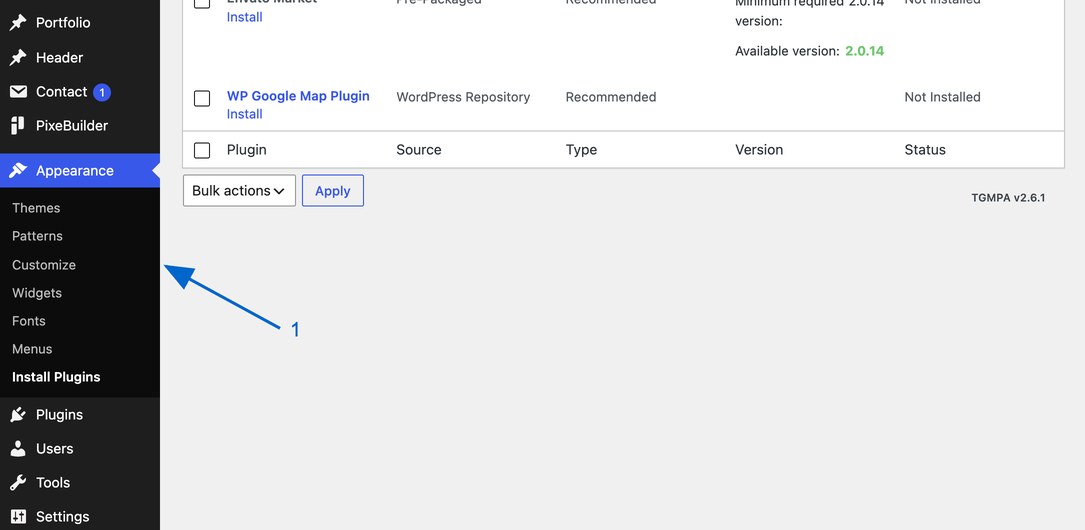
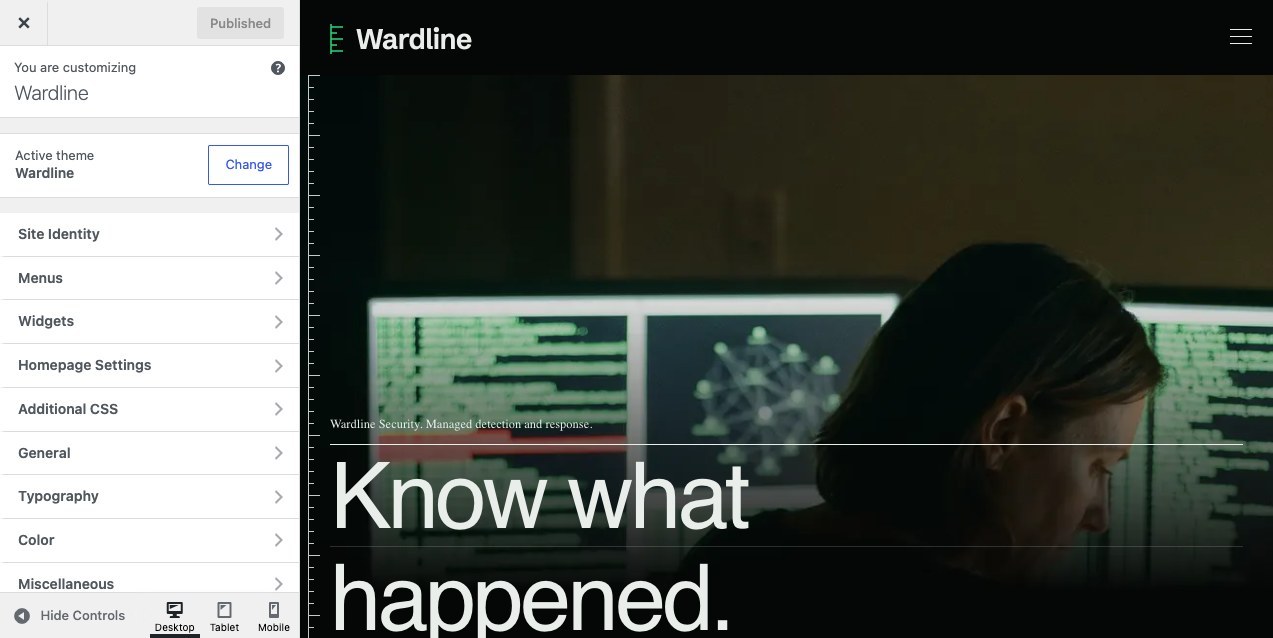
Theme Option
You can go to theme option at "Goodlayers" section in wordpress admin area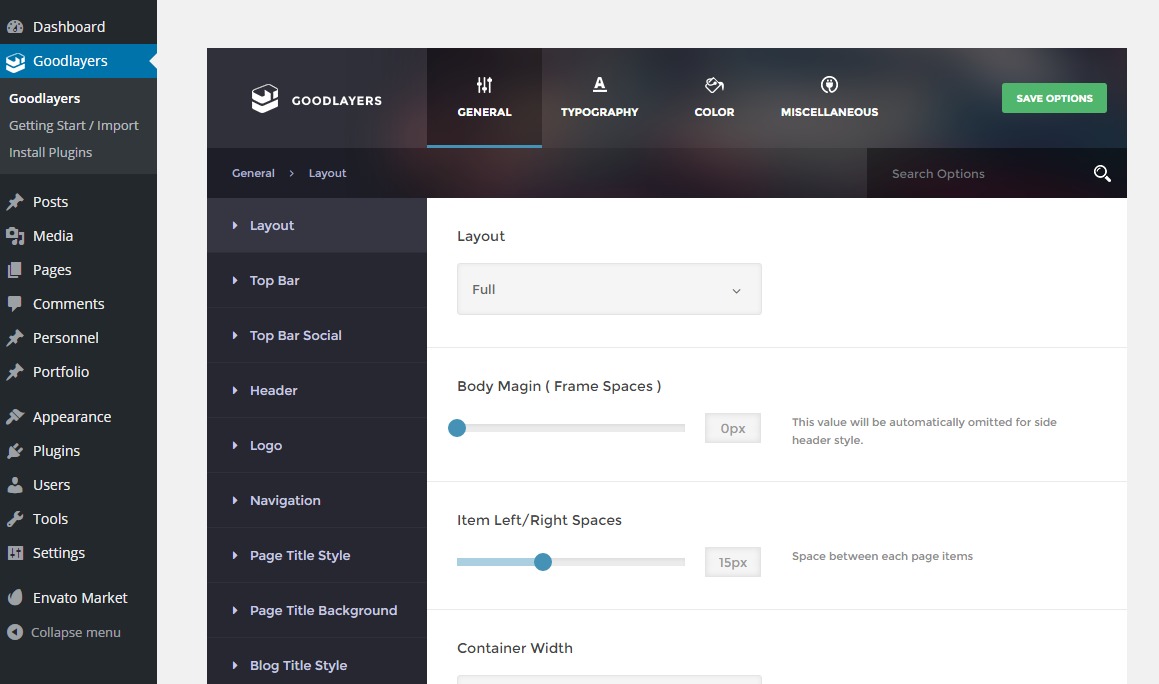
Import / Export Options
You can export and import your settings at "Theme Option > Miscellaneous > Import / Export". Each demo also ships with an Admin Panel Settings file (in the "Demos Stuffs" folder of the theme package) so you can apply a demo's theme options to an existing site without importing its content.Wardline Look / Colors
Wardline has one main style option, the Wardline Look. It sets the colours, the type styles and the look of the components ( cards, tables, forms, accordions, footer and so on ) for the whole site, without custom CSS.Where to find it
"Customize" > General > Layout > Wardline Look, or "Theme Option" > General > Layout > Wardline Look. When you import a demo, its look is set for you.The 4 looks and 12 values
Each value carries the colours of one demo. Demos in the same group share the same type and component shapes.| Look | Values ( demo colours ) | Character | Header used by the demos |
|---|---|---|---|
| Ledger | Main, Identity, OT, Onepage | Dark ground, bright green accent, mono labels | Bar ( logo row with contact text, menu row below ) |
| Field Report | Intel, Guarding, Academy | Warm paper ground, purple accent, serif display titles | Plain, centered logo |
| Clear Standard | Advisory, MSP, Healthcare | Light ground, green accent, grid lines | Plain, menu right, with top bar |
| Afterglow | Offensive, Cloud | Dark ground, magenta accent | Boxed |
Colors
The look sets five colour tokens on the page :--wl-accent ( buttons, links, marks ), --wl-ground ( page background ), --wl-ink ( text and titles ), --wl-mute ( secondary text ) and --wl-line ( hairlines and borders ). To change one of them without editing theme files, add a line to "Customize ( or Theme Option ) > Miscellaneous > Custom Css/Js", using the value you picked in Wardline Look, for example :
body.wardline-demo-main{ --wl-accent: #2f80ed; }
The font families themselves are chosen at "Theme Option > Typography" as usual.CSS classes for PixeBuilder
Put these in Advanced > CSS Class Selector of a wrapper, column or item to change just that part of the page.| Class | Put it on | Effect |
|---|---|---|
wl-g-page / wl-g-paper / wl-g-tint / wl-g-white / wl-g-dark / wl-g-accent / wl-g-photo | wrapper or column | Ground : switches the band to another background, and text, lines and buttons inside follow it |
wl-noward | wrapper | Leaves this band out of the vertical "ward line" drawn on the left of the page |
wl-ruler ( + wl-ruler-accent ) | empty divider or spacer item | Tick ruler in the shape of the current look, optionally in the accent colour |
wl-gridlines | wrapper | Column grid lines behind the band |
wl-cells ( + wl-cell-on on one column ) | wrapper | Joined cells : hairline dividers between the columns, one accent cell |
wl-blog-first | FW3 Blog item ( grid style ) | First post full width |
wl-pers-step / wl-pers-row | FW3 Personnel item | Stepped columns / thumbnail rows on phones |
wl-tl-rail | FW3 timeline item | Thin rail with a tick on each row |
wl-testi-rule | testimonial item | Accent rule above the quote |
wl-price-accent / wl-price-bars | price table item | Active tier in the accent colour / tiers drawn as a bar chart |
wl-btn-ink | button item | Dark ( ink ) button |
wl-f2 | a <div> around two fields inside a Contact Form 7 form | Two fields side by side |
wl-news | Contact Form 7 item | Newsletter form : email field joined to its button |
Thumbnail Size
You can add custom image size to uses in page builder and themes by going to "Theme option > Miscellaneous > Thumbnail Sizing" section.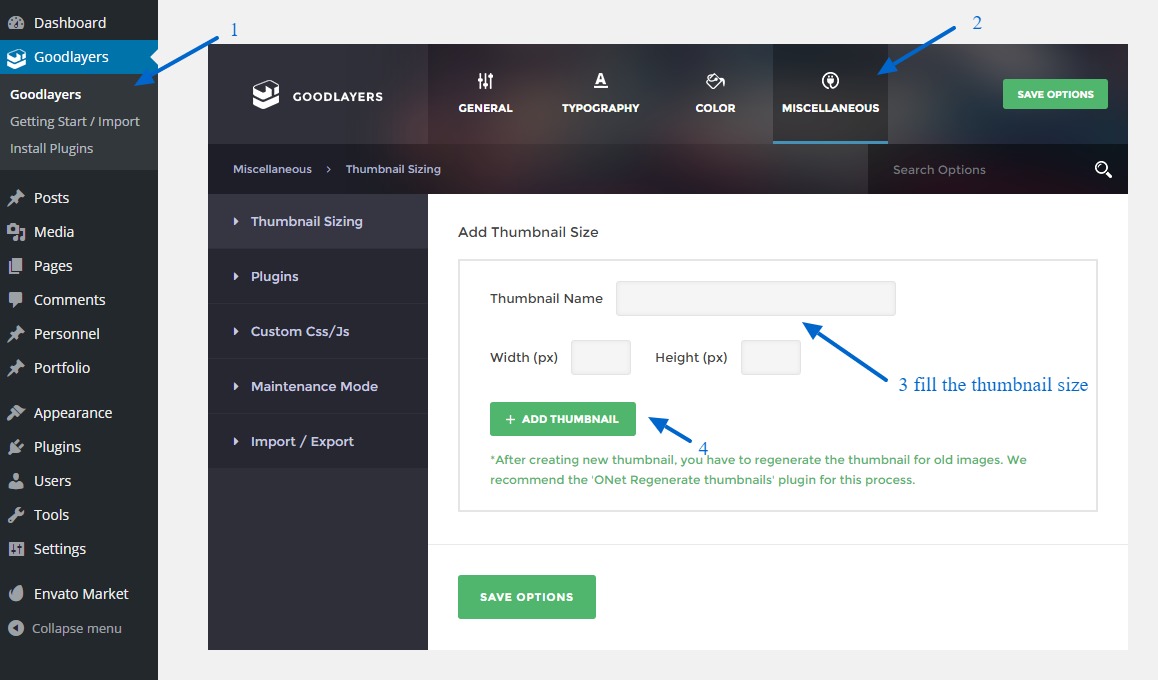
New tumbnail size only effects the newly uploaded images, so after you successfully added the image size, you may use the 'Regenerate Thumbnail' plugin to generate the thumbnail for old images as well.
Skin Settings
Creating Skin
Skin gives you an ability to change the elements color that resides in the wrapper / column ( Page builder items ). You can create new skin at the "Theme option > Color > Skin" area.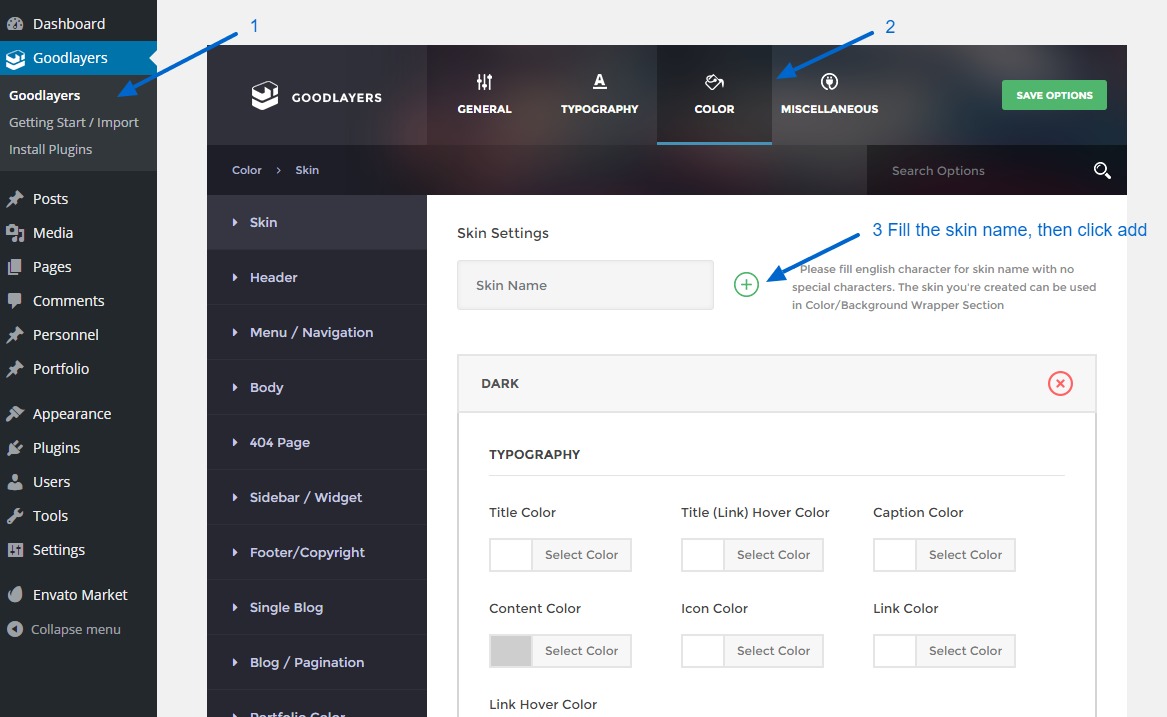
Assigning Skin
Wardline pages are built with PixeBuilder. Set colours directly on the wrapper, column or item (Style / Color options), or use the Wardline ground classes (wl-g-dark, wl-g-paper and so on, see Wardline Look / Colors ).Upload Custom Font
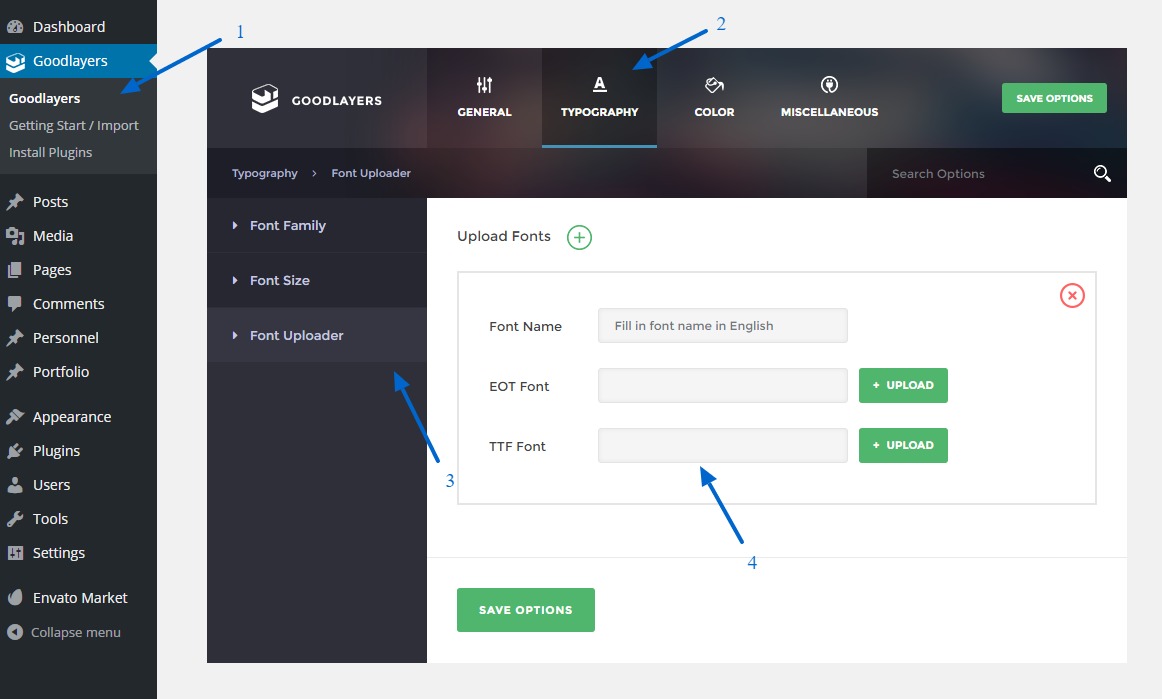
You can upload custom font at the "Theme option > Typography > Upload font" section. Both EOT and TTF font need to be supplied to make the font support across all devices.You can generate the font file here
Header / Logo
You can set the header style in the "Customize" page. Header area consists of 6 sections under the general tab : Top Bar, Top Bar Social, Header, Logo, Navigation and Fixed Navigation.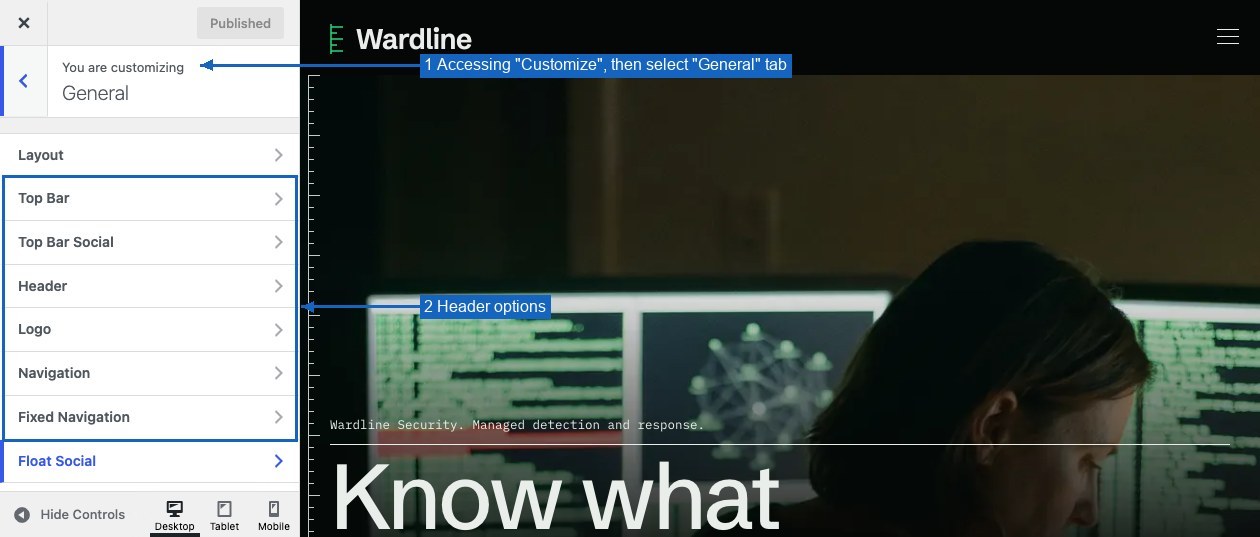
Top Bar
Topbar is an area that resides above logo & navigation.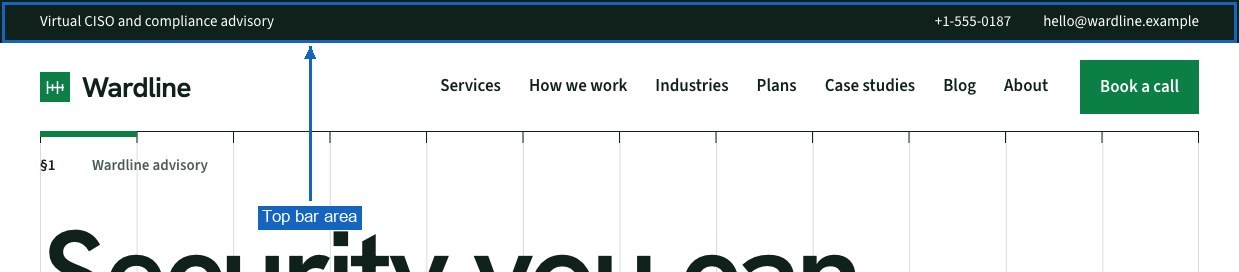
Header Style
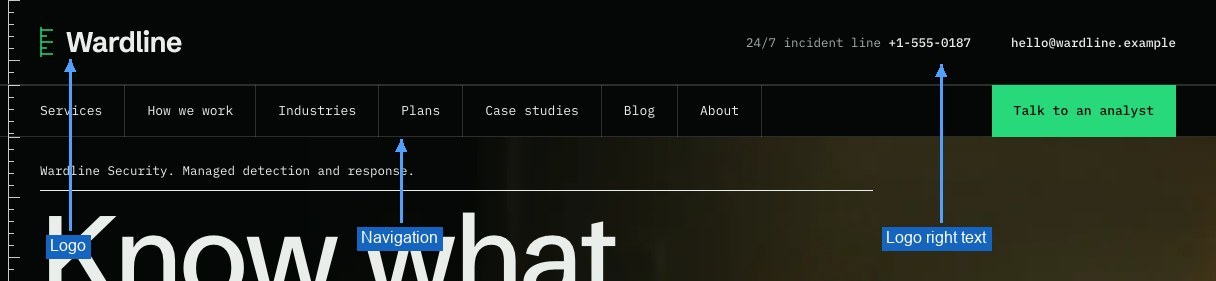
Header is an area that includes logo and navigation. You can select "header style" in header tab, then set the logo / navigation spaces from the corresponding tabs.Wardline has 6 header styles : Plain, Bar, Navigation Boxed, Boxed, Side Menu and Side Menu Toggle, with 23 layout variations (menu left / right, centered logo, splitted menu and more). The demos use : Bar ( Main, Identity, OT, One Page ), Plain with centered logo ( Intel, Guarding, Academy ), Plain with menu right and top bar ( Advisory, MSP, Healthcare ) and Boxed ( Offensive, Cloud ). The header on each demo is set up with these options, so you can also check the demo's Admin Panel Settings file.
Custom Header
You can create difference header style/color in difference pages with our custom header.1. Create a new header
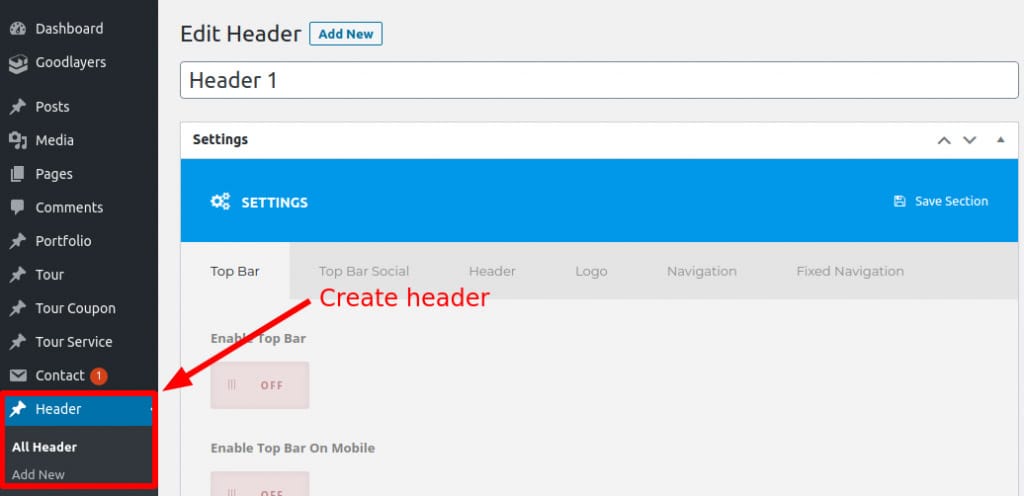
2. Select header style just like in theme option.
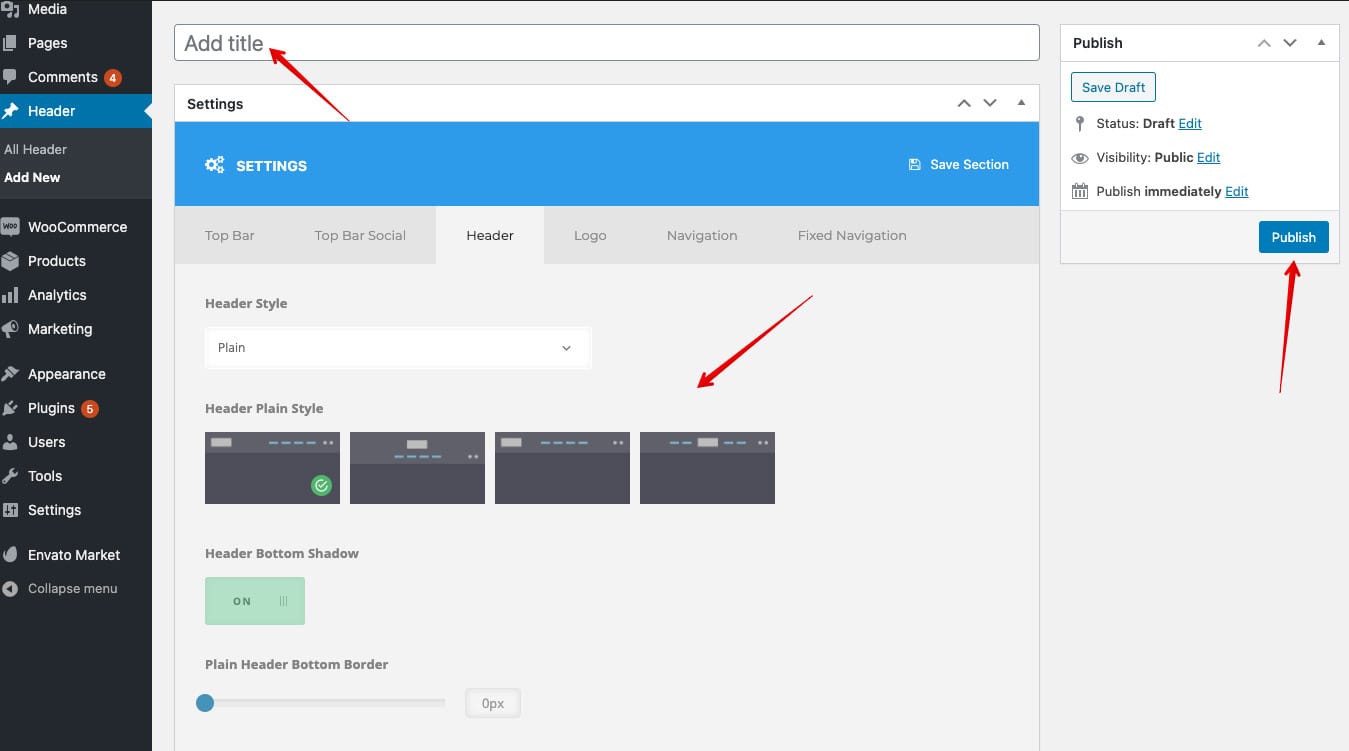
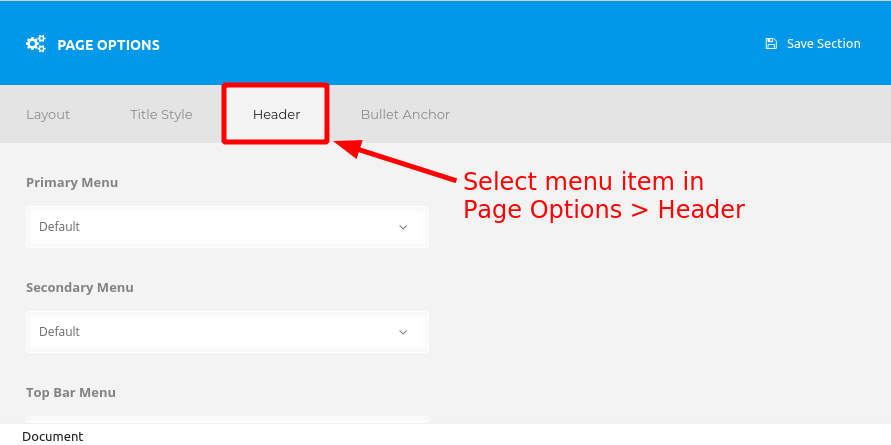
3. Select the custom header that you created in the page option directly.
Creating Menu
1.) Adding menu items
You can create menu by going to "Appearance > Menu" section.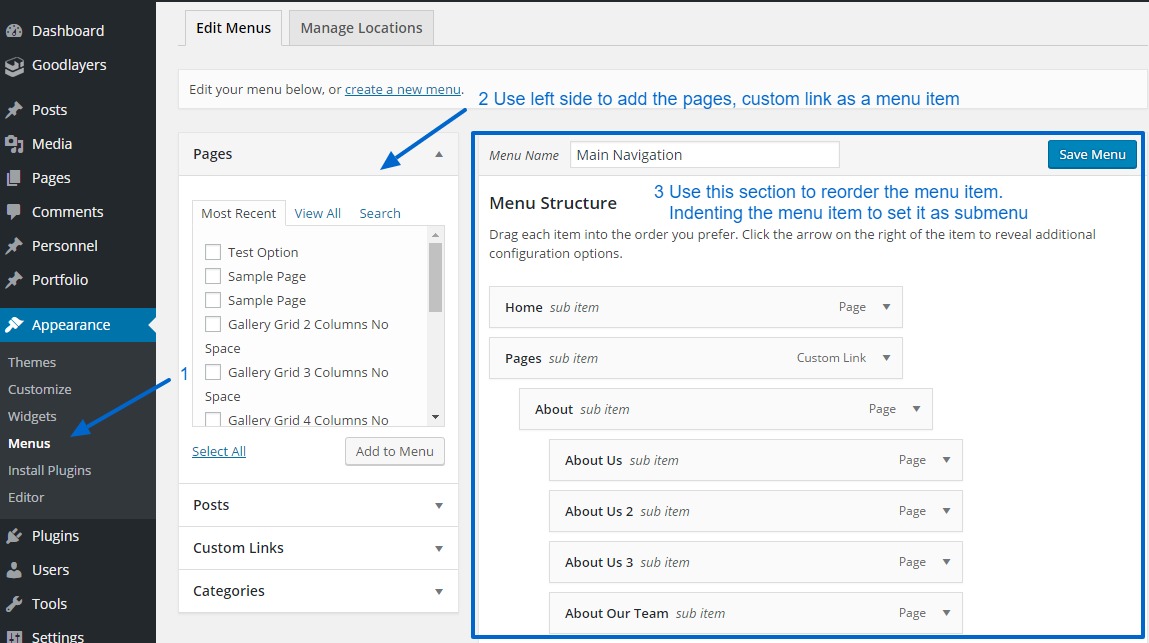
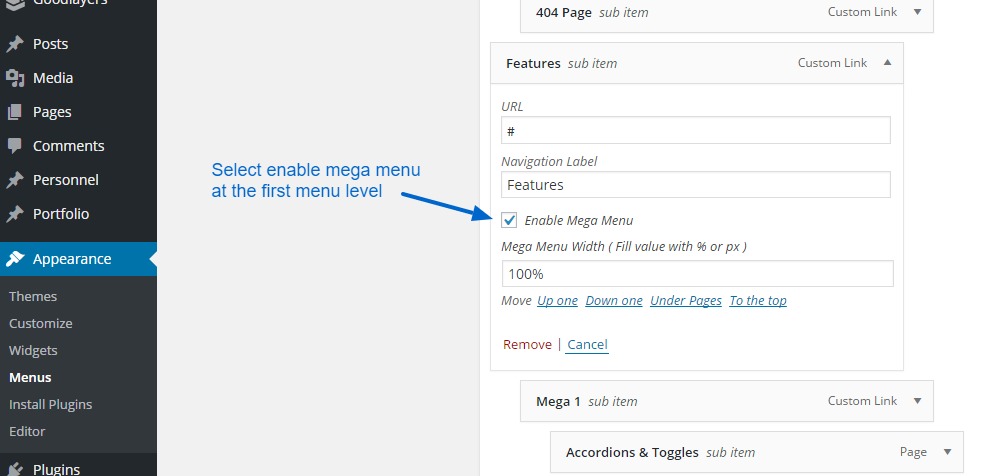
2.) Mega Menu
Mega menu consists of 3 menu levels.- First Level : use to defind a mega menu supported
- Second Level : acts as a column of the mega menu items
- Third Level : display the menu item lists
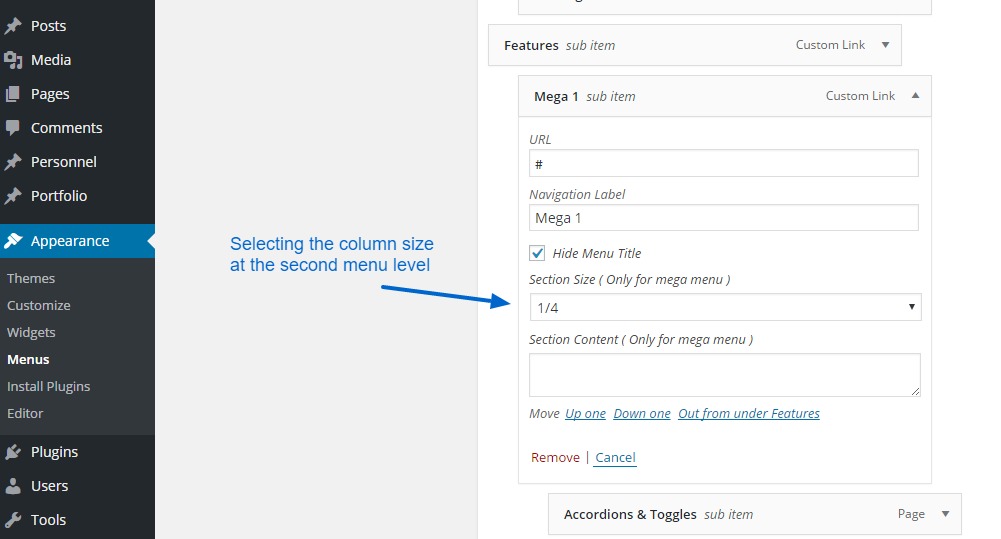
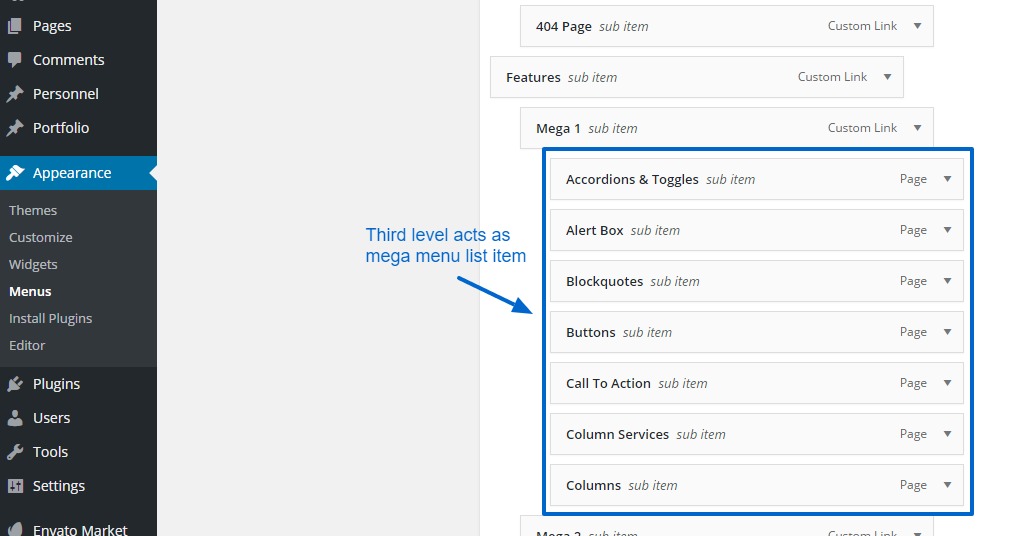
3.) Assign Menu
After you finished creating the menu, try assigning it to various themes locations at the "Manage Location" section.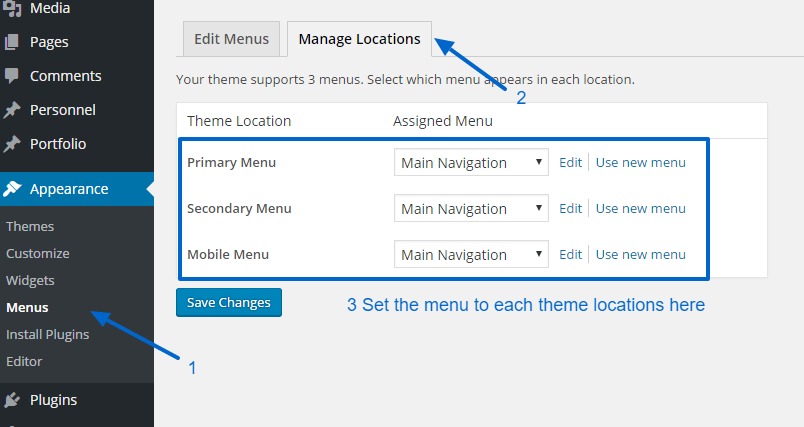
One-Page Menu
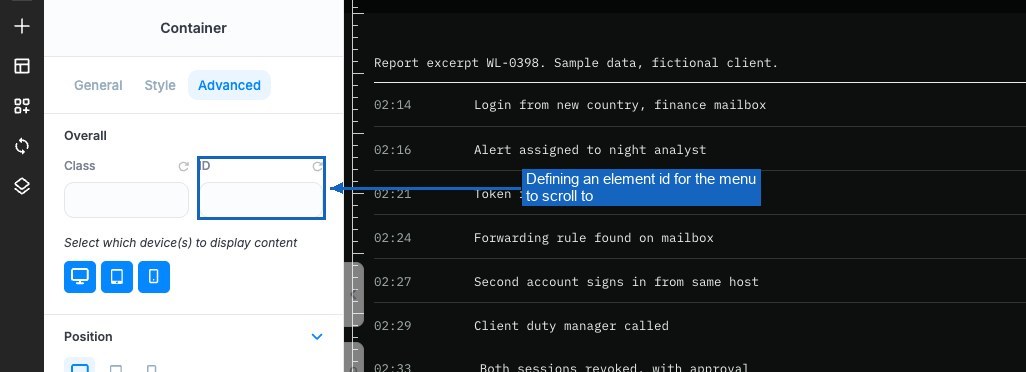
One-page website can be created using page builder. By defining an ID to each section of the page, you can create a menu which scroll to the individual section.1.) Defining ID to each section of the page.
Try editing any item to fill the ID to the element.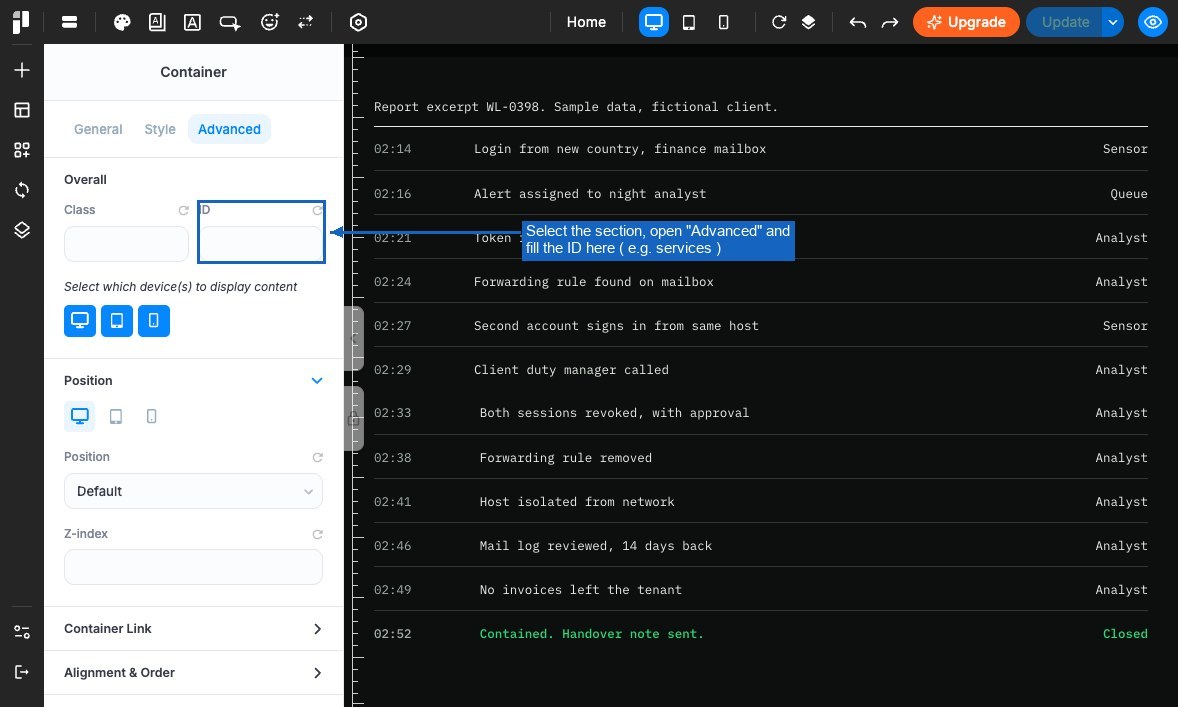
2.) Creating the menu anchor
At the "Appearance > Menu" area, try creating custom link menu item with #id as URL.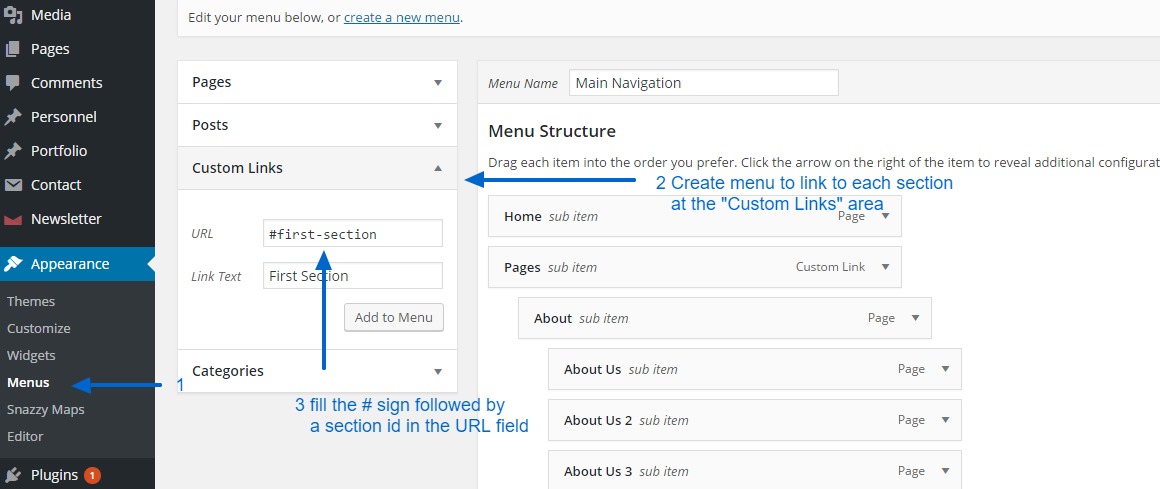
Keep doing this with another section in page builder. If you need 4 menu, you have to separate your page builder to 4 sections and create 4 menu anchors.
3.) Creating bullet anchor
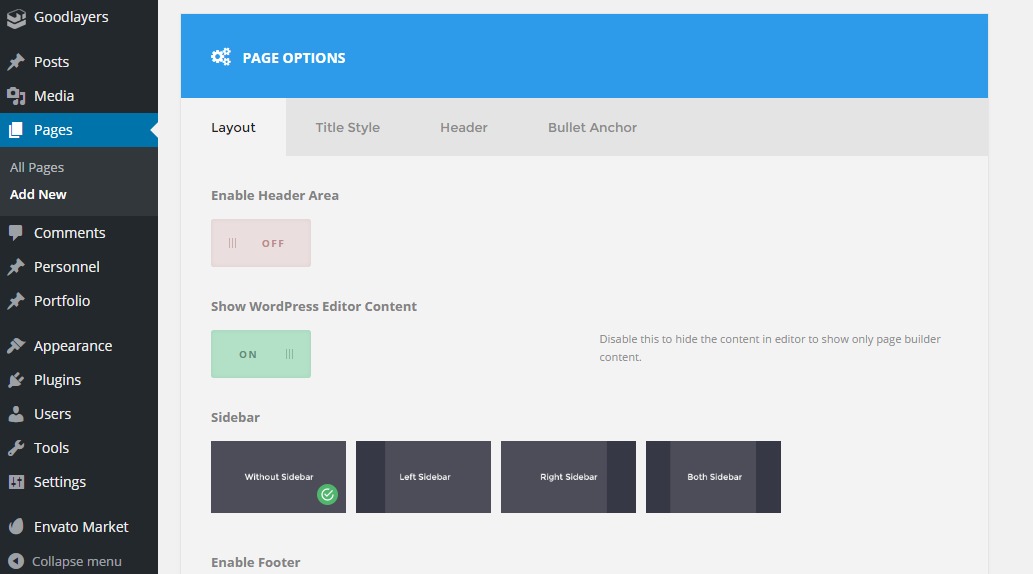
You can create the "Bullet Anchor" at the "Page Options" when you edit each page. Choosing the "Bullet Anchor" tab to add new bullet and assign #id in the same way as menu anchor.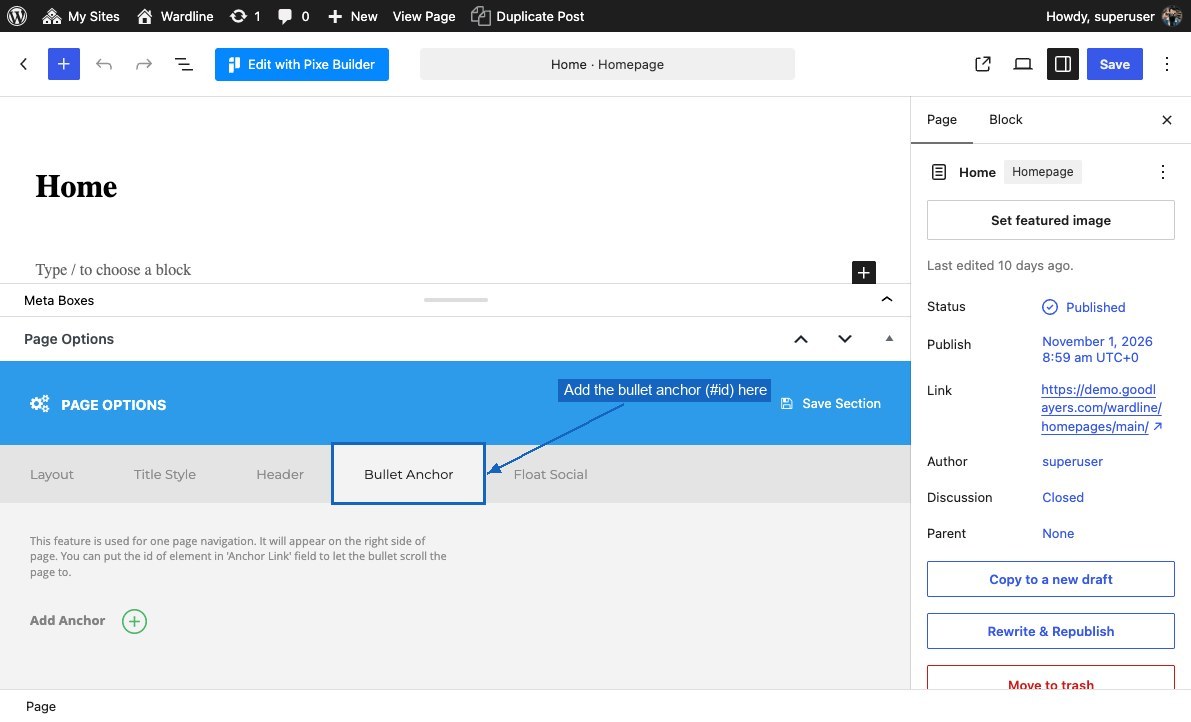
Footer / Copyright
The footer and copyright area can be changed at the "Customize > General > Footer / Copyright" sectionFooter
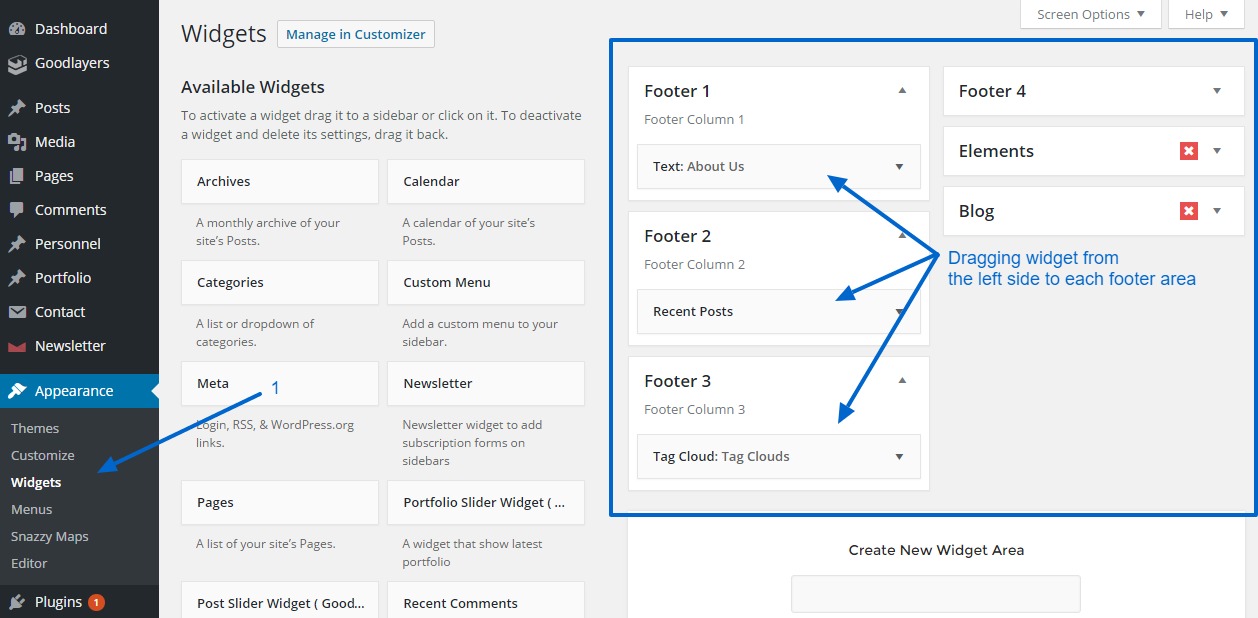
You can select one of 9 footer layouts as shown on the following screenshot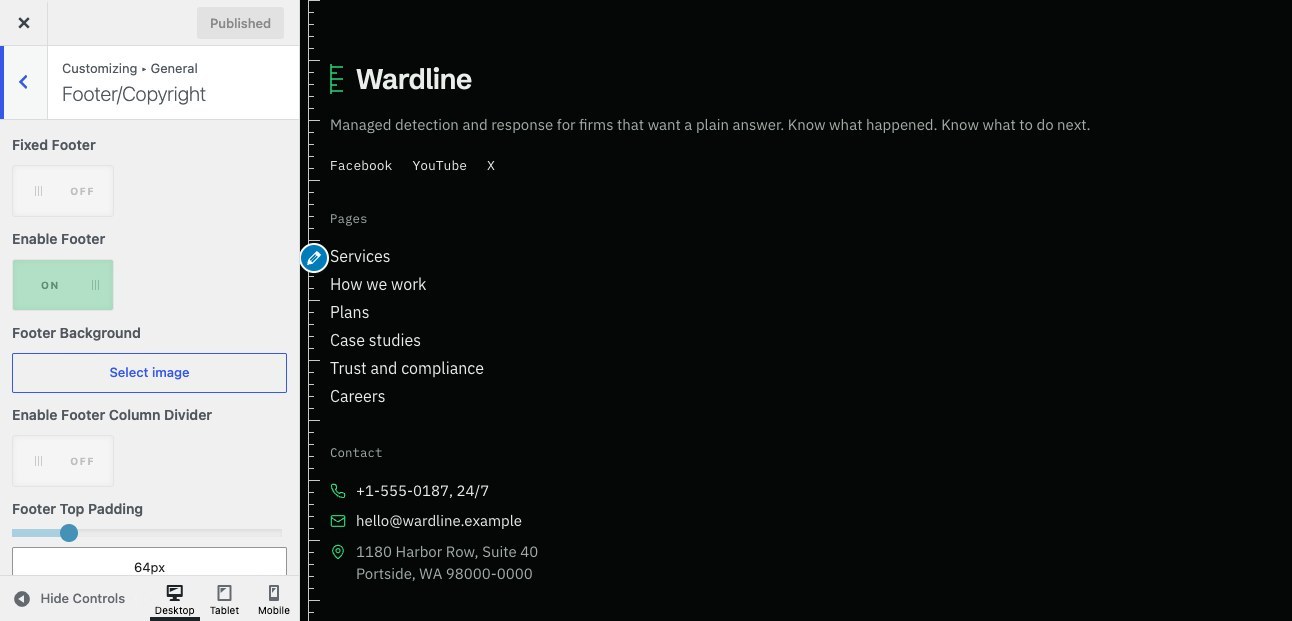
After selecting the layout, you can assign the widget to the footer at the "Appearance > Widget" area. The widget you assigned will matched with the footer layout. ( Eg. Footer 4 will be ignored if you select the 3 column footer style )
Creating Page & Set The Homepage
Go to 'Page > Add New' to create new page.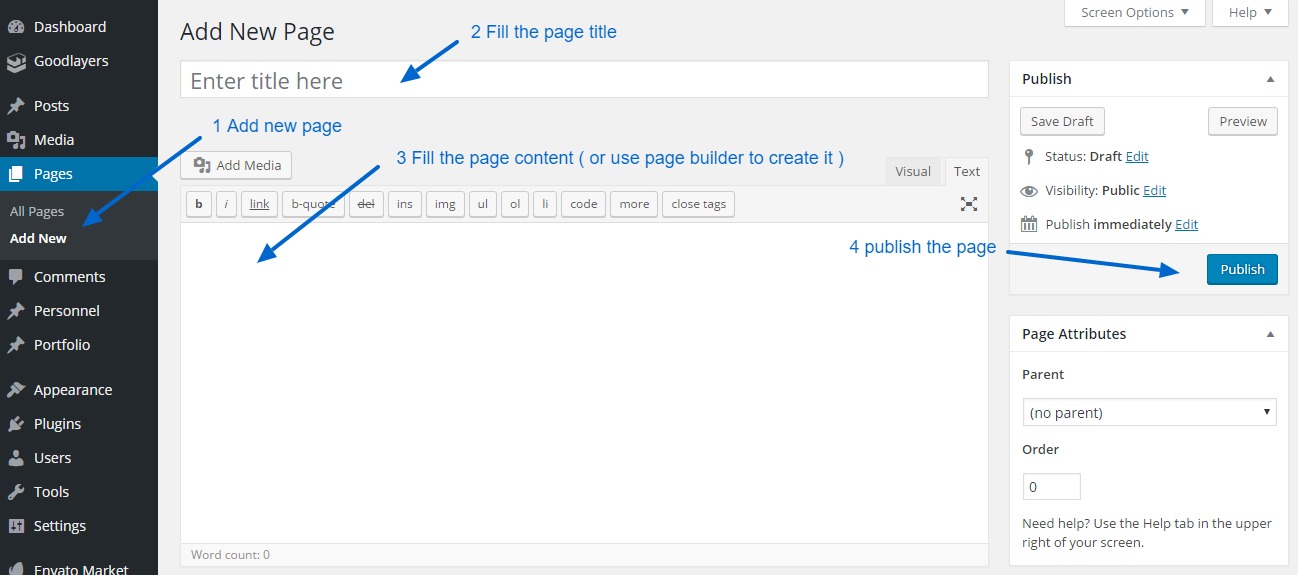
You can set page sidebar, title background and caption at the "Page Option" area. ( at the very bottom of the page )
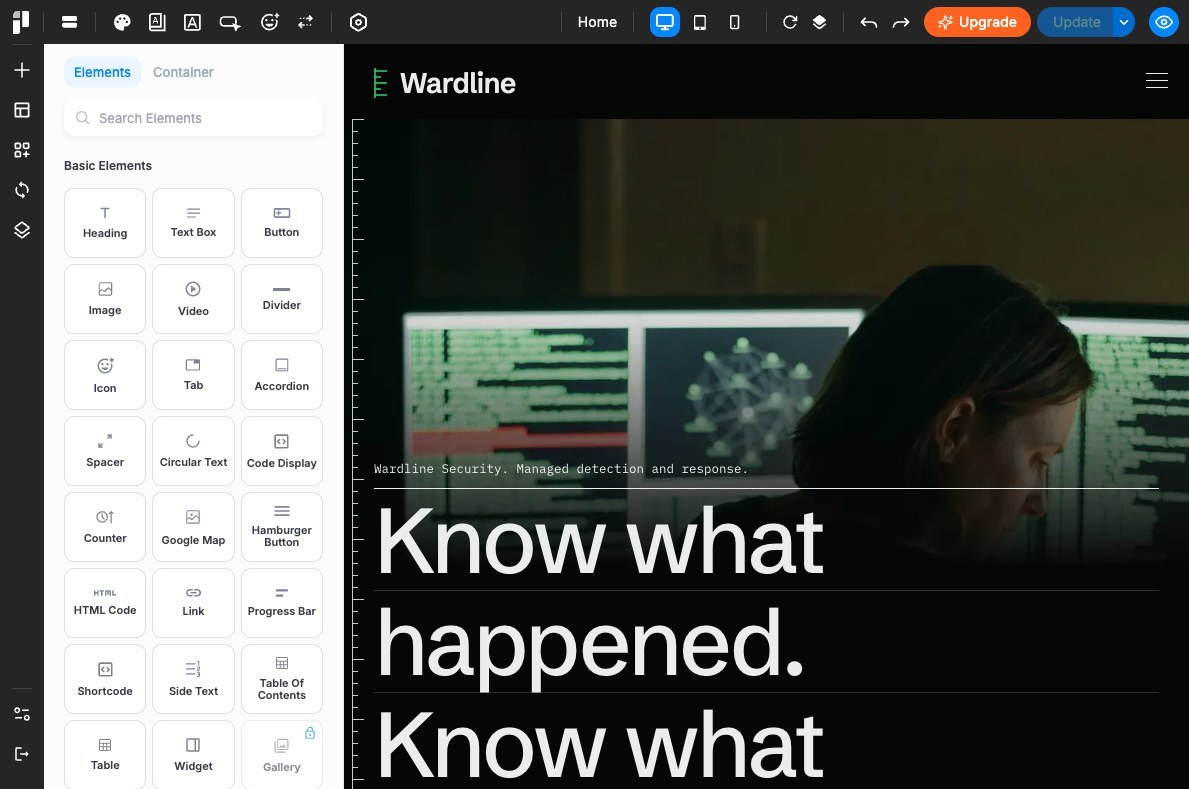
You can also use "PixeBuilder" ( see the Page Builder section ) to create more advanced layouts.
Set the page as Homepage
Go to 'Setting > Reading' area. Choose the front page as static page and select the page you want to be homepage.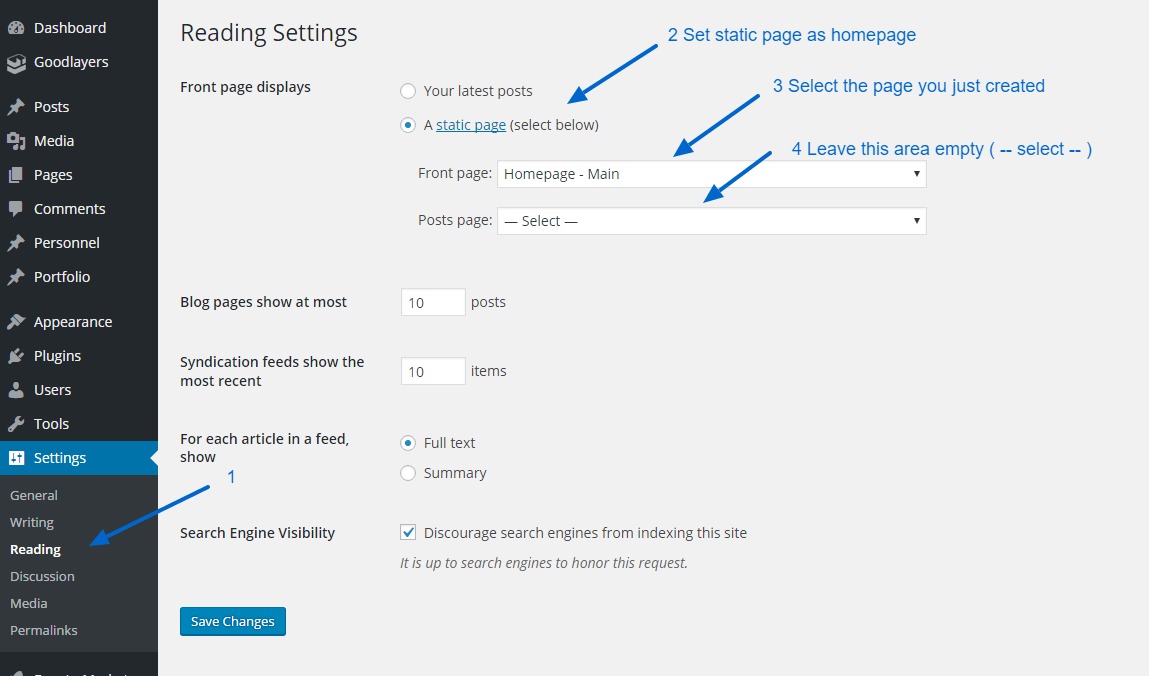
Creating Blog
1.) Creating New Articles
Go to "Post > Add New" to create new articles.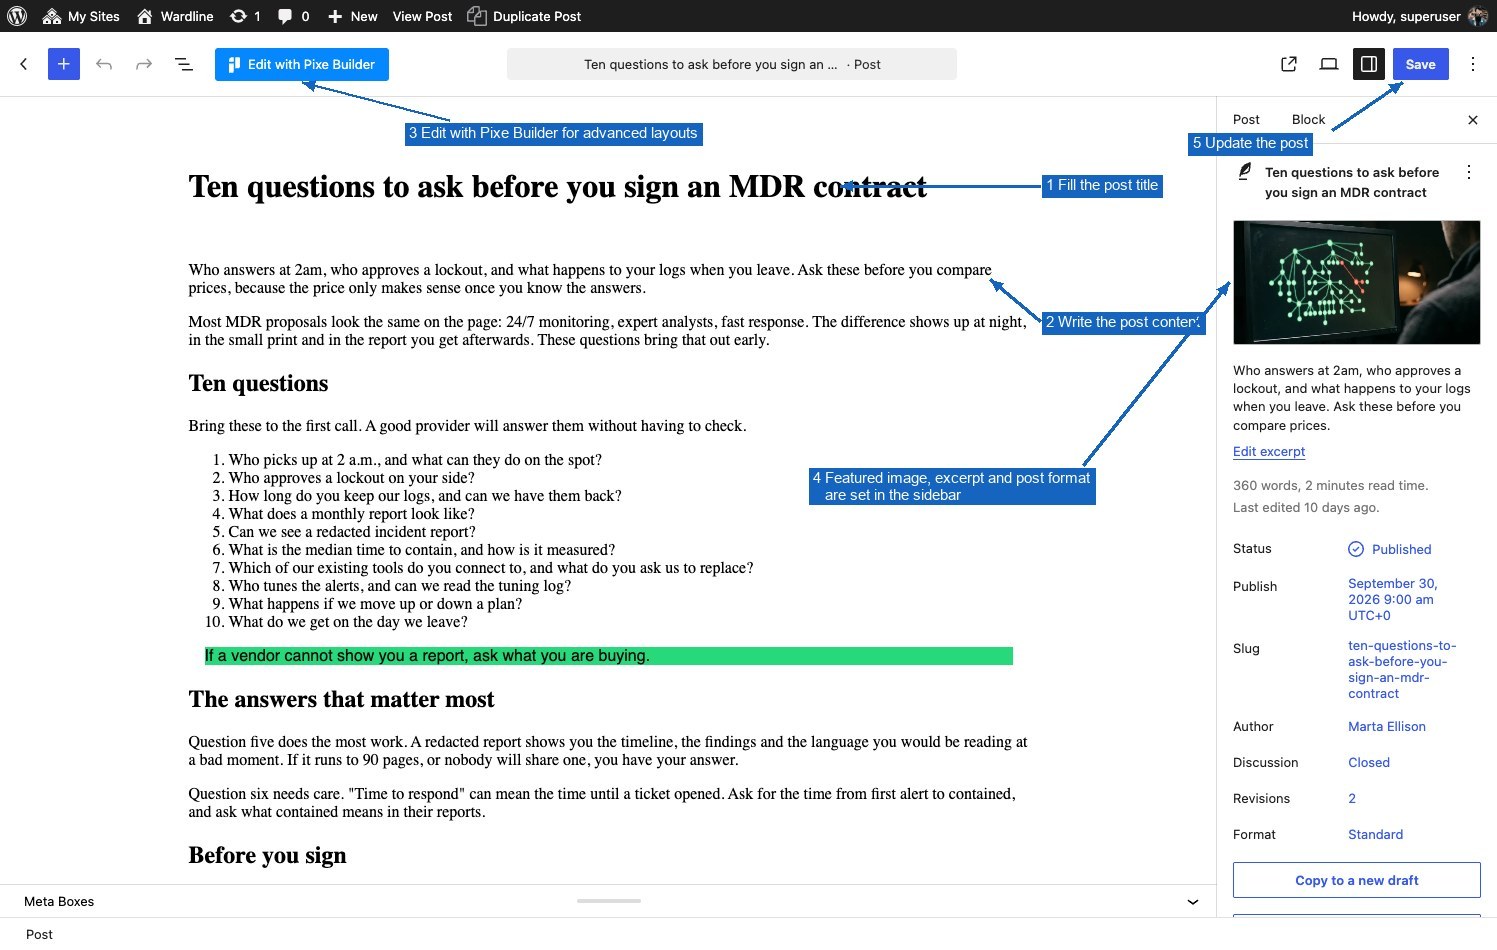
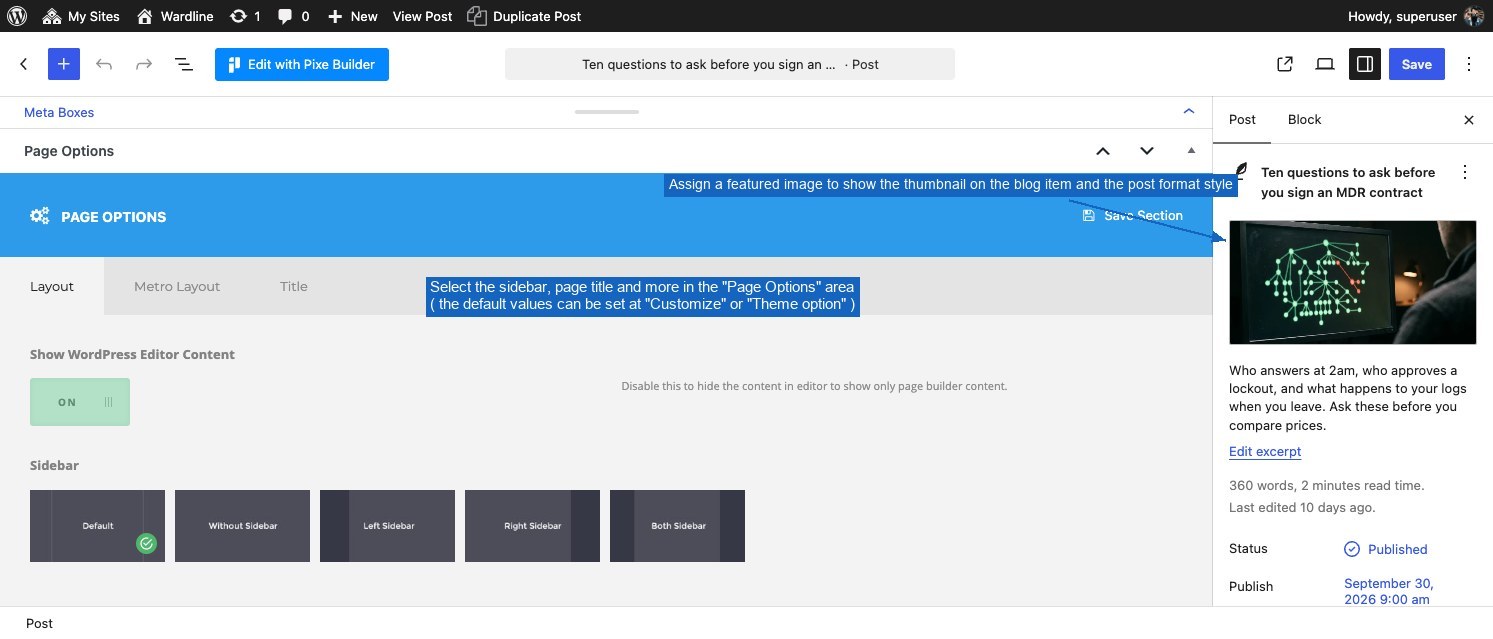
2.) Creating Blog Item ( list of articles )
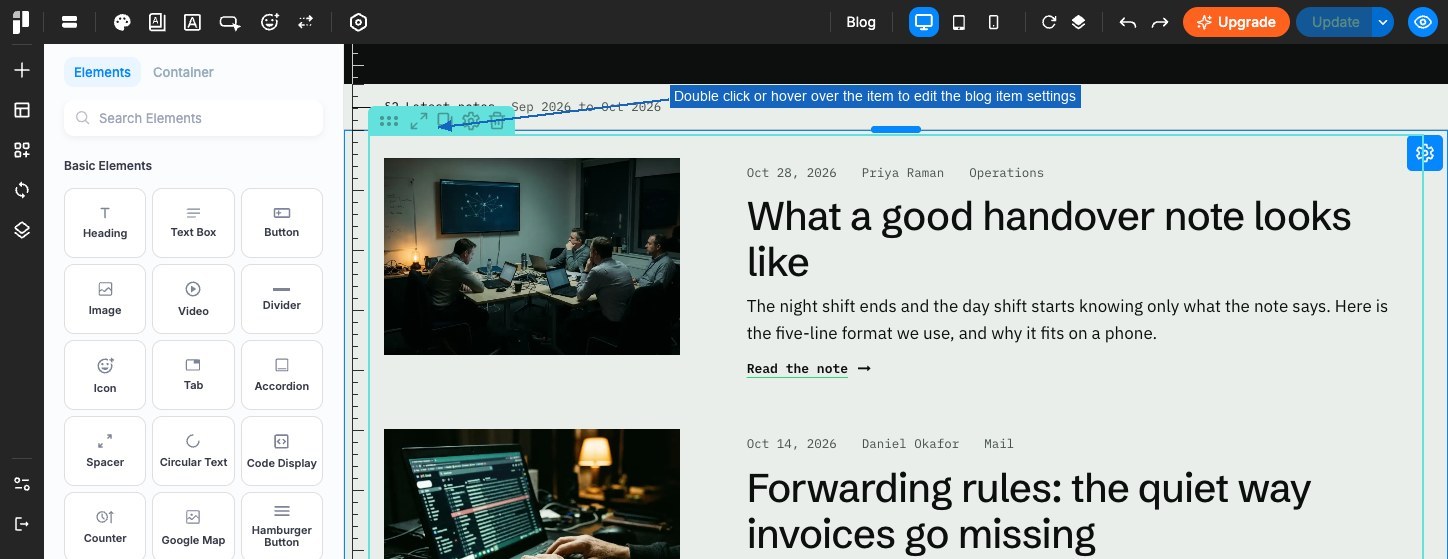
Create new page at "Page > Add New". Edit it with PixeBuilder, add the "FW3 Blog" item, then publish the page.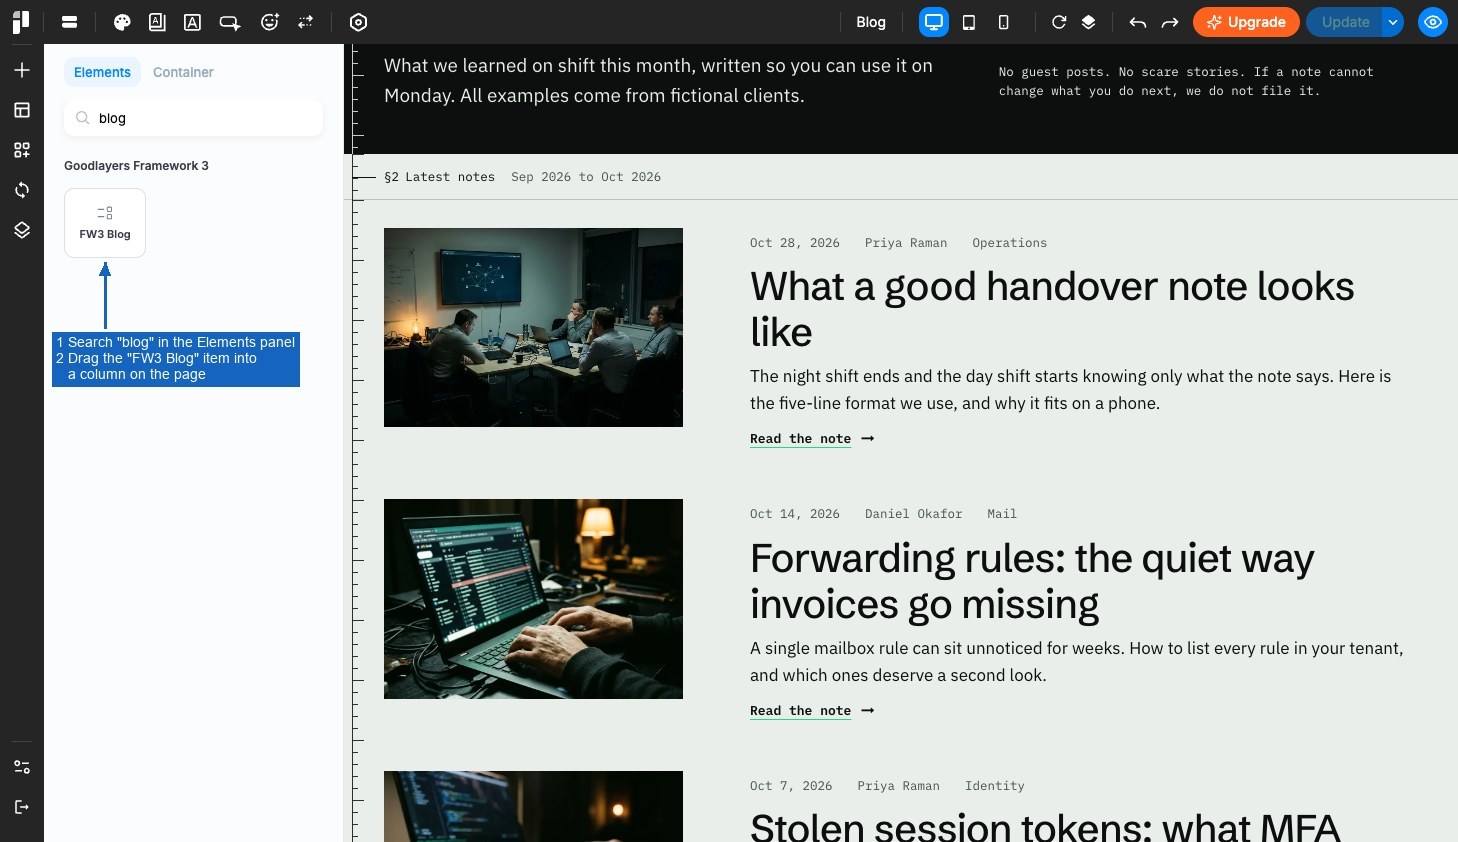
3.) Post Format
Post format give you an ability to style the post in different ways.First, you need to select the post format option.
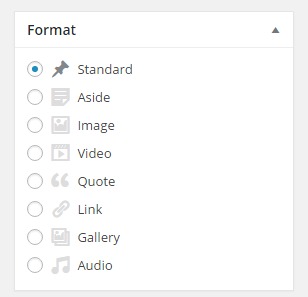
Here's the explanation of the each post format type.
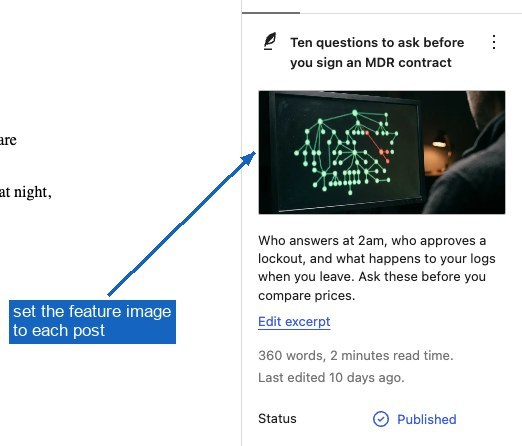
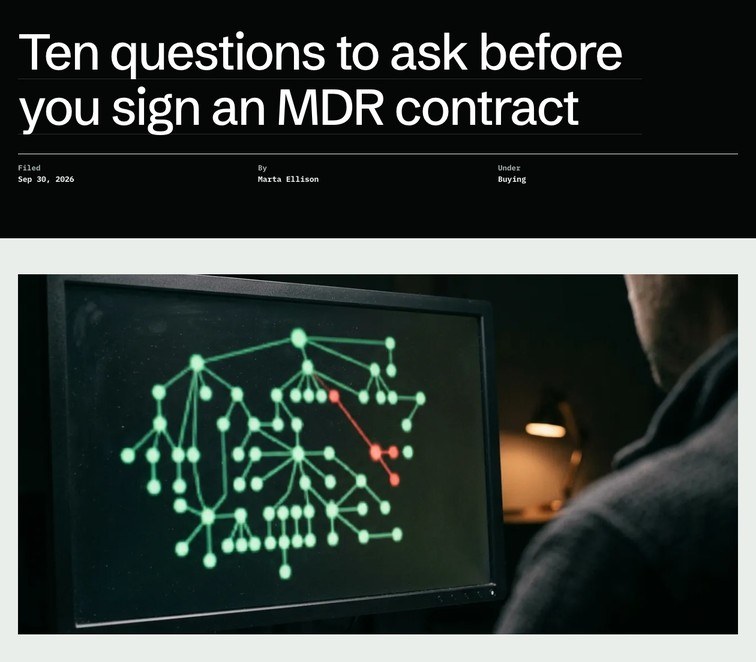
- Standard : Feature image will be shown above post title | screenshot1 | screenshot2
- Image : Place the url of the image at the top of the post and it'll show up above the post title
- Gallery : Place the gallery shortcode at the top of the content and it'll show a slideshow above post title
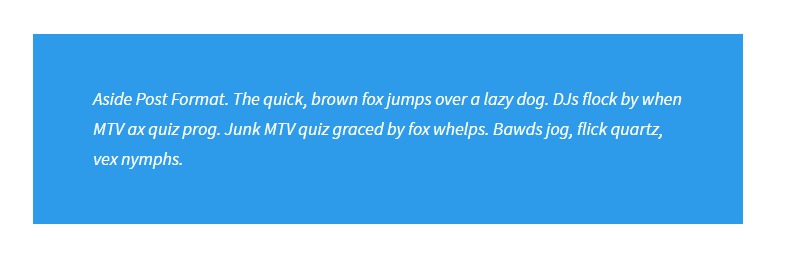
- Aside : All content in aside post format will shows like this | screenshot1
- Link : Place link url at the top of the content and it'll link the title of the post to the link you want
- Quote : Place quote html at the top and the rest content will shows as quote author
- Audio : Place audio url or shortcode at the top and it'll showing up above post title
- Video : Place video url or shortcode at the top and it'll showing up above post title
Creating Portfolio
You need the "Goodlayers Core Portfolio" plugin before continuing this section. You can learn more about the plugin installation at the "Getting Start > Install Plugin" section.1.) Create new portfolio post.
Add new portfolio at the "Portfolio > Add New" section. Fill the title, category, tag as you want.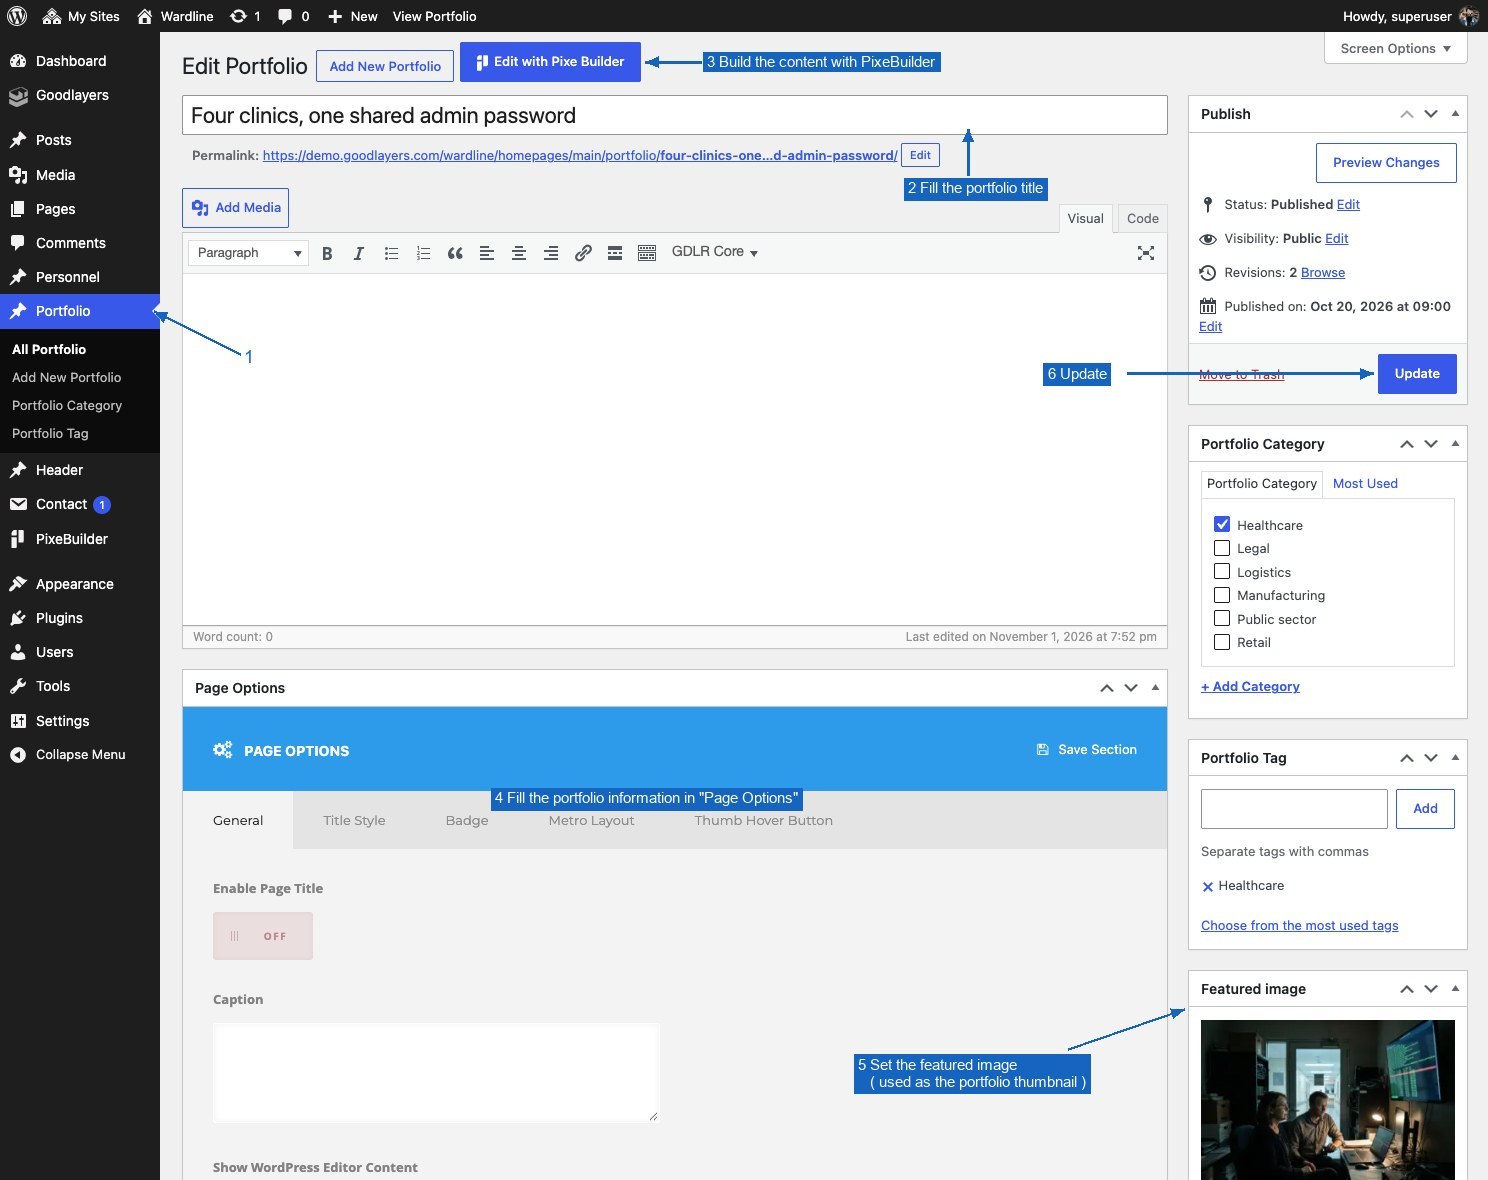
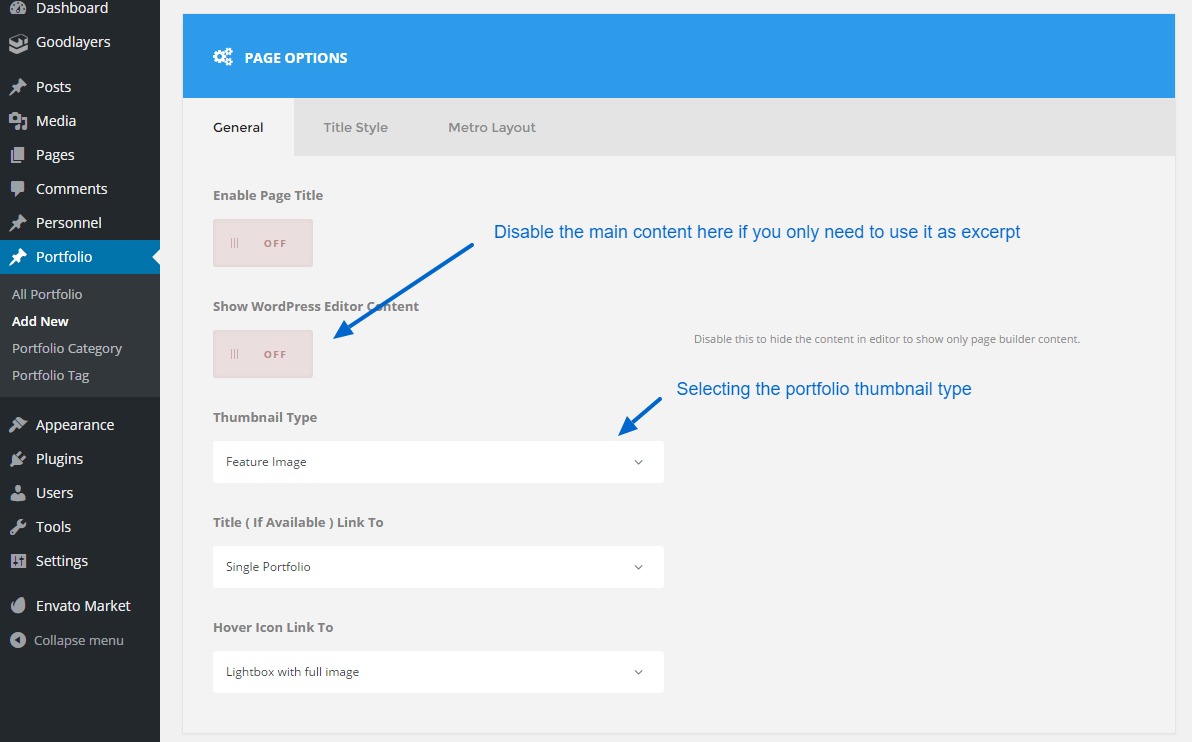
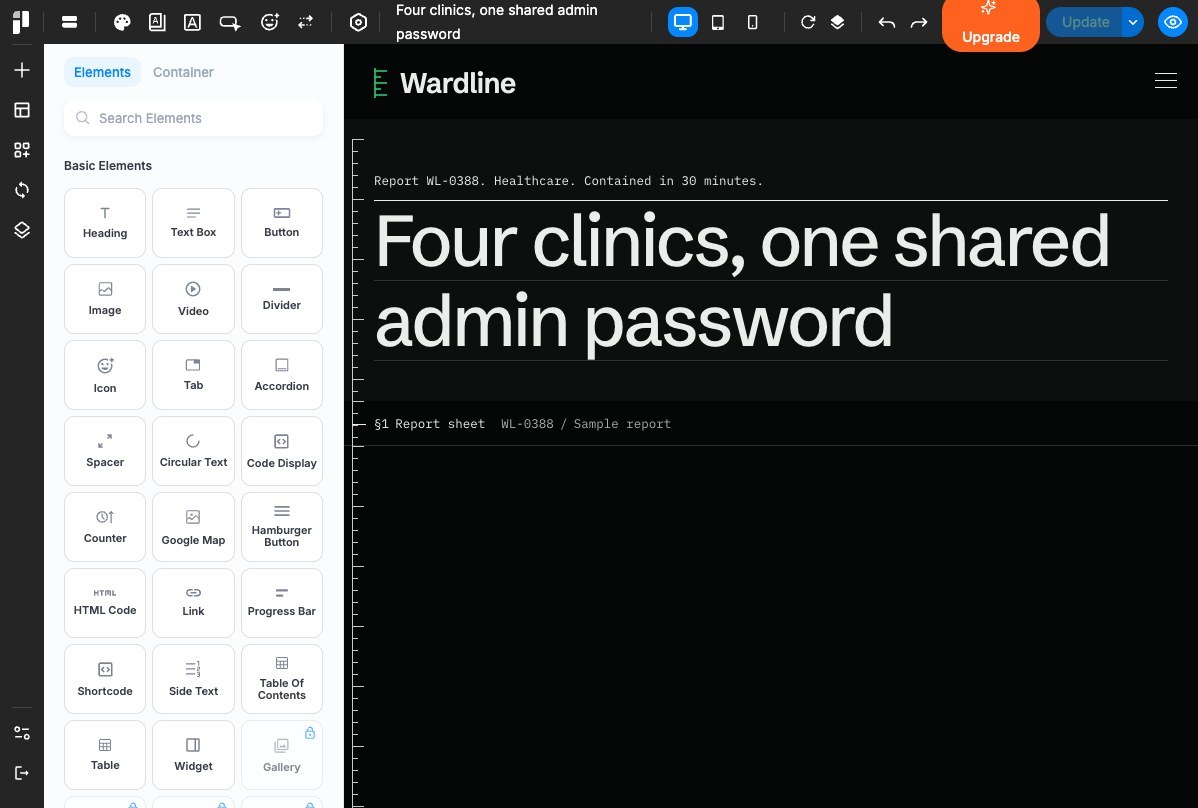
In the Wardline demos each portfolio post is a case study : build its content in PixeBuilder (for example a report sheet with the "FW3 Portfolio Info" item and a table).
2.) Creating portfolio item ( list of portfolios ).
Create new page at "Page > Add New". Edit it with PixeBuilder, add the "FW3 Portfolio" item, then publish the page.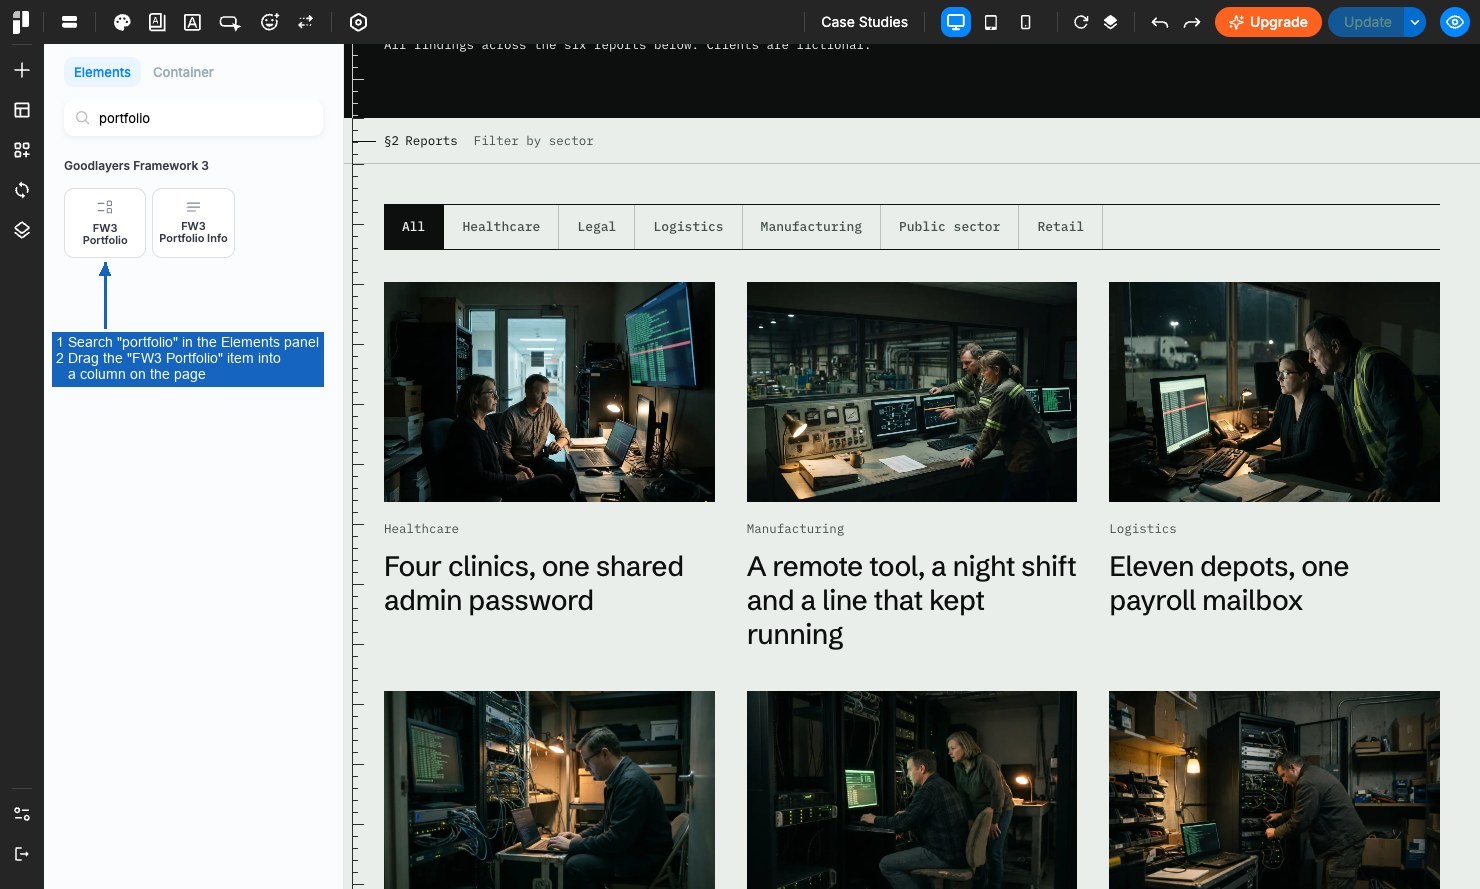
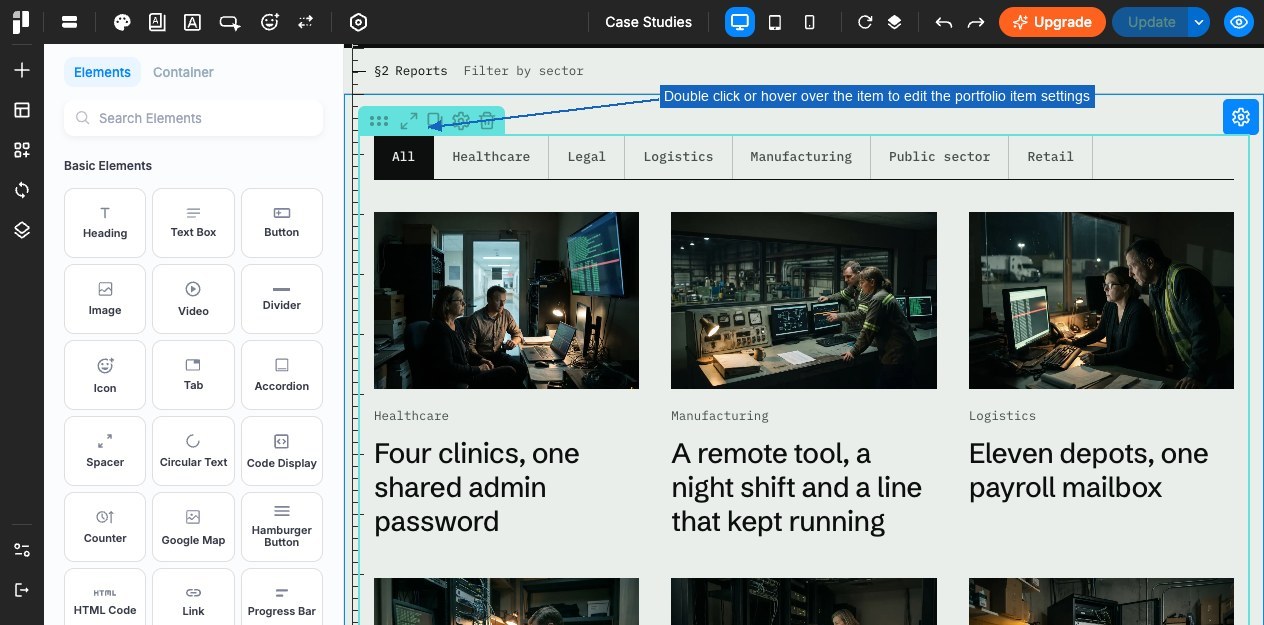
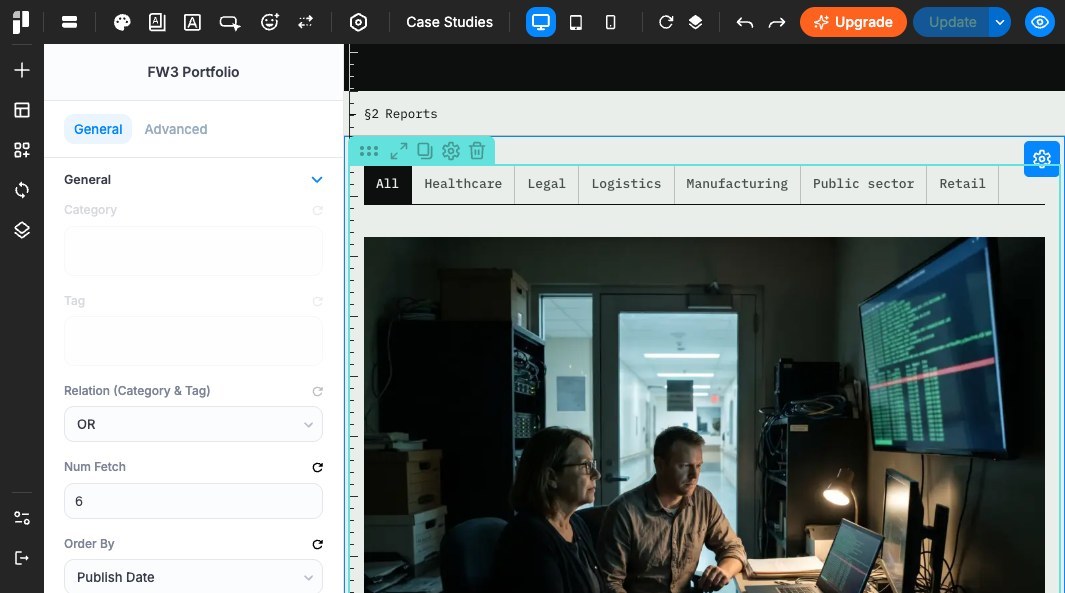
Double click or hover over the portfolio item to edit the portfolio item options.
Metro Layout
"Metro" is a layout that align the element in masonry style. You can select different column width and thumbnail type for each items which result to more attractive display style.The metro layout is supported on the "FW3 Blog" and "FW3 Portfolio" items. ( You can learn more about these two elements on previous section )
Select the style of the "FW3 Blog" or "FW3 Portfolio" item to metro style to enable the metro layout.
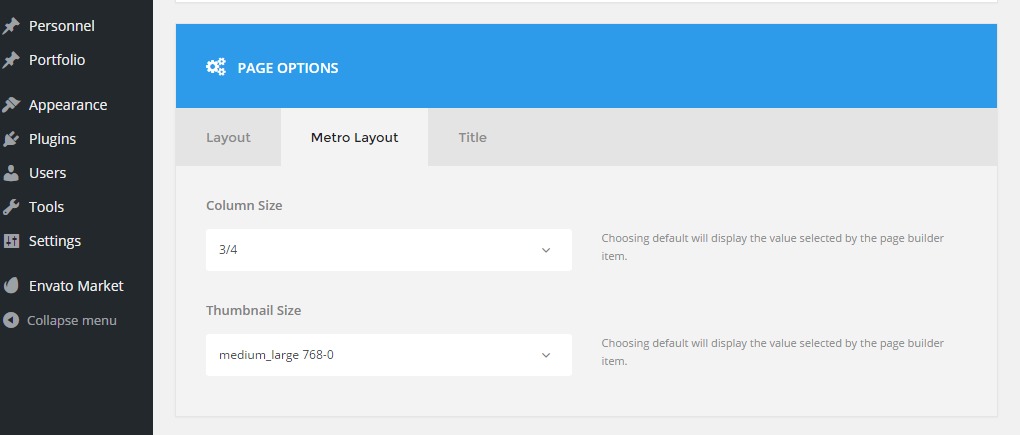
Try editing "blog/portfolio" single page which you need to the layout to be differnt. In page option area, you'll see the "Metro Layout" tab, try selecting the column and thumbnail size as you need.
Selecting "Default" means to use the settings you selected in the blog / portfolio item
Creating Personnel
You need the "Goodlayers Core Personnel" plugin before continuing this section. You can learn more about the plugin installation at the "Getting Start > Install Plugin" section.1.) Create new personnel post.
Add new personnel at the "Personnel > Add New" section. Fill the title, category, and page option according to the personnel information.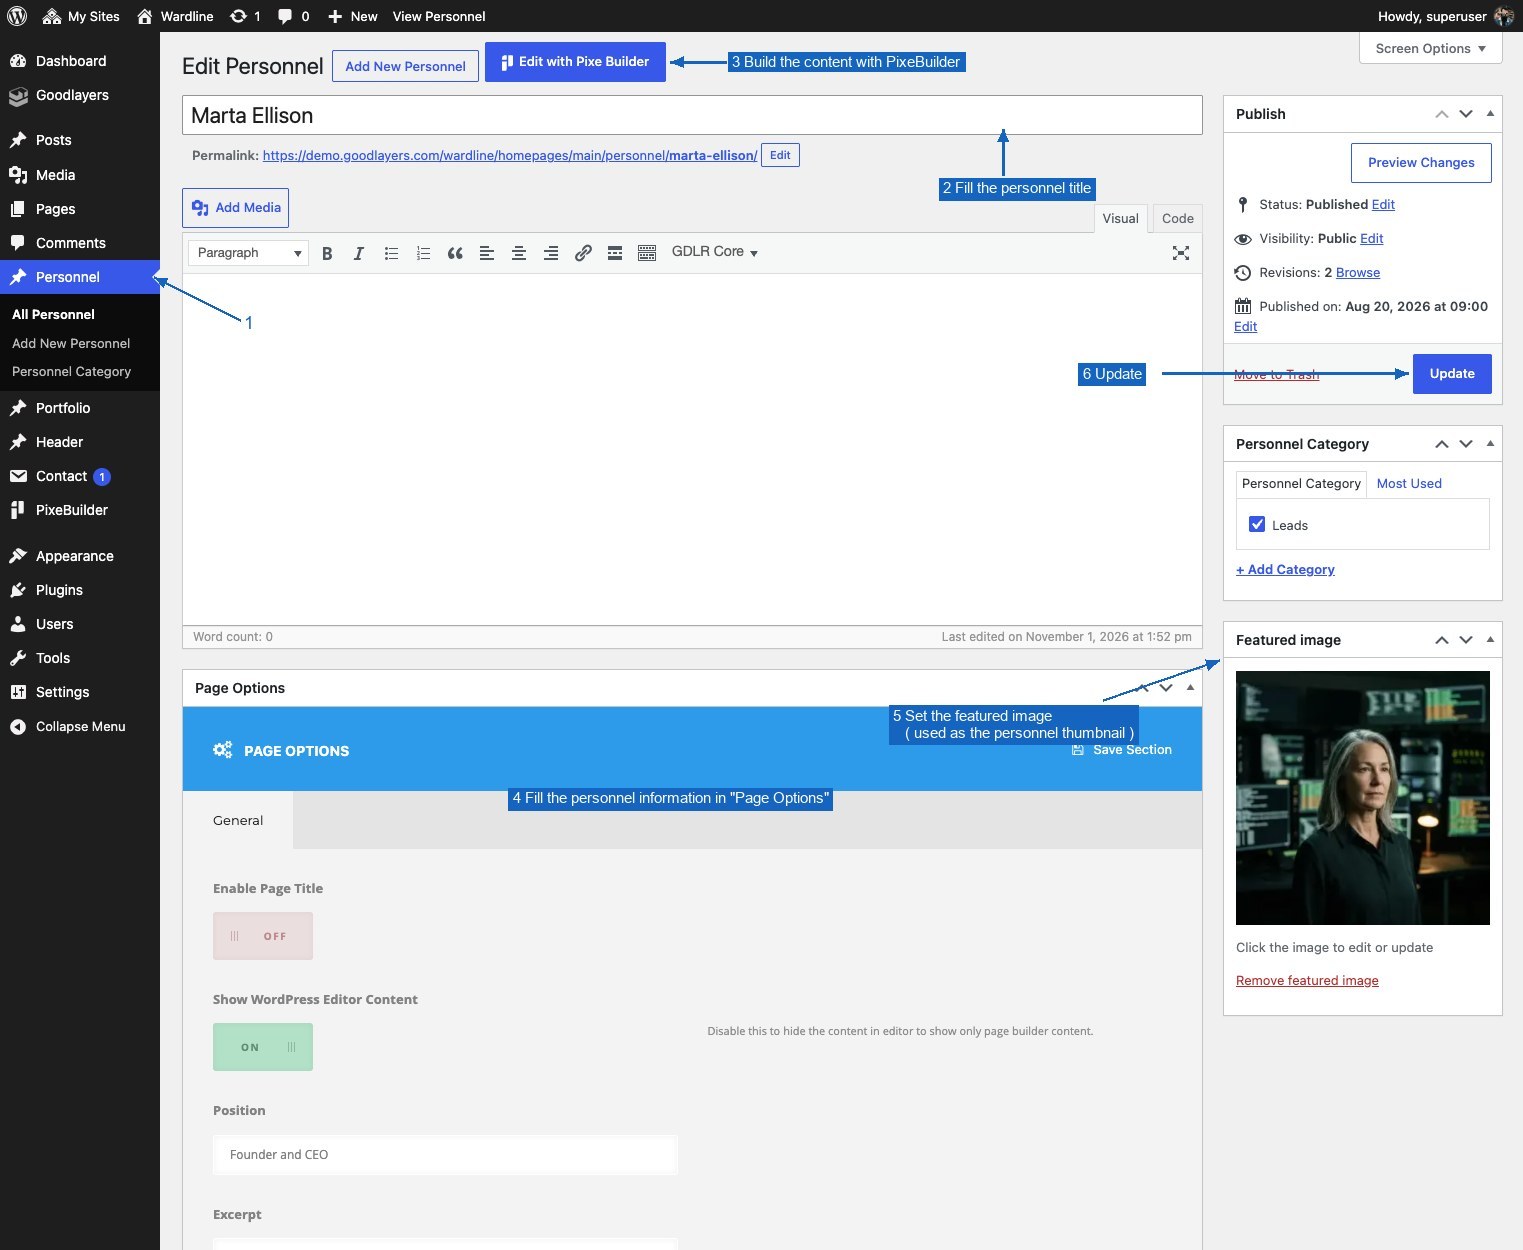
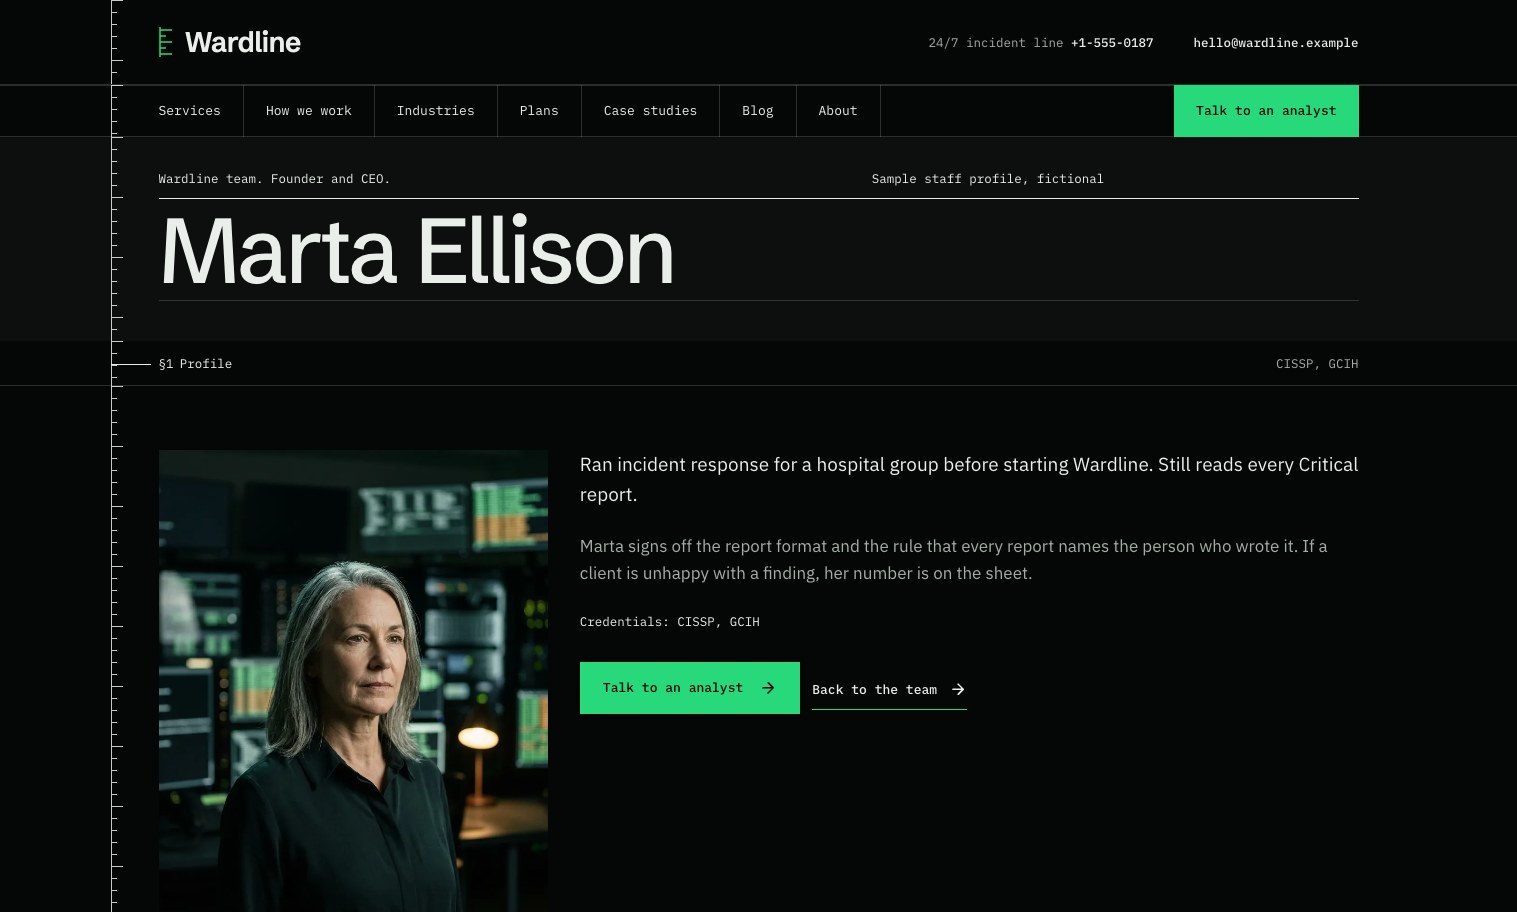
The single personnel page shows the name, position and photo with the text beside it. You can add more content with PixeBuilder.
2.) Creating personnel item ( list of personnel ).
Create new page at "Page > Add New". Edit it with PixeBuilder, add the "FW3 Personnel" item, then publish the page.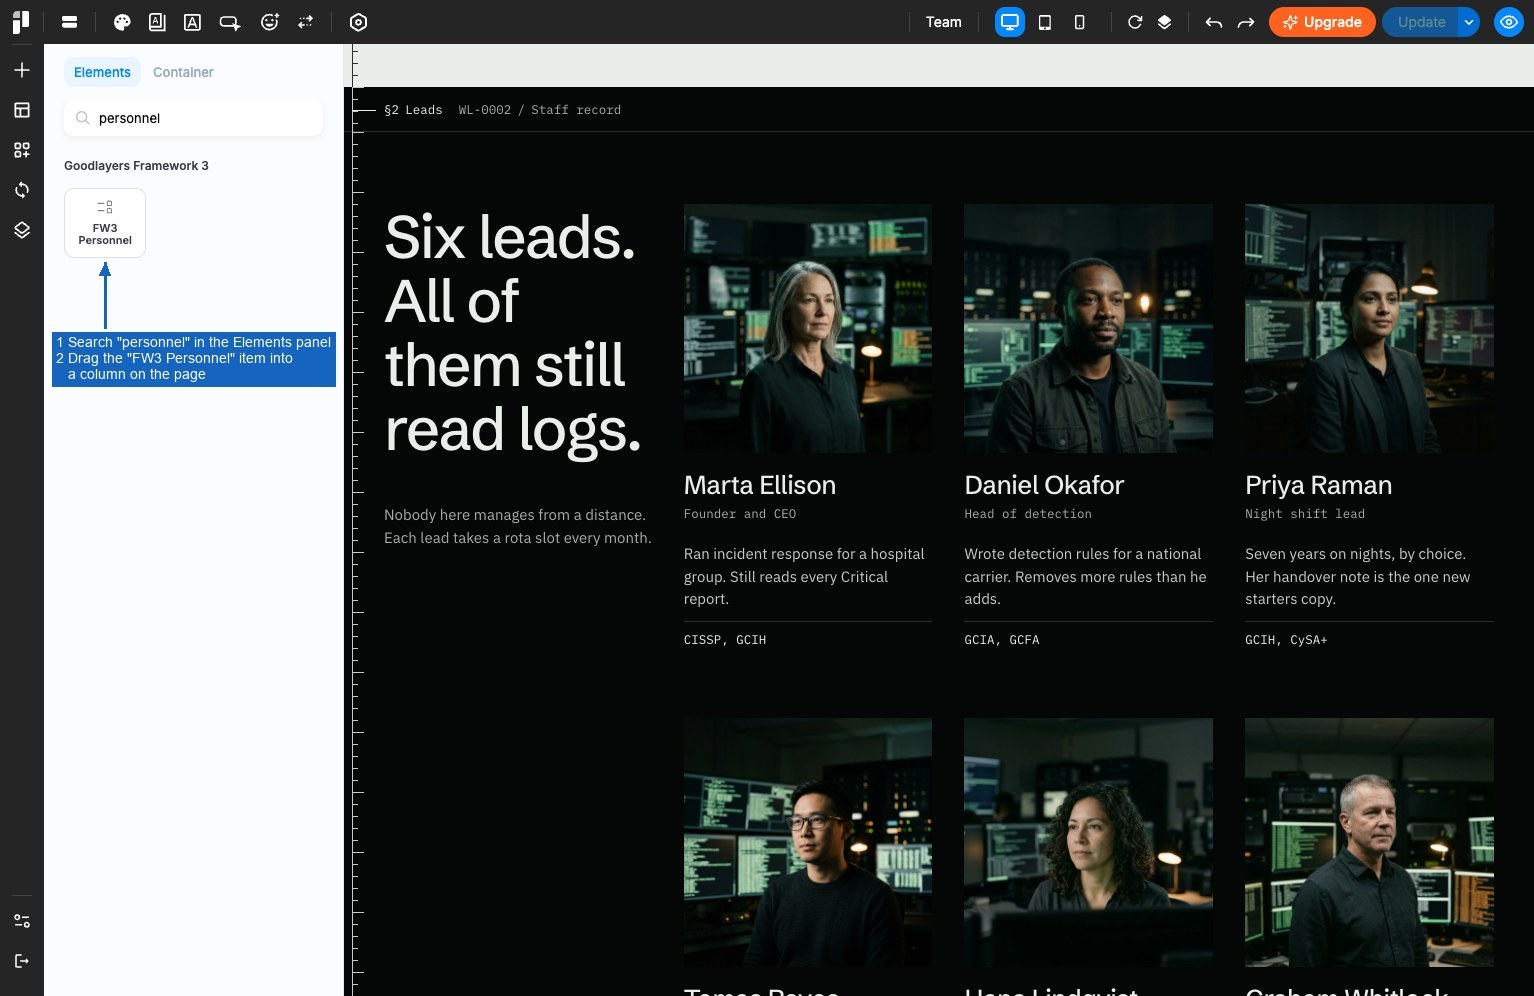
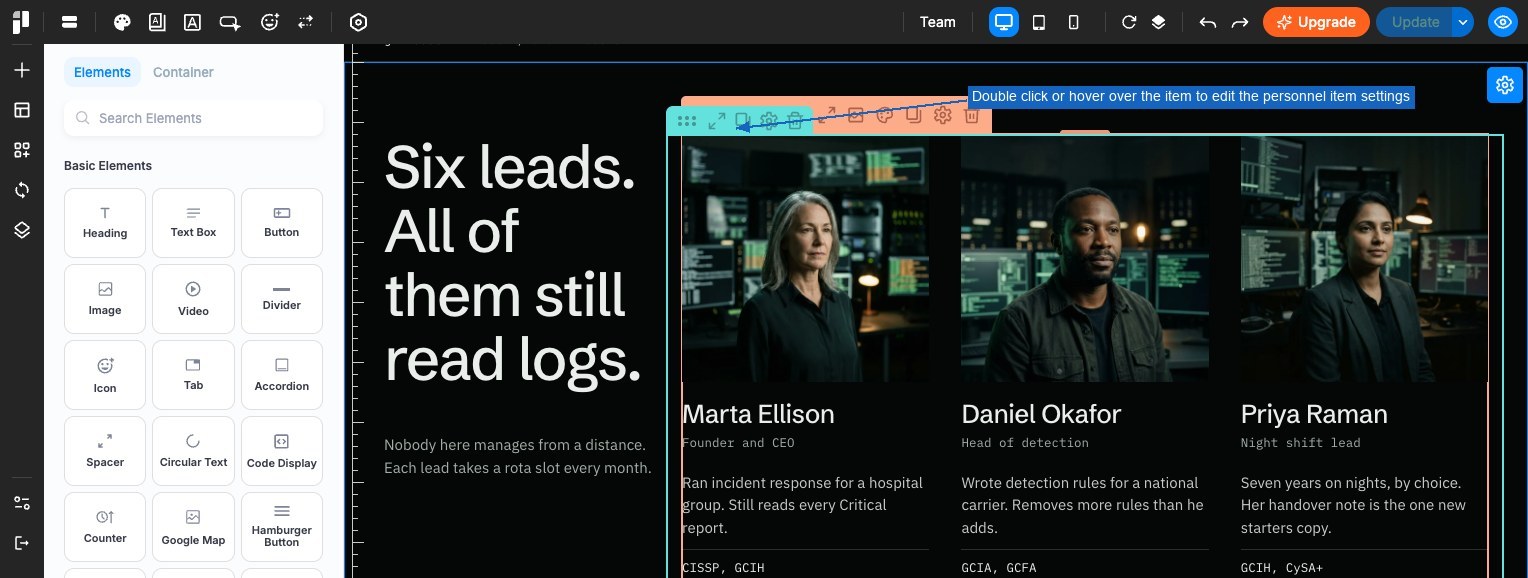
Double click or hover over the personnel item to edit the personnel item options.
Managing Sidebar
Creating Sidebar
Sidebar can be created at the "Appearance > Widget" area.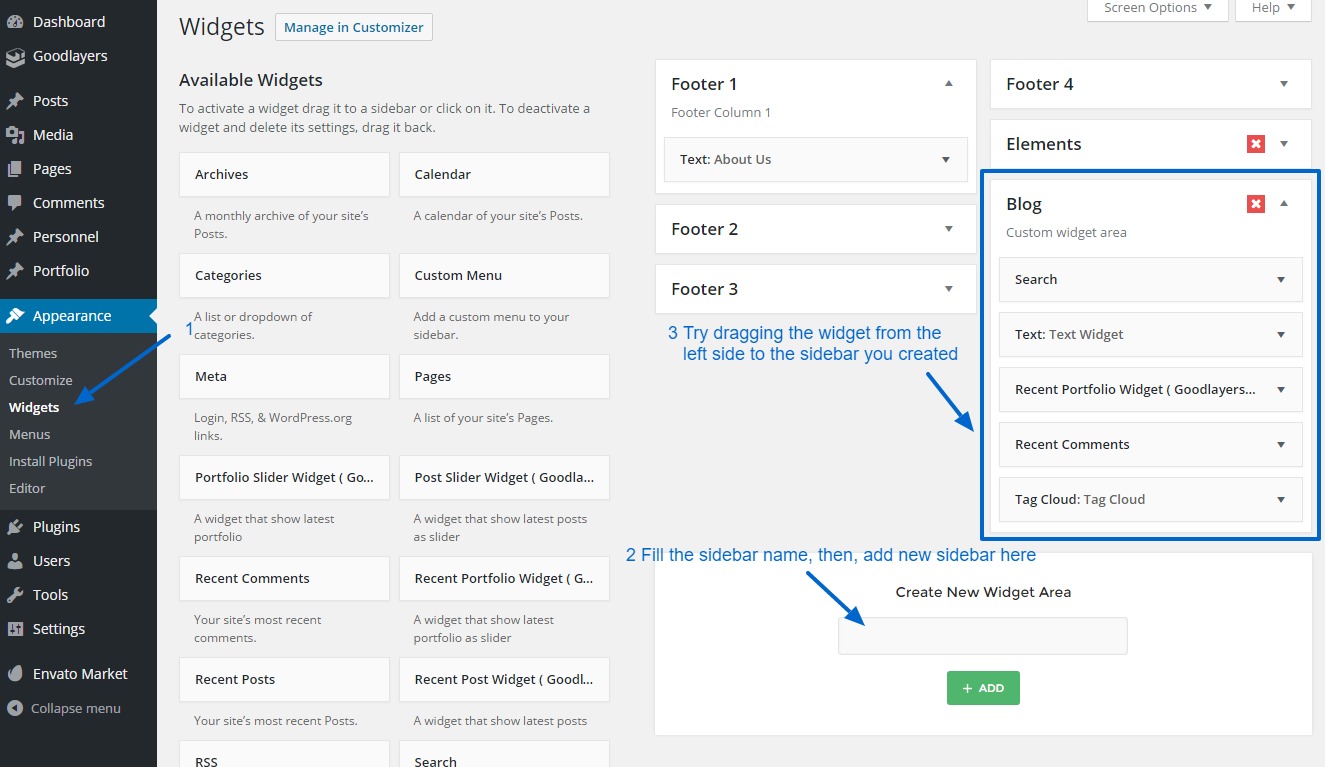
Assigning The Sidebar
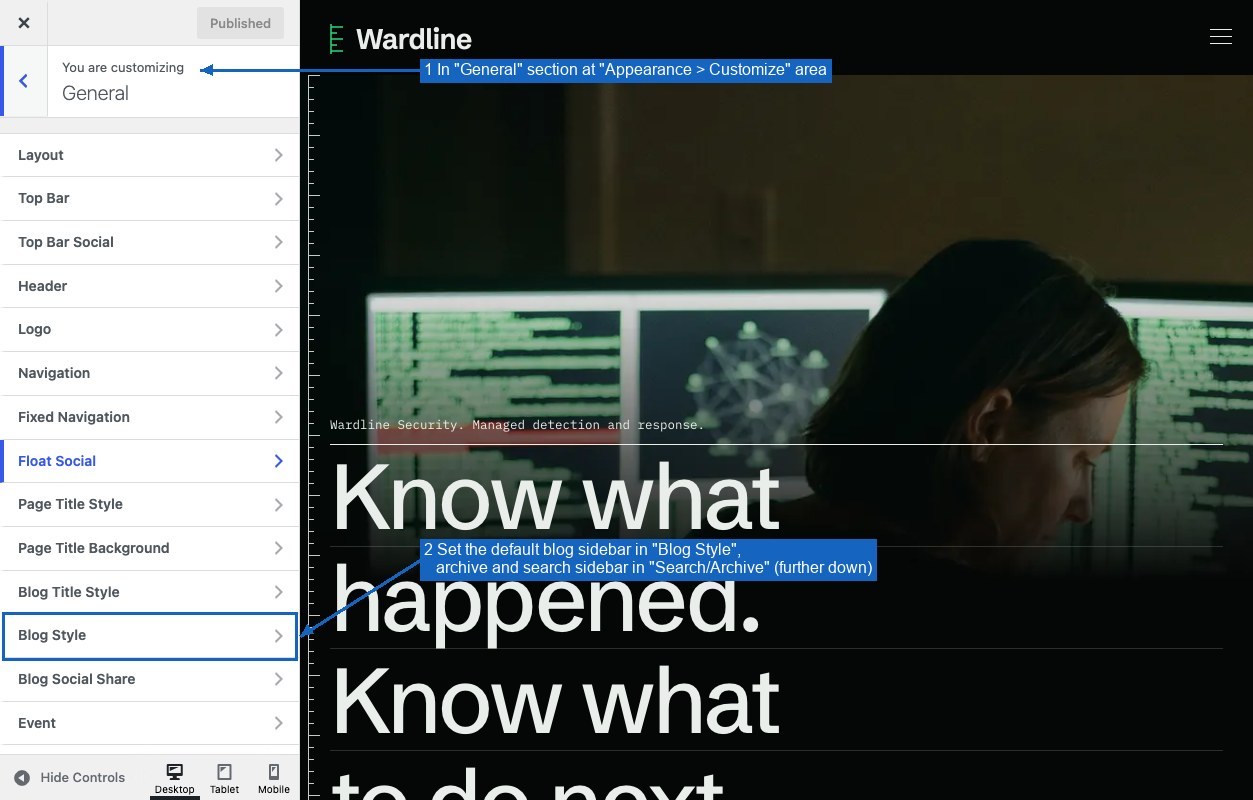
After you created sidebar, you can assign it to any page/post you want in the "Page Option" area. You can also set the default sidebar for blog, archive and search page at the "Customize > General" section as well.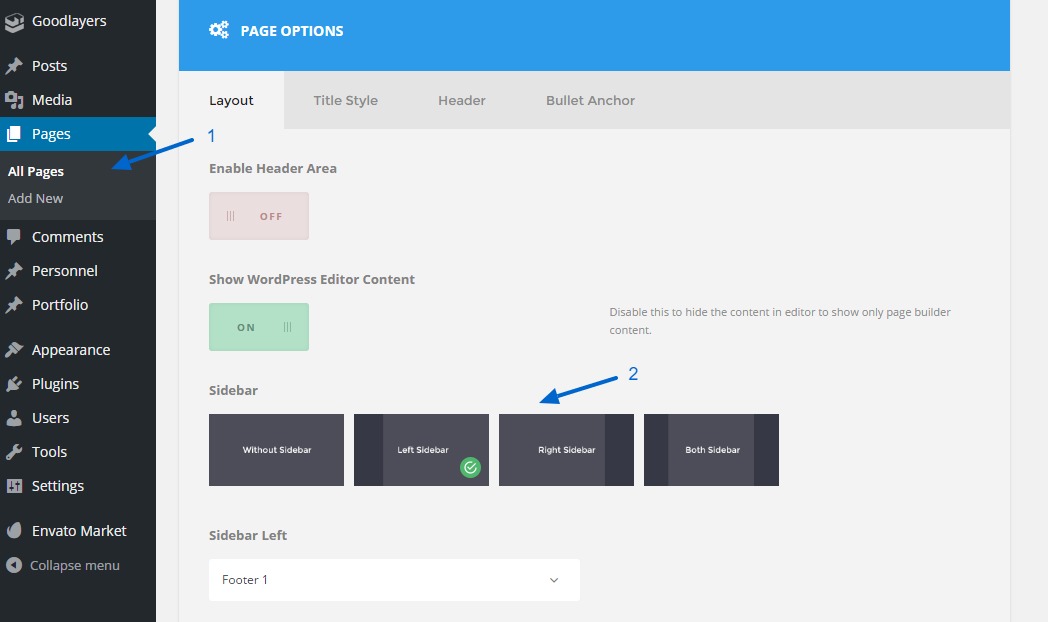
Page Builder ( PixeBuilder )
We recommend PixeBuilder, a free page builder available on the WordPress plugin directory. All 12 Wardline demos are built with it, and the theme adds its own style options on top.Install PixeBuilder
PixeBuilder is listed as a recommended plugin at Appearance > Install Plugins. You can also install it from Plugins > Add New or let the demo importer install it for you (see Import Demo Site).Edit a page
Open any page, post or portfolio item and click Edit with PixeBuilder. Content is arranged as wrapper > column > item : the wrapper is a full-width section, columns divide it, and items (heading, text, image, button, table, accordion and so on) go inside the columns.Goodlayers Framework 3 items
In the element panel, the Goodlayers Framework 3 group contains the items that come from the Goodlayers Core plugin and are used by the demos, for example FW3 Blog, FW3 Portfolio, FW3 Portfolio Info and FW3 Personnel.Wardline CSS classes
Every wrapper, column and item has an Advanced > CSS Class Selector field. Wardline provides ready-made classes for it (grounds, rulers, joined cells, personnel, price table and form variants). See Theme Settings > Wardline Look / Colors in the menu on the left.Learn more
The full PixeBuilder guide is at https://docs.pixebuilder.com/.Contact Form 7
We provided the full layout as a default style for Contact Form 7 plugin. The fields follow the Wardline Look : boxed fields in Ledger and Afterglow, underlined fields in Field Report and Clear Standard. Wrap two fields in<div class="wl-f2"> to put them side by side.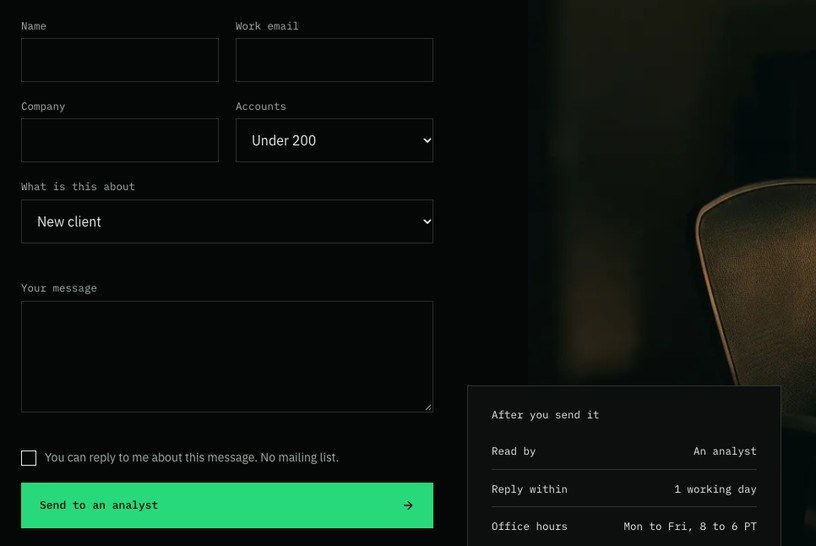
We also provide a snippet code if you want to add a layout and style to the form as well.
Here's the explanation of what each class do[text* your-name placeholder "Full Name*"][email* your-email placeholder "Email*"][text* your-subject placeholder "Subject*"][textarea* your-message placeholder "Message*"][submit class:gdlr-core-full "Submit Now"]
Input Wrap Class
- gdlr-core-input-wrap : base class for styling
- gdlr-core-bottom-border : only shows button border
- gdlr-core-no-border : remove border from input box
- gdlr-core-large : large input & button style
- gdlr-core-small : small input & button style
- gdlr-core-full-width : extend input to full column width
- gdlr-core-round : apply round border to input fields
- gdlr-core-dark-transparent-style : set the input color to "dark & transparent"
Wrapper Class
- gdlr-core-column-30 : assign the box as 1/2 column
- gdlr-core-column-60 : assign the box as full column
- clear : clear the line ( usually clear after last column of every line )
Button Class
- gdlr-core-large : large size button
- gdlr-core-small : small size button
- gdlr-core-full : full width button
- gdlr-core-round-button : round button
Translation & Localization
Translation is a wordpress function that helps you translate the theme's string or change the wording within the same language.Translate using Wordpress Plugins
https://support.goodlayers.com/document/translation-loco-translate-plugin/Translate using PO EDIT Application
https://support.goodlayers.com/document/translation-po-edit/Fully Compatible Multilingual Plugins
Shortcodes
Shortcode is a simple set of functions that easily helps you create an element in the area that does not supported the page builder feature. You can easily find the shortcode list at the "Visual mode of wordpress WYSIWYG Editor"You can also see list and description of the shortcode attribute online here.
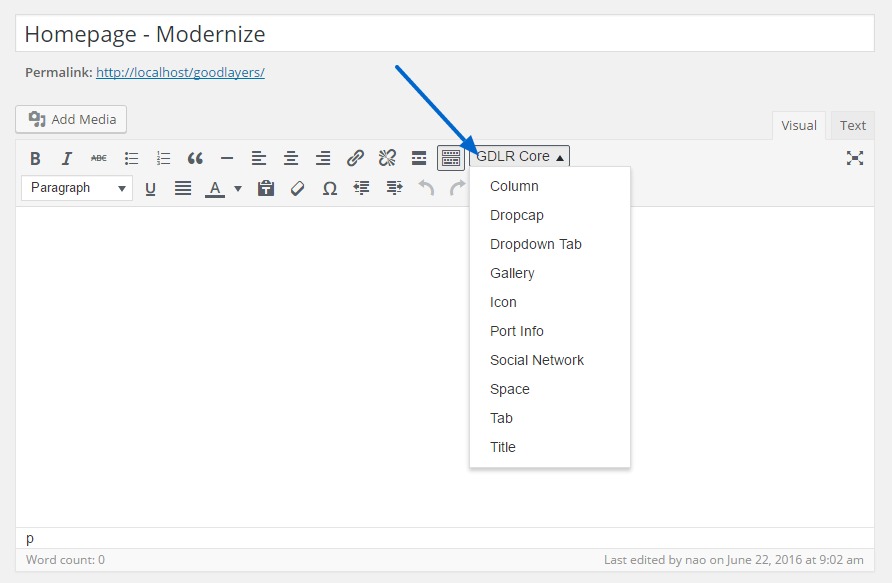
Snippet Code
Top Bar Contact : place this at "Customize > General > Top Bar > Top Bar Left" area[gdlr_core_icon icon="fa fa-phone" size="16px" color="#ffffff" margin-left="" margin-right="10px" ] +1 555 0142 [gdlr_core_icon icon="fa fa-clock-o" size="16px" color="#ffffff" margin-left="27px" margin-right="10px" ] Monday - Friday 8:00 - 17:00 [gdlr_core_icon icon="fa fa-envelope-o" size="16px" color="#ffffff" margin-left="27px" margin-right="10px" ] [email protected]Footer Contact : place in the content area of a "Text" widget in the footer
					[gdlr_core_icon icon="fa fa-map-marker" size="16px" color="#ffffff" margin-left="0px" margin-right="12px"] 2400 Example Avenue, Suite 12, Your City

					[gdlr_core_icon icon="fa fa-phone" size="16px" color="#ffffff" margin-left="0px" margin-right="12px" ] +1 555 0142

					[gdlr_core_icon icon="fa fa-envelope-o" size="16px" color="#ffffff" margin-left="0px" margin-right="12px" ] [email protected]
Icon List
Icons come from two places in Wardline.Theme and Goodlayers shortcodes ( icon font classes )
Font Awesome and Elegant Icons are loaded by the theme and can be used in shortcodes and in any "icon class" field. The Goodlayers Core plugin also provides Simple Line Icons and Ionic Icons in its icon picker.Font Awesome
See list of icons here Usage : ex "fa fa-gear"Elegant Icon Fonts
See list of icons here Usage : ex "arrow_down" (use exact icon name from the list)Simple Line Icons
See list of icons here Usage : ex "icon-map" (add 'icon-' in front of the name from the list)Ionic Icons
See list of icons here Usage : ex "ion-plus-round" (use exact icon name from the list)PixeBuilder icon picker
The demos use the SVG icon libraries built into PixeBuilder, mainly Lucide, plus Material Symbols and Font Awesome. Choose an icon from the picker of any icon-enabled item ( icon, icon list, button and so on ).Floating Social Network
Floating social network will allow you to enable links to your social media and stick it on the right side of your page all the time.
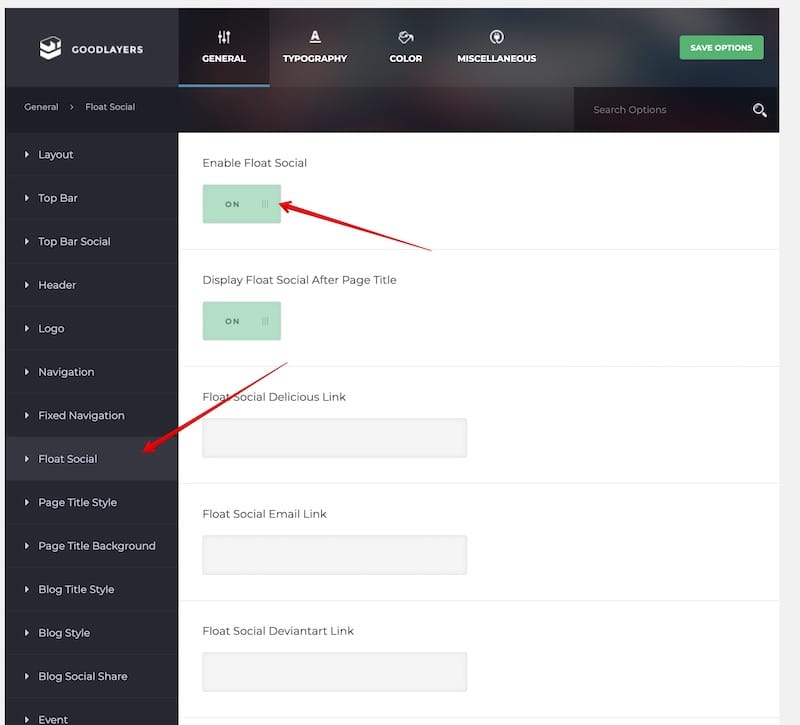
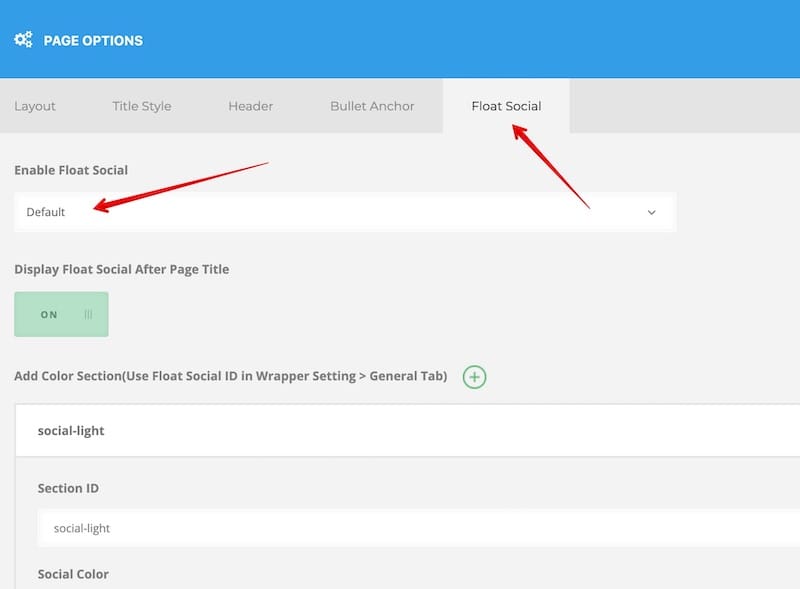
This feature can be enabled from 2 places
1. From admin panel (This will enable in every pages).
2. From the bottom of each page (To enable/disalbe in specific pages).
Colors
1. Default color can be customized in Admin Panel Color > Body and Color > Footer(for footer) 2.1 You can also set different colors in a single page as well. By create a section color in the page setting in the bottom of the page.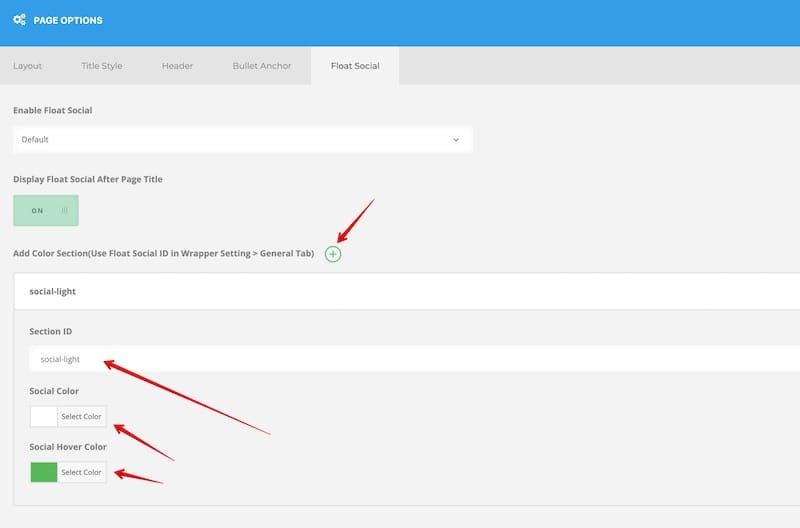
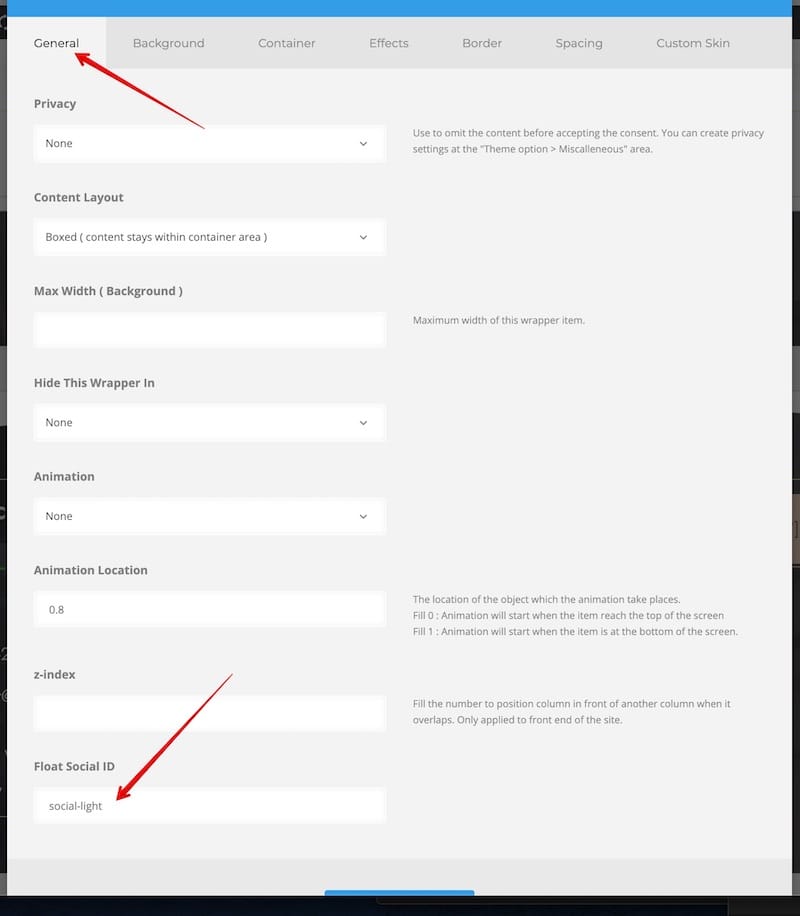
2.2 After that you can assign the id that you create to the wrapper here.
Social Network API
Obtaining Twitter Authentication Info
https://support.goodlayers.com/document/obtain-twitter-authentication-info/Register Your Site to Obtain Twitter Share Count
https://opensharecount.com/Since twitter deprecate the function to retrieve the share count number, you need to register your site with "https://opensharecount.com/" in order to retrieve the twitter share count number in social network item.
Obtaining Instagram Access Token
https://support.goodlayers.com/document/obtain-instagram-access-token/Obtaining Facebook ID & Access Token
https://support.goodlayers.com/document/obtaining-facebook-id-access-token/Finding your Youtube Channel ID
https://support.google.com/youtube/answer/3250431?hl=en